How to format Notes for the iPhone and iPad

If you need to jot down a quick note to yourself to remember later, it's hard to beat the built-in iOS Notes app on your current iPhone and iPad. I mean, it's already on your device and it's pretty quick to start a new note, especially with the Quick Note feature on iPadOS 15. But sometimes you're going to need more than just plain text. In fact, you'll want to make use of the various formatting tools that are in the Notes app to bold, italicize, and underline your text, but you can also do so much more than that. Did you know the Notes app supports lists, checklists, and even data tables? No matter what you need, the Notes app has you covered!
Here's how to format all of your Notes on your best iPhone and iPad with iOS 15.
How to create titles and headings in Notes
You can easily add titles and headings to your notes to give them a more formal style and make everything easier to organize.
- Launch Notes on your iPhone or iPad.
- Tap the New Note button in the bottom right corner.
- Tap the Aa icon, which opens the text formatting menu.
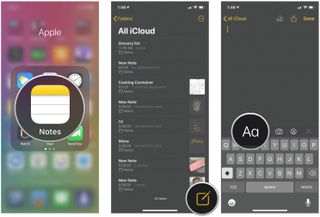
- Tap Title for the next text you type will be formatted as a title.
- Tap Heading for the next text you type will be formatted as a heading.
- Double-tap a single word or triple-tap to select all text that you want to reformat as a title or heading, then follow steps 4-5 to reformat it.

If you use a title or heading in a note, pressing the return key on your iPhone or iPad's keyboard will automatically format new text after that point as "body" text. So, if you want to go from, for instance, a title to a heading, remember that you'll need to choose the Heading format from the formatting menu.
How to automatically start new notes with a title or heading
Of course, you can automatically begin each new note with a title or heading if you wish.
- Open Settings on your iPhone or iPad.
- Tap Notes.
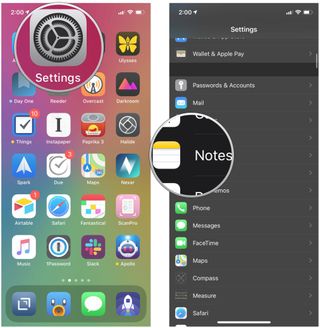
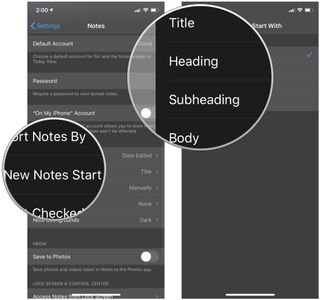
- Tap New Notes Start With.
- Choose between Title, Heading, Subheading, or Body.
How to format lists in notes
In Notes, you can choose from three different types of lists to keep everything in order.
- Launch Notes on your iPhone or iPad.
- Tap the New Note button in the bottom right corner.
- Tap the Aa icon, which opens the text formatting menu.

- Tap on the list format you'd like to use. Choose from either dashed, numbered, or bulleted.
- Type out your list.

How to bold, italicize, underline, and apply strikethrough in Notes
Emphasize the text of your notes by bolding, italicizing, or underlining it.
Master your iPhone in minutes
iMore offers spot-on advice and guidance from our team of experts, with decades of Apple device experience to lean on. Learn more with iMore!
- Launch Notes on your iPhone or iPad.
- Tap an existing note, or Create New Note.
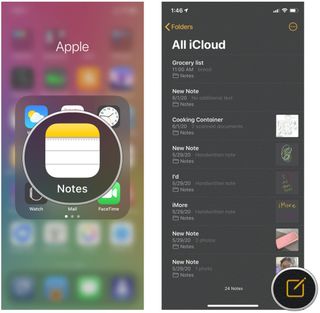
- Tap on the empty space or select text that you wish to change by double-tapping or tapping and holding.
- Tap the right arrow in the pop-up menu.
- Tap the B I U icon in the pop-up.
- Tap either Bold, Italic, Underline, or Strikethrough to format your text the way you want.

- If you're starting new text but want it to emphasize what you're about to type from that point forward, just tap the Aa button above the keyboard.
- Tap your preferred format style.

How to create a checklist in Notes
Create a quick shopping or to-do list with the checklist format.
- Launch Notes on your iPhone or iPad.
- Tap the New Note button in the bottom right corner.

- Tap the checklist icon to create a checklist entry.
- Tap return once to create another entry.
- Double-tap return when you're done making your checklist to start using standard body text.
- Tap the checklist bullet point to check it off. Tap it again to uncheck the item.

How to add a table to a note
Tables is one of the more recent additions to the Notes app. It allows you to format data in your note so that it is easier to read.
- Launch Notes on your iPhone or iPad.
- Tap the New Note button in the bottom right corner or enter an existing note.

- Tap the table button in the formatting bar.
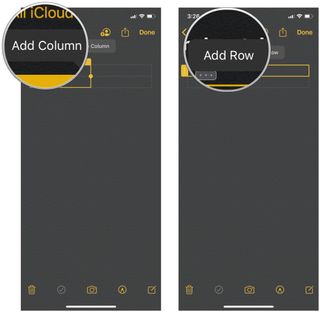
- Tap the More buttons on either the top or the side of one of the left-most cells (buttons look like three dots). The top More button controls columns, while the side More button controls rows.

- Choose Add Column or Delete Column from the top More button to add or delete a column.
- Choose Add Row or Delete Row from the side More button to add or delete a row.
- Enter your data into the table.
- Tap the table button again to bring up several options you can take for the table object.
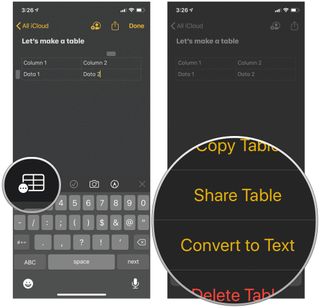
As you can see, it's pretty easy to add a table to one of your notes and you can even adjust the number of cells as you see fit. For a more in-depth look at how tables work, check our full guide on how to use tables in Notes.
Add some pizazz to your notes
The Notes app is incredibly handy for jotting down whatever you need to reference later. But sometimes you're going to need a little bit more than just plain text. Sprucing up your notes with rich formatting is easy in the Notes app, so feel free to get fancy!
Updated March 2022: Updated for iOS 15.
Christine Romero-Chan was formerly a Senior Editor for iMore. She has been writing about technology, specifically Apple, for over a decade at a variety of websites. She is currently part of the Digital Trends team, and has been using Apple’s smartphone since the original iPhone back in 2007. While her main speciality is the iPhone, she also covers Apple Watch, iPad, and Mac when needed.
When she isn’t writing about Apple, Christine can often be found at Disneyland in Anaheim, California, as she is a passholder and obsessed with all things Disney, especially Star Wars. Christine also enjoys coffee, food, photography, mechanical keyboards, and spending as much time with her new daughter as possible.
Most Popular


