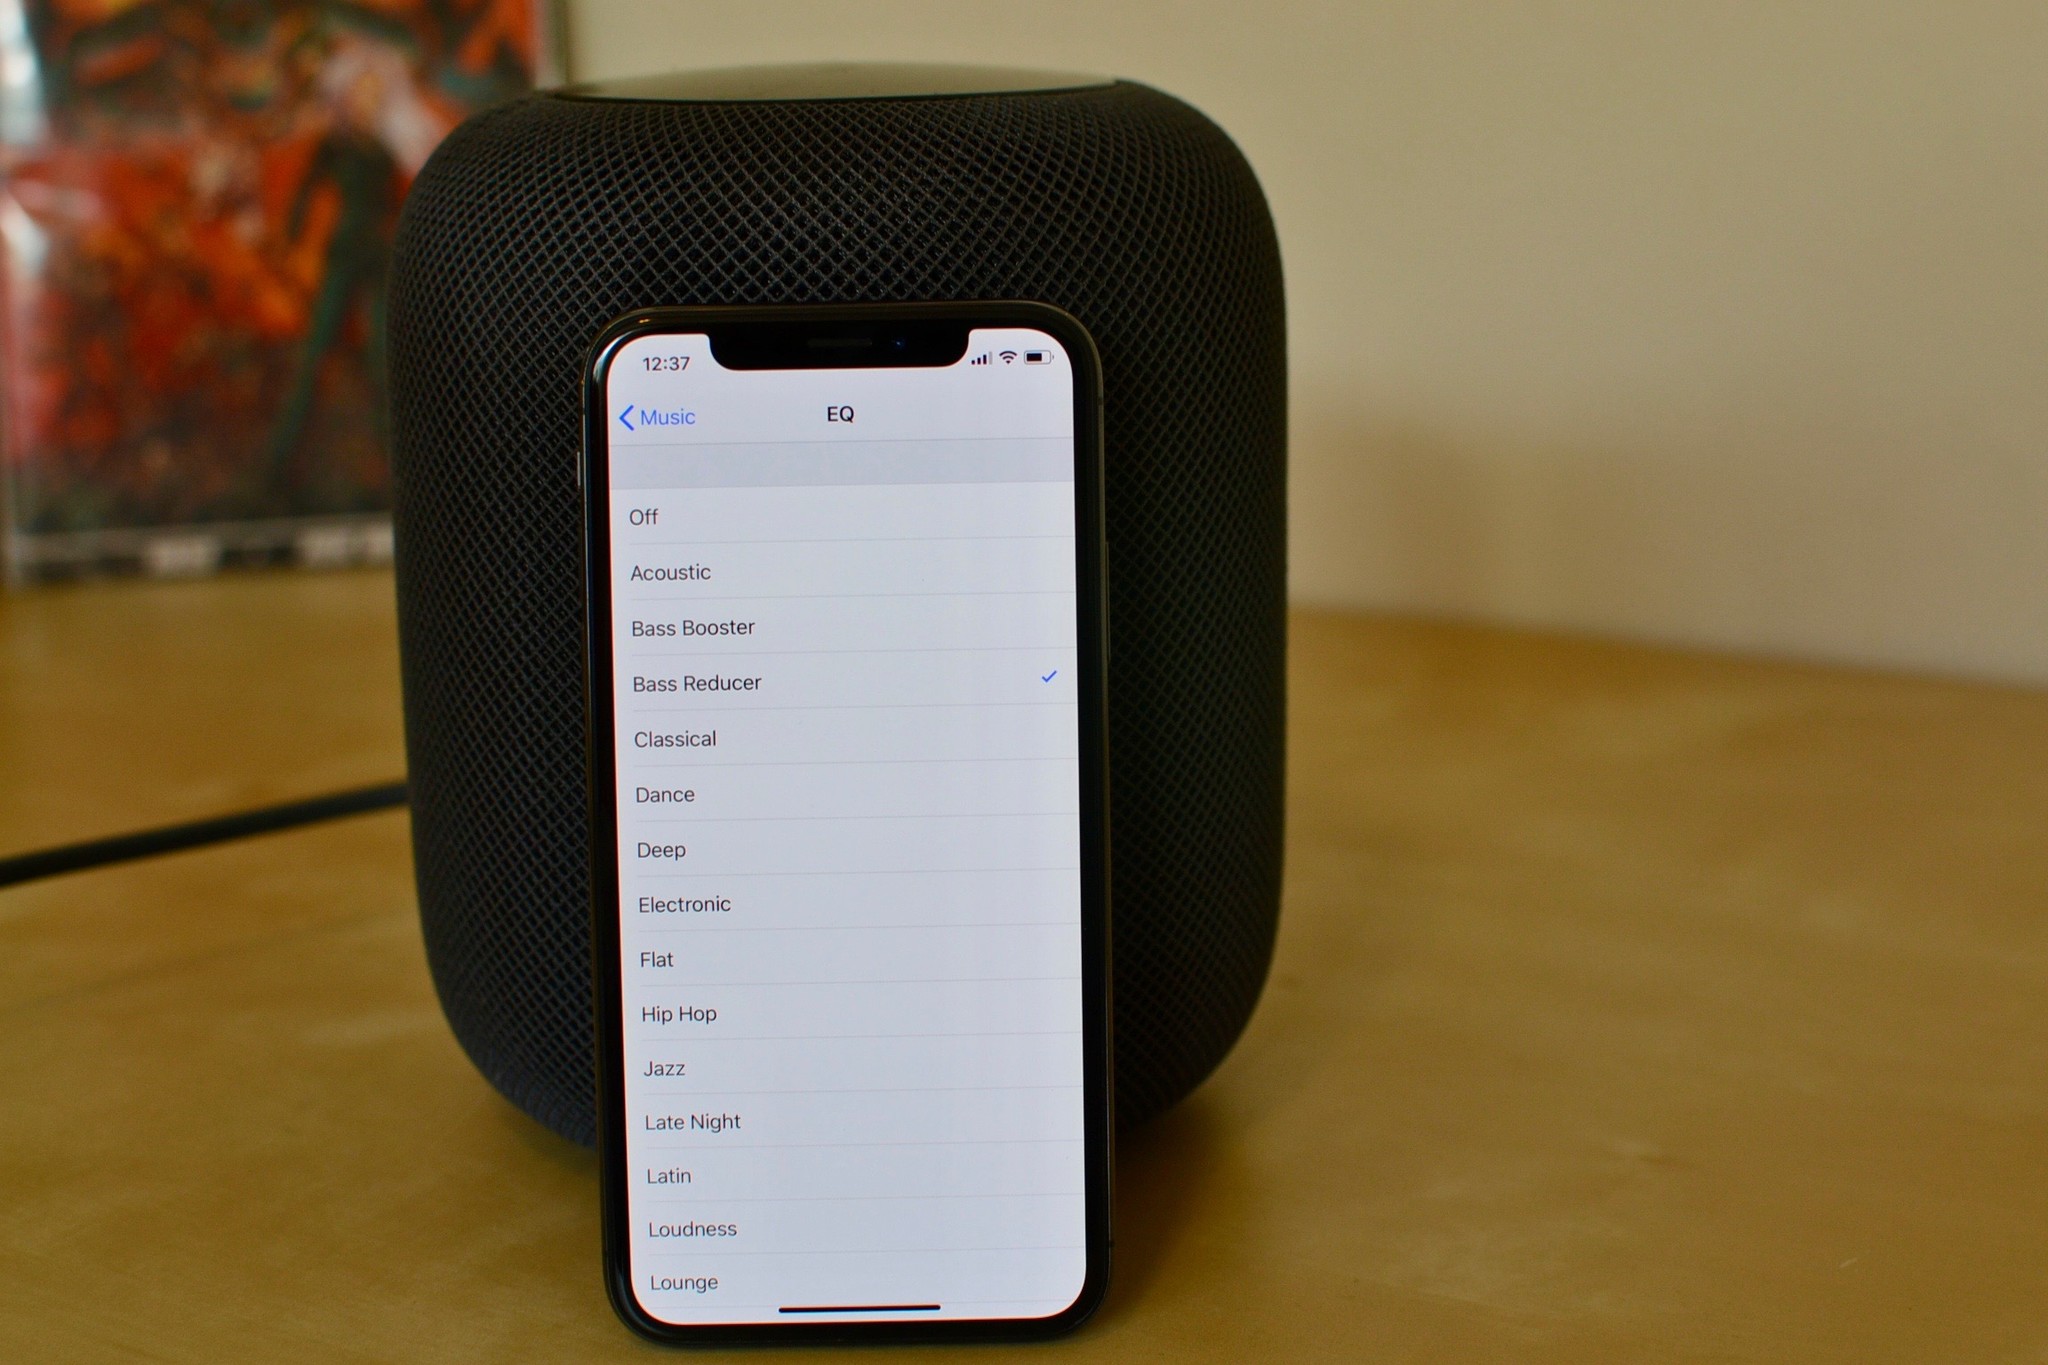
I am hugely impressed with the sound quality produced by HomePod. Its ability to fill a room — to make it almost seem as though music is playing all around me — is a feat of technological advancement that is absolutely astounding.
That being said, the HomePod's fine-tuning suffers from that unnatural bass equalization that to some makes for better depth, but to others sounds a bit muddy.
If you're of the latter camp, there's not a lot you can do when listening to music directly from your HomePod, but when AirPlaying, you have a lot of options for adjusting the equalization, adding in a bit more of those highs to balance out the sound.
- How to adjust the EQ of the HomePod when AirPlaying from an iPhone or iPad
- How to adjust the EQ of the HomePod when AirPlaying from a Mac
- What the EQ level adjustments do
- Third-party EQ options
How to adjust the EQ of the HomePod when AirPlaying from an iPhone or iPad
If you're AirPlaying directly from your iPhone or iPad, via iTunes or Apple Music, you can adjust the equalization using a handful of presets.
Note: The EQ adjuster does not work after you've begun AirPlaying music to your HomePod, so set the EQ before you switch to HomePod.
- Begin playing music from your iPhone.
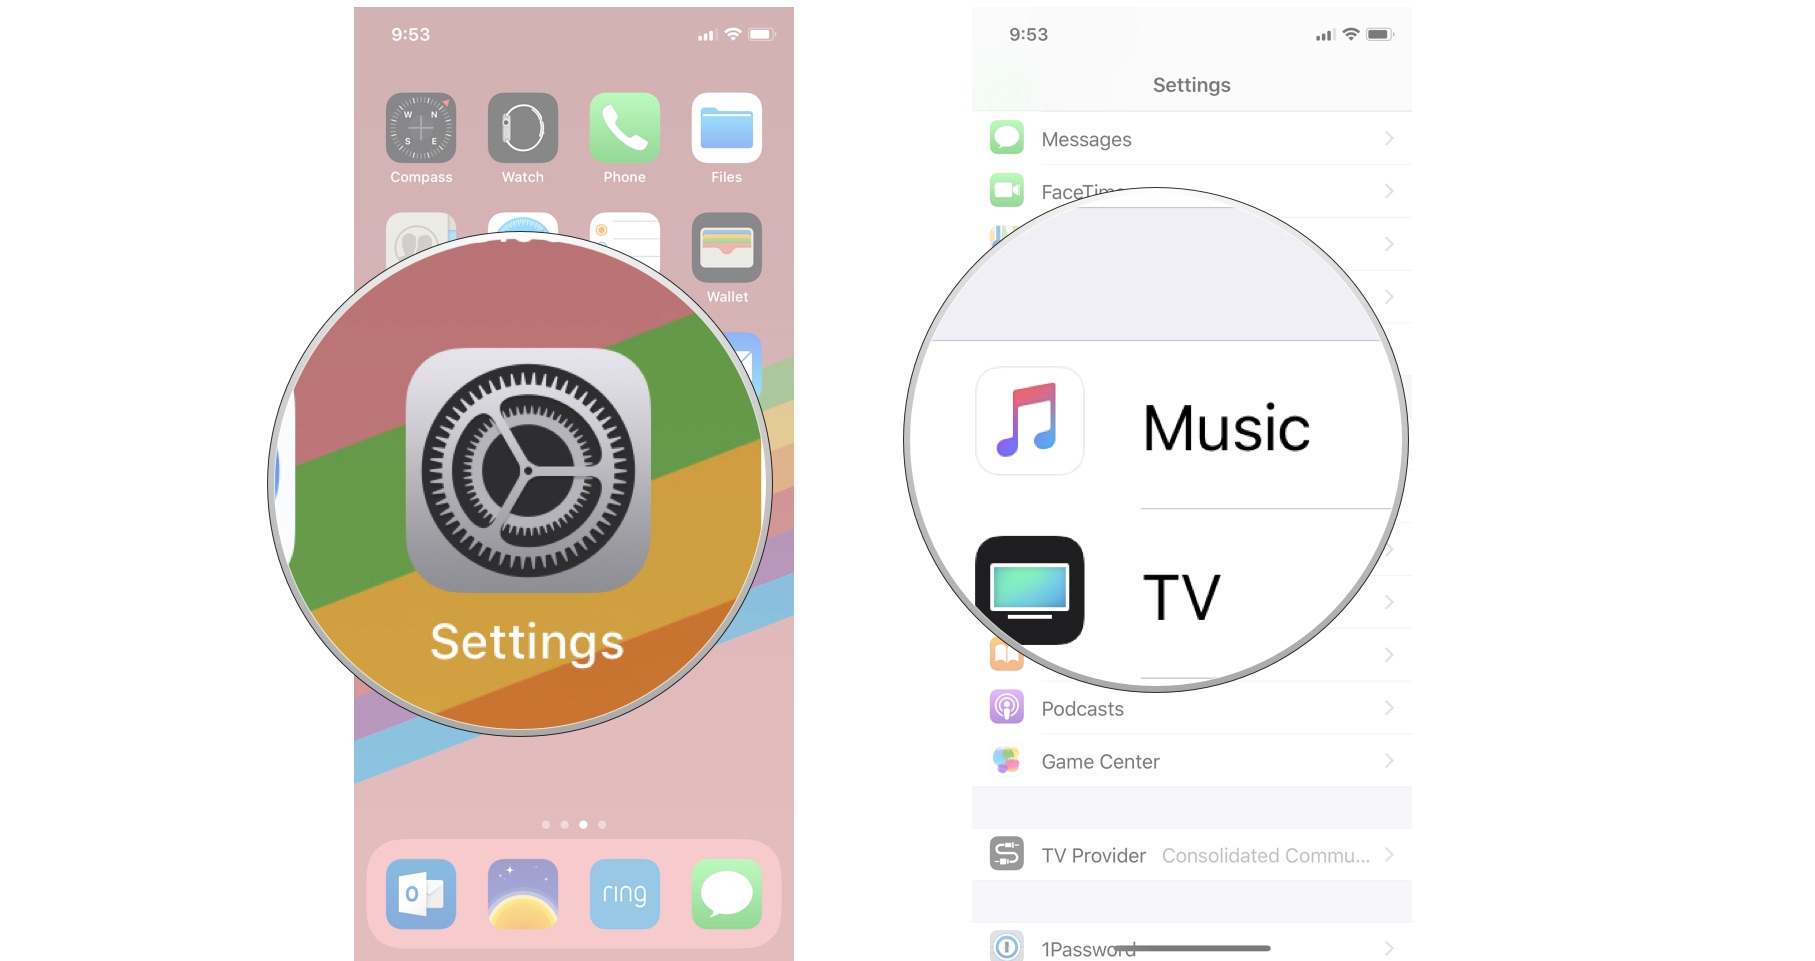
- Launch the Settings app on your iPhone or iPad.
- Tap Music.
- Scroll down and tap EQ under the Playback menu.
- Select a preset. If you're trying to reduce the heavy bass, I recommend either Bass Reducer or Treble Booster, but you can play around with the presets to get your ideal balance.
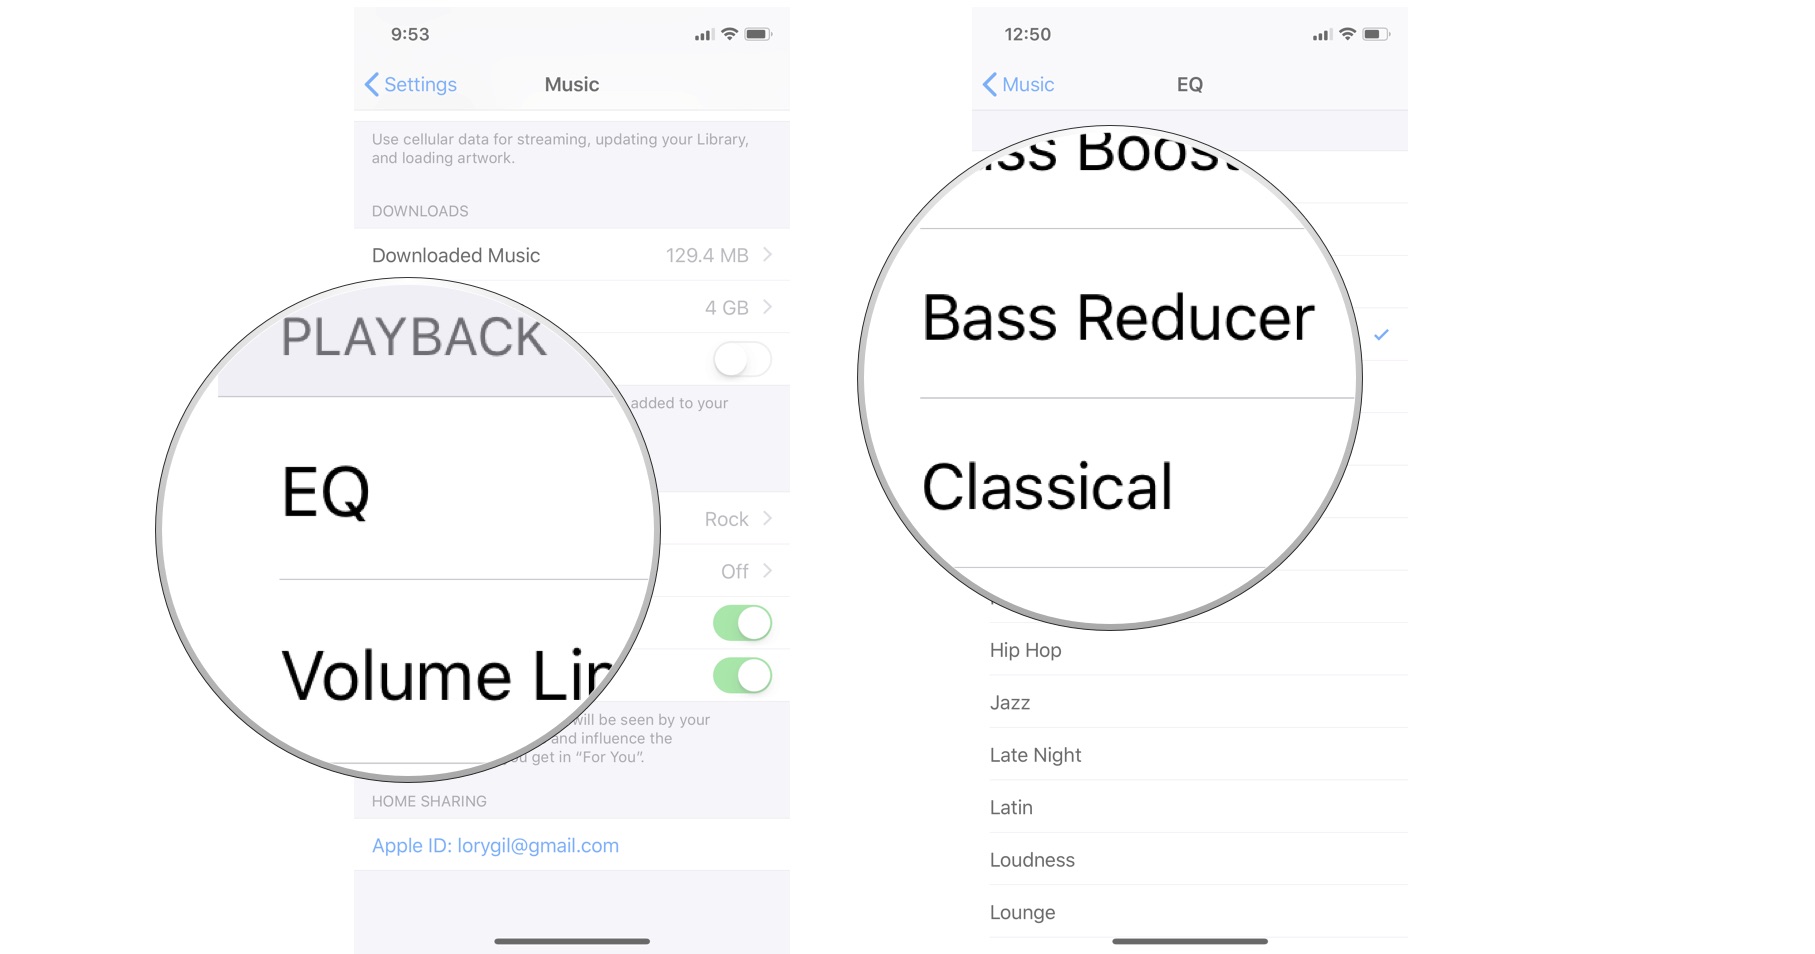
The new EQ preset will save on your iPhone and will always be used when AirPlaying from the Music app on your iPhone or iPad. To change the preset, you can follow the steps above, but the audio won't change until you stop AirPlaying and then start AirPlaying again.
Note: Many third-party music streaming services, like Spotify and Tidal, have their own in-app equalizers you can use to adjust your levels.
Master your iPhone in minutes
iMore offers spot-on advice and guidance from our team of experts, with decades of Apple device experience to lean on. Learn more with iMore!
How to adjust the EQ of the HomePod when AirPlaying from a Mac
When AirPlaying from a Mac, you have more control over the equalization adjustments thanks to the Equalizer.
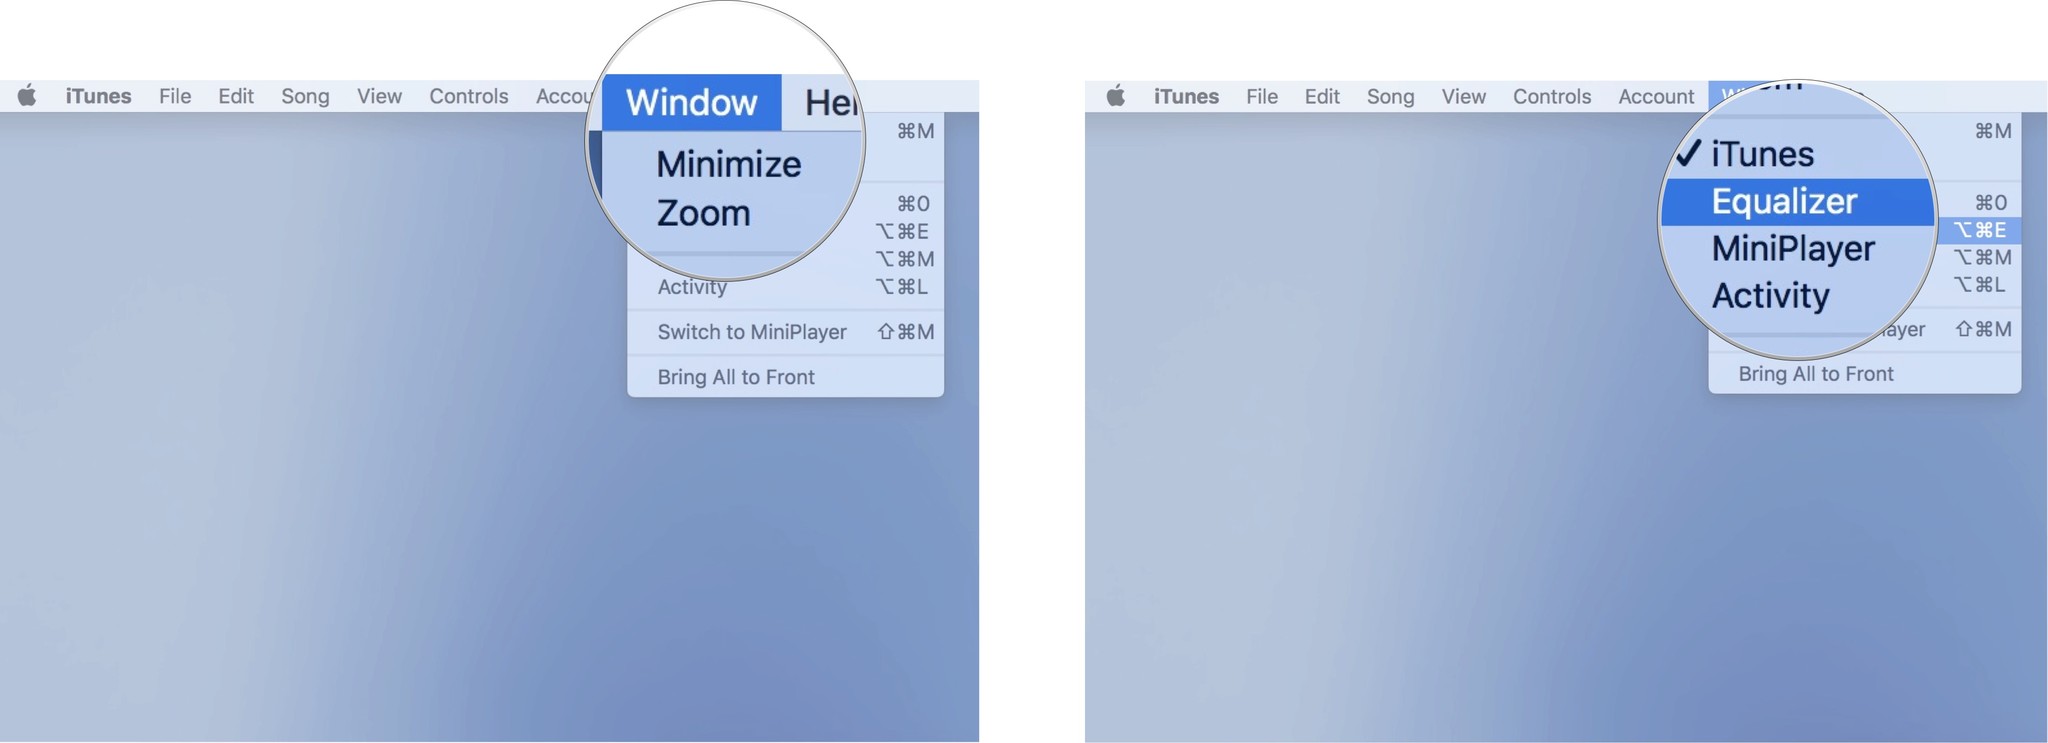
- Launch iTunes on your Mac.
- Click on Window in the app menu bar.
- Select Equalizer.
- To select a preset, click on the dropdown menu. If you're trying to reduce the heavy bass, I recommend either Bass Reducer or Treble Booster, but you can play around with the presets to get your ideal balance.

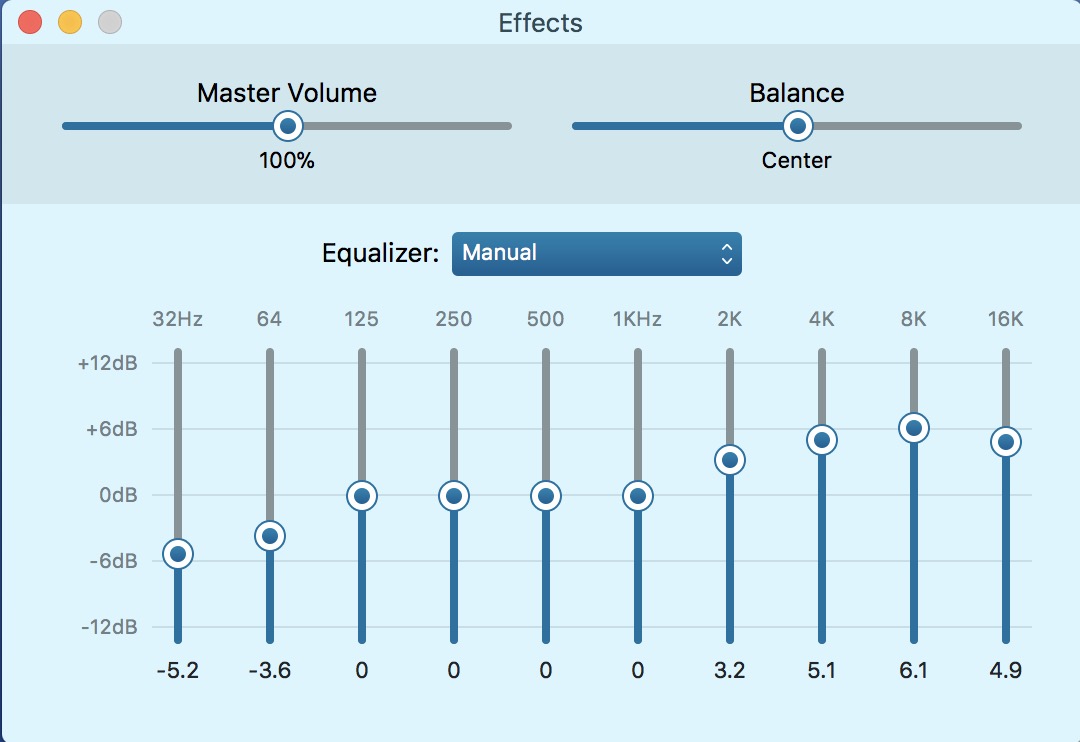
- To adjust the EQ manually, drag the dB sliders up or down to suit your balance. A short understanding of the EQ "knobs" is that the sliders to the left are all of the low-end and bass adjustments while the sliders to the right are the high-end and treble adjustments. For more detailed information, keep reading.

What the EQ level adjustments do
Thank goodness my college courses are finally paying off (I actually had to pull out my old textbook for this). The Equalizer adjusts the frequency you hear. The lower frequencies change the low-end while the higher frequencies change ... you guessed it ... the high end.
- 32Hz - 0 - 60Hz covers the very lowest end of the frequency spectrum. It's called the Sub Bass and when boosted, it increases the thickness of things like the kick drum, bass, and the lower-end notes in other instruments.
- 64Hz - The Bass frequency improves the sound of toms, deep instruments, and a song's bottom end. With both the 32 and 64Hz sliders up, you'll be setting the EQ for a thicker sound better suited for dance music (feel the beat).
- 125Hz - Once you get above 100Hz, you're getting into the mid frequencies. Keep these sliders somewhere in the middle for the best balance of sound. It makes guitars and the drum's snare more pronounced and adds an overall "hard" sound to a song. Punk rockers traditionally set their guitar amps to boost the mids.
- 250Hz - Though this is also part of the midrange frequency, you should use it sparingly. It boosts vocals and makes guitars sound thicker. It can also make your overall sound a little muddy, so don't push this level too high.
- 500Hz - Another mid range level. It'll give a bit of punch to your music, boosting higher end sounds while still maintaining some of the low-end. It can pull out bass notes while keeping the rest of the audio clear.
- 1KHz - This section starts the highest part of the mid-range level. It can be described as "tinny" if you use too much of it. It adds a little more presence to things like vocals and piano.
- 2KHz - The 2KHz section starts the high-mid frequencies. It's best for giving sound more of an attack. It adds a bit of crunch to your overall sound. Works well with guitar-heavy music and starts the effects of boosting the treble.
- 4KHz - When adjusting the levels here, you'll be punching the higher levels and really putting the attack into the toms and makes acoustic music clearer. It'll also add some sharpness to electronic instruments.
- 8KHz - Once you get to the high range frequencies, you're dealing with all highs. It'll punch up things like crash symbols and high pitch instruments like trumpets, flutes and the like. When you max out this and the 16KHz levels, everything else gets pulled into the background.
- 16KHz - At the highest range frequencies, you're boosting the highest pitches in music, like crash symbols, piccolos, violins, and such. Too much boosting in this area could lead to a hissing sound in your music, so use it sparingly.
The most important thing to know about equalization frequencies is that it's OK to play around with it. You don't have to be a sound engineer to just listen and adjust.
Third-party EQ options
You don't have to stick with the equalization options Apple gives you. You can try out a variety of EQ apps to help set the right levels.
Airfoil for Mac
Another reason to own Airfoil is it's built-in EQ features. What makes Airfoil stand out is that the EQ options are mapped to the AirPlay audio, not the Mac, so when you adjust levels from Airfoil, the changes will take place on your HomePod.
It works with Spotify, Pandora, Tidal, YouTube, QuickTime, and any other audio source you listen to. Start streaming audio, AirPlay it to your HomePod (and any other AirPlay device you want), and then adjust the equalization for whatever you're playing.
Airfoil costs $29, but you can download a free trial to see if it's worth your money (it is).
- $29 - Download at Rogue Amoeba
EQu for iPhone and iPad
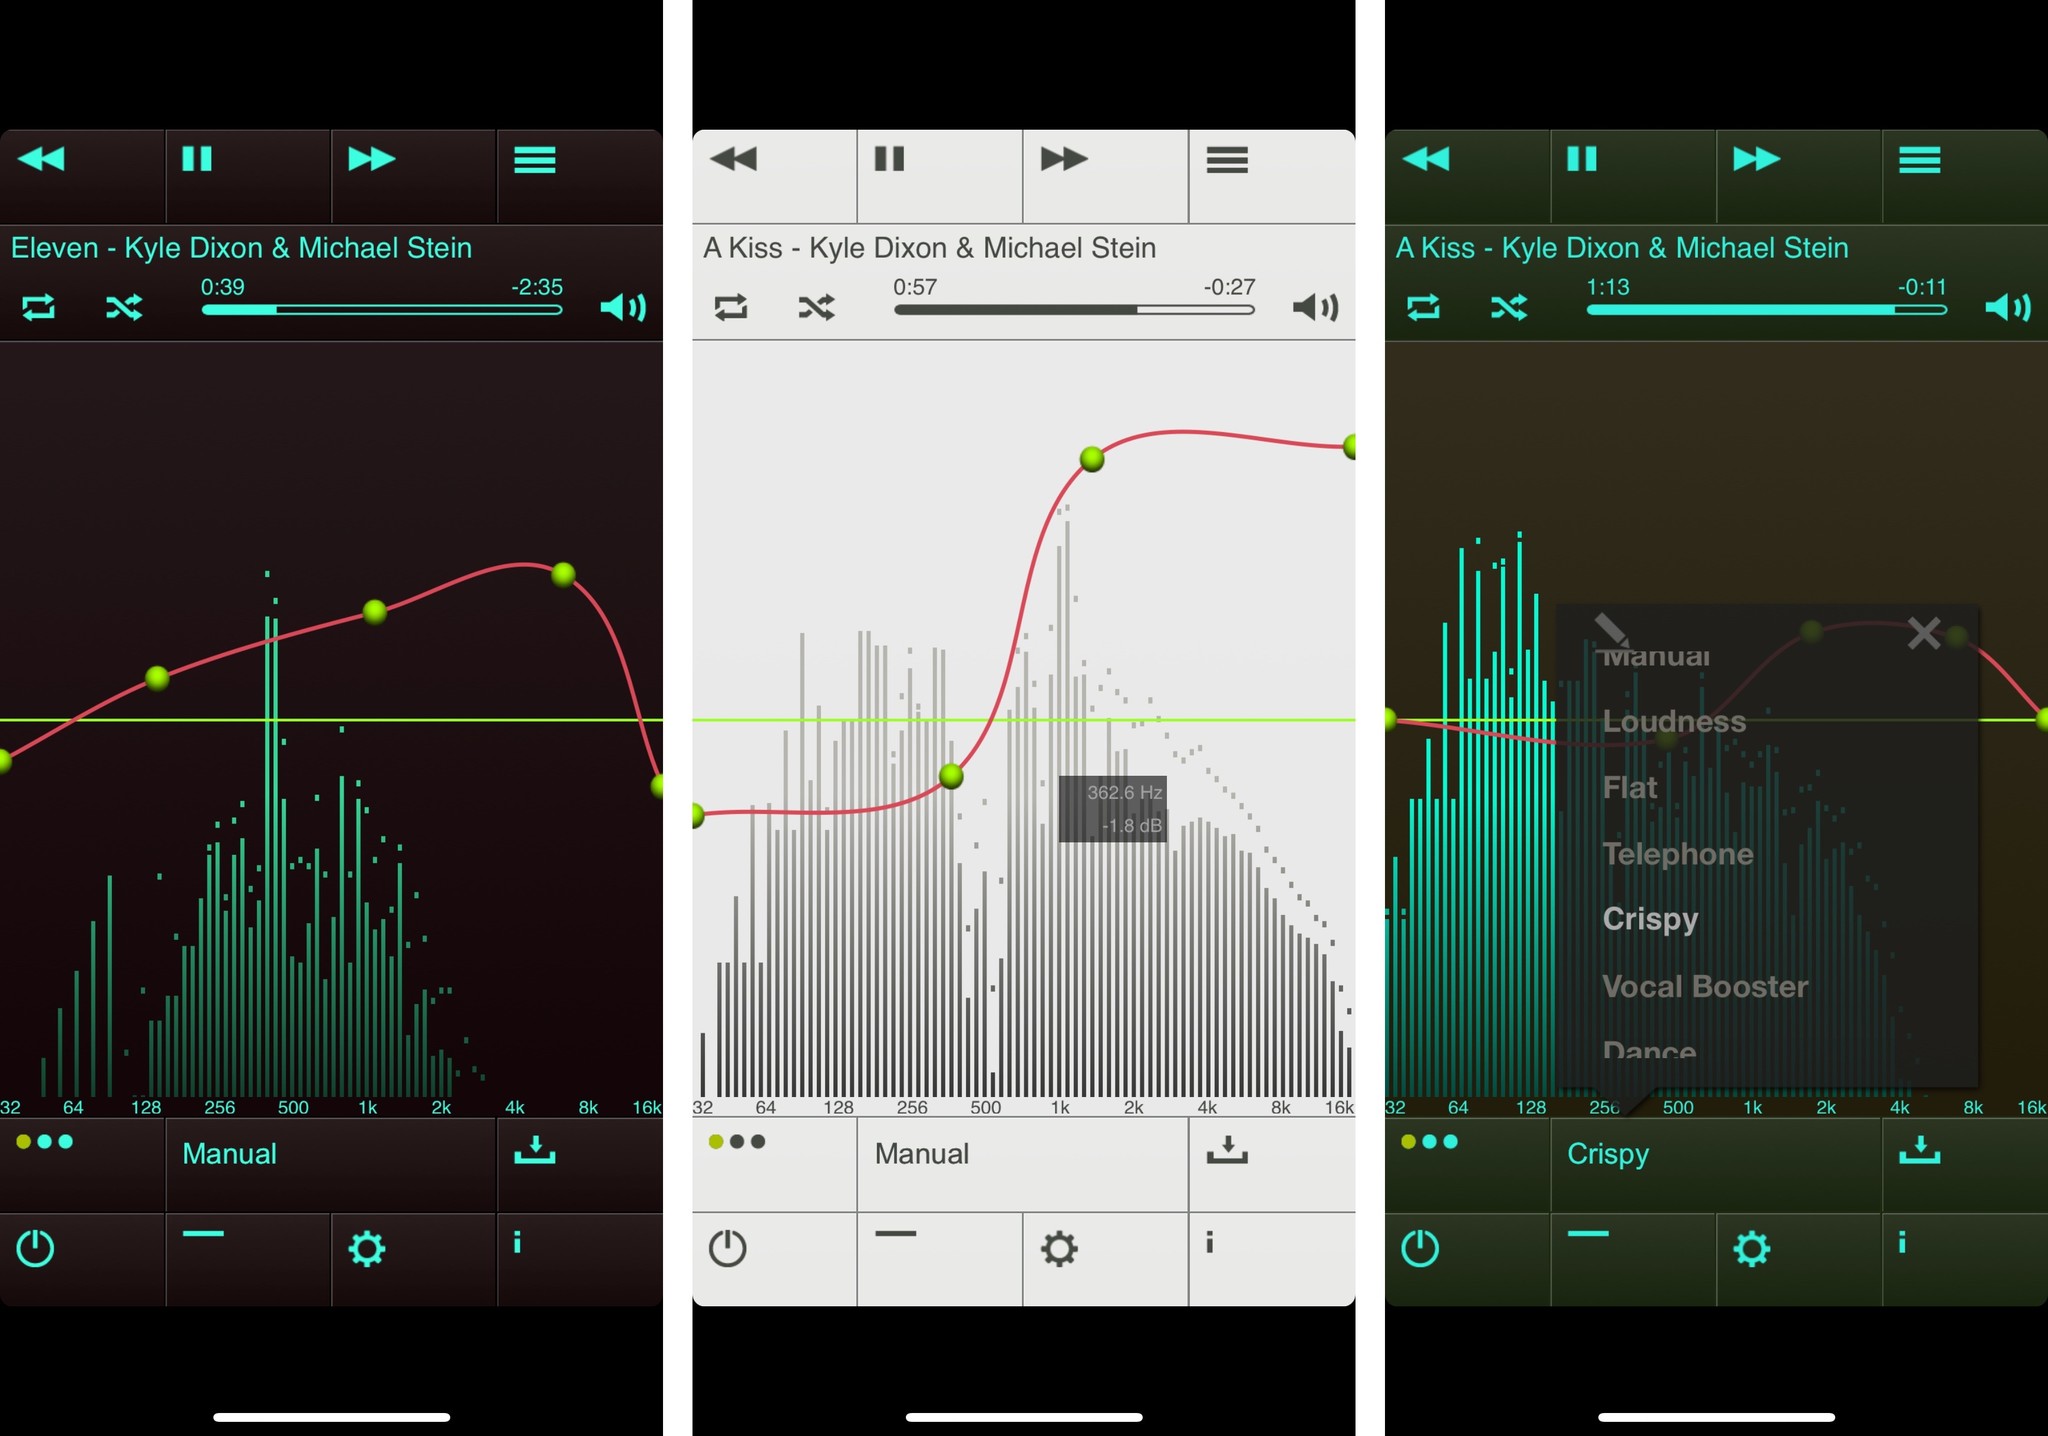
Note: There are currently no third-party apps that support EQ adjustment of Apple Music content (whether downloaded or not), so if you're a heavy Apple Music user, you should stick with Apple's built-in EQ presets.
There are a number of different equalizer apps for iPhone and iPad, but I landed on the $2.99 EQu app as my personal favorite because of the drag-to-adjust EQ levels. While music is playing, touch the red frequency line on the EQ display and drag the curve up or down to adjust the levels. Refer to my information about the Equalizer levels to get an idea for what you want to do.
This app uses music from your iTunes Library (purchased or ripped music, not Apple Music) that has been downloaded to your iPhone. So, you'll need a robust library to make this purchase worth the (very low) price.
For $1.99 more, you can download an in-app version of TuneIn radio (you can't simply connect to your own TuneIn app, unfortunately, due to Apple restrictions) and listen to local and global radio stations through EQu with the ability to set the equalization of whatever you're listening to.
- $2.99 Download now
Any Questions?
Do you have any questions about setting the EQ for Airplaying music to your HomePod? Put them in the comments and I'll help you out.
Lory is a renaissance woman, writing news, reviews, and how-to guides for iMore. She also fancies herself a bit of a rock star in her town and spends too much time reading comic books. If she's not typing away at her keyboard, you can probably find her at Disneyland or watching Star Wars (or both).
