Can't take a photo? Use Optimize Storage to free up space on your iPhone
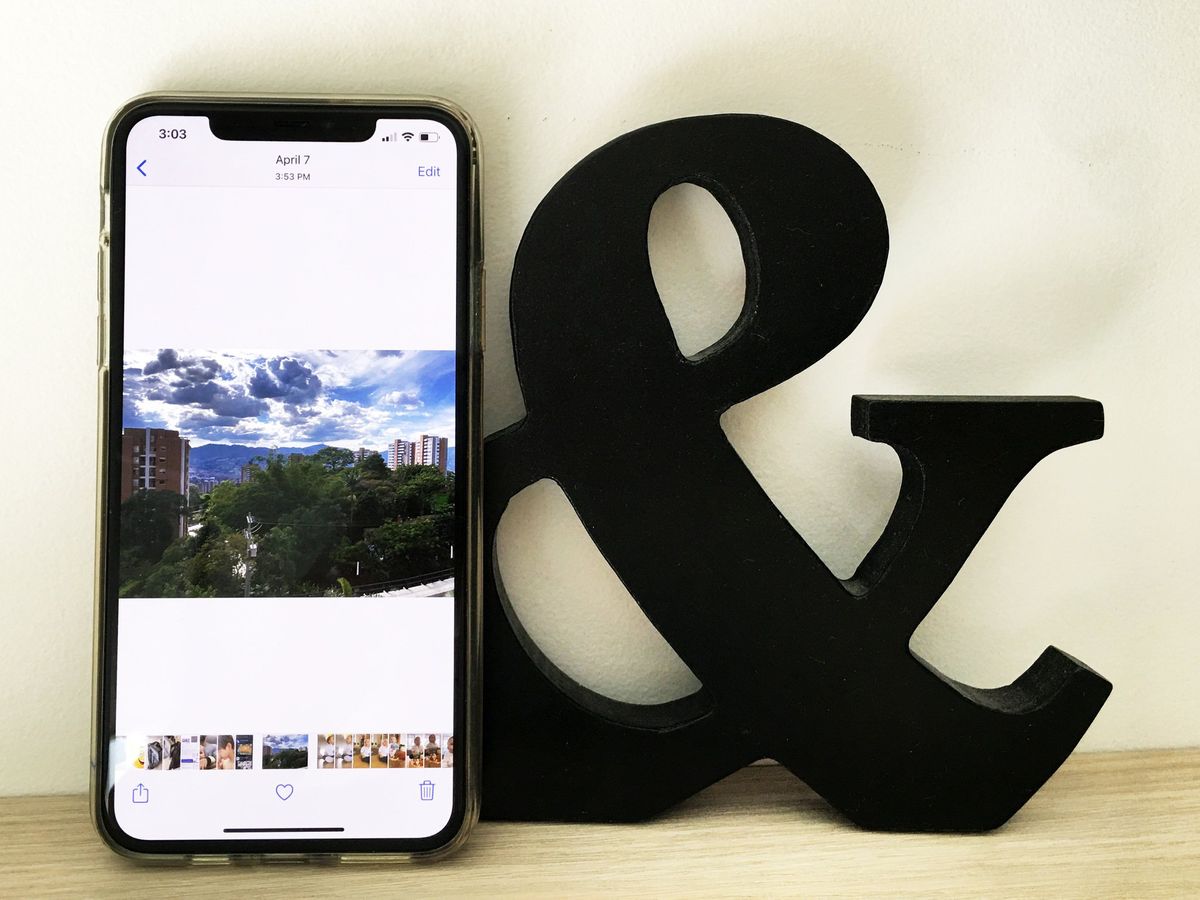
Pictures and videos take up a ton of storage space, and for good reason — all that data is what makes your photographs and snaps look phenomenal. But if you're hitting that pesky "out of storage" error while trying to take pictures on a 64GB iPhone, outstanding photos become less of a delight — you'd settle for being able to take any photo, at that point.
Luckily, you don't have to compromise: Apple's iCloud Photos lets you store all your images and video online, freeing valuable storage space on your device. And if you're still having trouble, we've got a few other tips to help get you back to image snapping glory.
- How to enable iCloud Photos and free up storage space
- How to free up more space on your iPhone to take photos
How to enable iCloud Photos and free up storage space
By default, when you take a photo with your iPhone or iPad, it gets stored on that device. Snap a selfie? Shoot a video? All of it gets locally saved. But photos and videos take up valuable storage space — and it can be a pain to continually remember to move old photos to your computer (or delete old images) so that you can take new ones.
Instead, Apple offers iCloud Photos: If you've ever used Dropbox before, it's like that — When you turn on iCloud Photos and are on Wi-Fi, Apple will automatically and securely upload all images and video from your iPhone or iPad to your iCloud account, where it can then be redownloaded and synced to your Mac, iPad, iPhone, or the web via iCloud.com; any piece of tech that has iCloud Photos enabled will receive any photo or video present on your other synced devices.
This is a nice sync and backup system to ensure that all your images are on all your devices, but it doesn't solve the problem of having too many images on your iPhone or iPad. When you delete an image locally, it will try and delete it everywhere if iCloud Photos is enabled. Not exactly what the average user wants.
Instead, Apple offers an option called Optimize iPhone Storage: When checked, your iPhone or iPad will locally store only the latest images and video you've shot or viewed; the others live up in iCloud, ready to be downloaded when you need them — and not taking up storage space when you don't.
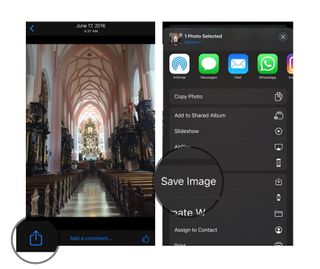
You can view any of the images you have stored on iCloud at any time. If you'd like to download them onto your device for any reason, simply click the Share button in the lower-left corner, then scroll down to click Save Image. Once you download a certain number of images and videos, your device will intelligently sync the oldest ones you've viewed back up to iCloud and then delete them from local storage, thus preventing you from having to do manual image and video pruning.
Master your iPhone in minutes
iMore offers spot-on advice and guidance from our team of experts, with decades of Apple device experience to lean on. Learn more with iMore!
If you think this sounds like a good deal for your iPhone, you're right: It keeps your local storage happy and saves you from having to delete adorable baby pictures of your cousin.
Here's how you go about setting up iCloud Photos and Optimize iPhone Storage.
- Make sure you're on Wi-Fi.
- Enable iCloud Photos.
- Launch the Settings app.
- Tap Photos.
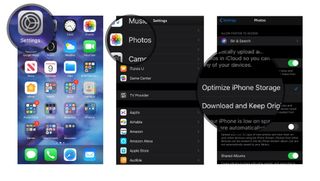
- Select Optimize iPhone Storage.
Once you do so, iCloud will automatically remove older images from your device, storing only the most recent images locally.
The rest of those images and videos will continue to be stored safely in iCloud at full resolution and in their native format — JPG, PNG, MOV, or RAW — and continue to be downloaded to all other devices where you've selected the "Download and Keep Originals" option. (I highly encourage enabling this full storage option on a device like a desktop Mac, so you always have a full offline backup of your photos.)
It may take a while for these changes to take place, especially if you're on a slower Wi-Fi network, so don't despair if your storage space doesn't initially free up.
How to free up more space on your iPhone to take photos
If you have a 64GB iPhone, turning on iCloud Photos might not be enough — you may need to do some more sprucing on your iPhone to make your Camera happy. Here are a few tips I've found that work well to quickly clear up space.
1. See what's taking up space
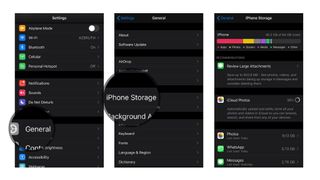
Not sure what's clogging up room on your iPhone? You can check your available space at any time by going to Settings > General > iPhone Storage.
2. Delete apps
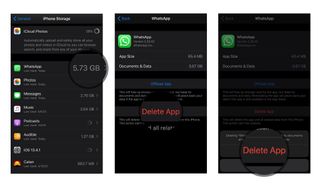
From the storage management section, you can see exactly what apps are hogging your iPhone or iPad's available space — and, if you want to, delete them right then and there by tapping on the app and pressing Delete App. Be warned, however, that if you delete certain apps, you may delete any saved or stored data, as well.
3. Prune your Messages
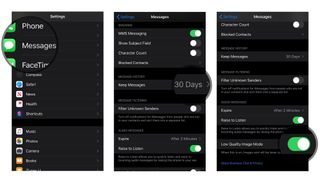
By default, the Messages app saves all the gifs, stickers, videos, and other multimedia you share with your friends directly to your device. To get rid of it, you have to manually delete threads from the Messages app.
But you can prevent clogging from happening in the future: In Settings > Messages, you can reduce the largesse of your messages files by changing how long you Keep Messages (30 days, a year, or forever) and by turning on Low Quality Image Mode, which automatically reduces the file size of potentially gigantic gifs and other photos.
4. Prune your Music
If you don't use Apple Music (or even if you do but have songs saved offline), your local music library can quickly overwhelm your iPhone. To keep your Adele songs from choking your selfie game, go to Settings > General > iPhone Storage > Music, then swipe left on any artist entry you wish to delete.
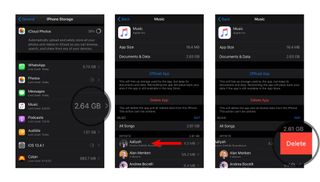
And if you have an Apple Music or iTunes Match subscription, you can further reduce your storage costs by turning on Optimize Storage in Settings > Music.
5. Check out our other storage tips
Are these tricks not working for you? We've collected a few other suggestions for items you can trim from your iPhone or iPad below.
- Out of storage error on your iPhone? Here's the fix!
- How to find and remove 'Other' files from iPhone and iPad
- How to delete files from iCloud on your iPhone or iPad
Questions?
Any other tips, tricks, or questions about freeing up your local storage or iCloud space so that you can snap photographs? Let us know in the comments.
Updated May 2020: Updated instructions for use with iOS 13.

Jaclyn Kilani is a content writer at iMore. She's a longtime Apple addict with a flair for creating (written works, design, photos; you name it!) on her devices. Jaclyn has also worked in the marketing sector for over 16 years, dabbling in a bit of everything from writing to graphic design and digital marketing. In her heart of hearts, however, she is a born writer and an avid reader who adores everything about the written word. Someday she may even churn out a book or two. Throughout her career, Jaclyn has also developed something of an addiction to all things Apple. Her professional and personal life is enhanced by an ever-growing collection of iPhones, iPads, MacBooks, Apple Watches, and even AirTags. Luckily, this expensive habit is of great use to her work at iMore, where she writes with authority on Apple products and the accessories that go with them.

