How to manage your Apple ID account on Mac
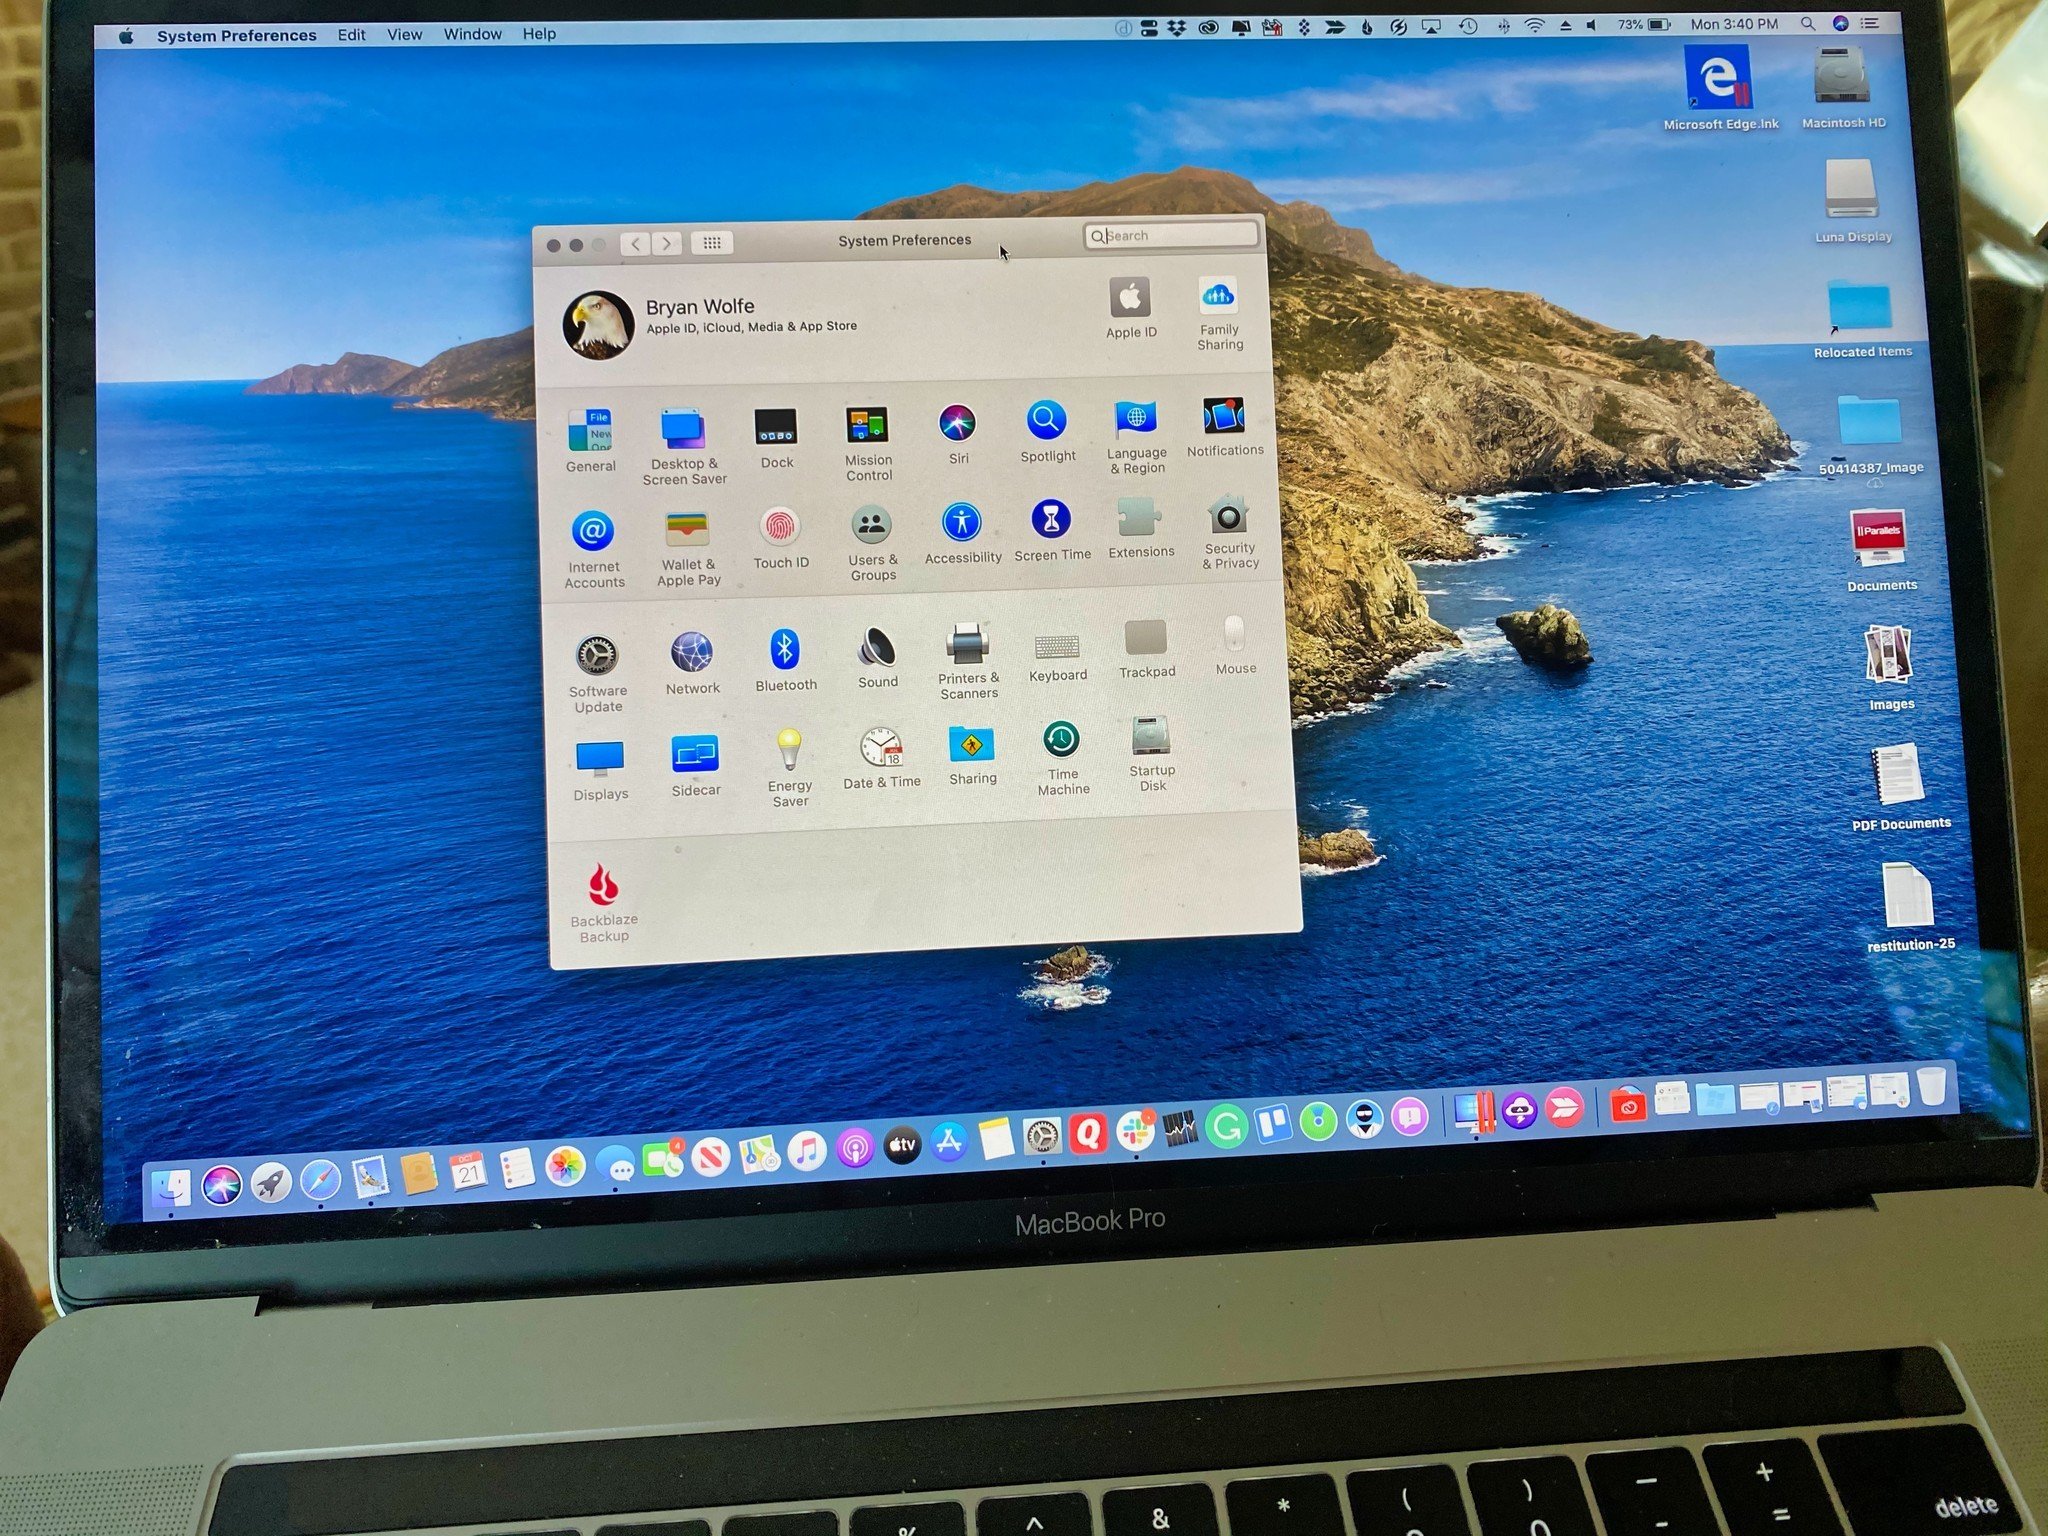
Managing your Apple ID is a little bit easier, thanks to macOS Catalina. Here's everything you can do to manage your Apple ID on your Mac.
- Where's Apple ID on Mac?
- How to view the Apple ID and privacy policy on Mac
- How to set up your Apple ID name, phone, and email information on Mac
- How to set up your Apple ID password and security information on Mac
- How to set up your Apple ID payment method and shipping address on Mac
- How to set up your Apple ID iCloud settings on Mac
- How to set up your Apple ID media and purchase settings on Mac
- How to view and manage your Apple ID trusted devices on Mac
Not on macOS Catalina? Look at our older guide:
Where's Apple ID on Mac?
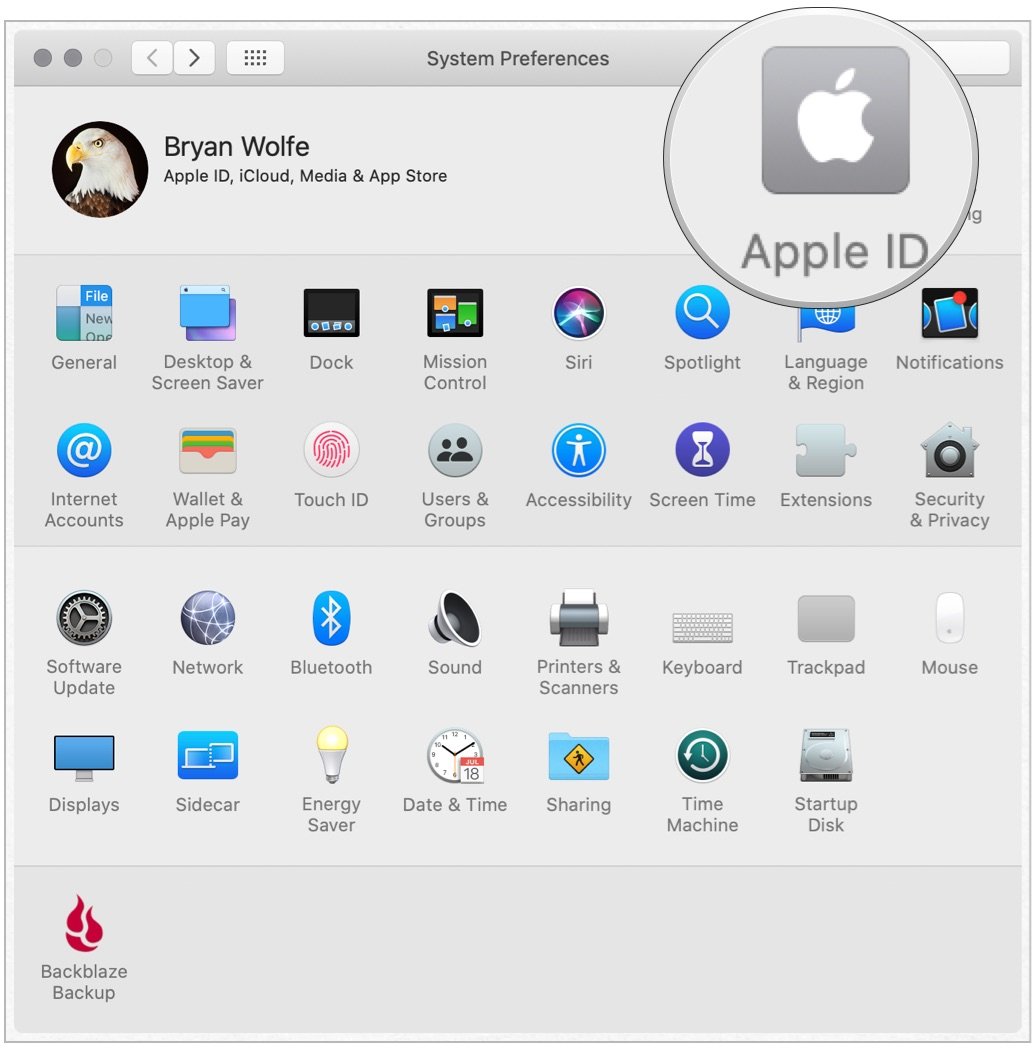
You can find everything to do with Apple ID on your computer under System Preferences.
- Click on System Preferences on your Mac Dock.
- Select Apple ID.
How to view the Apple ID and Privacy policy on Mac
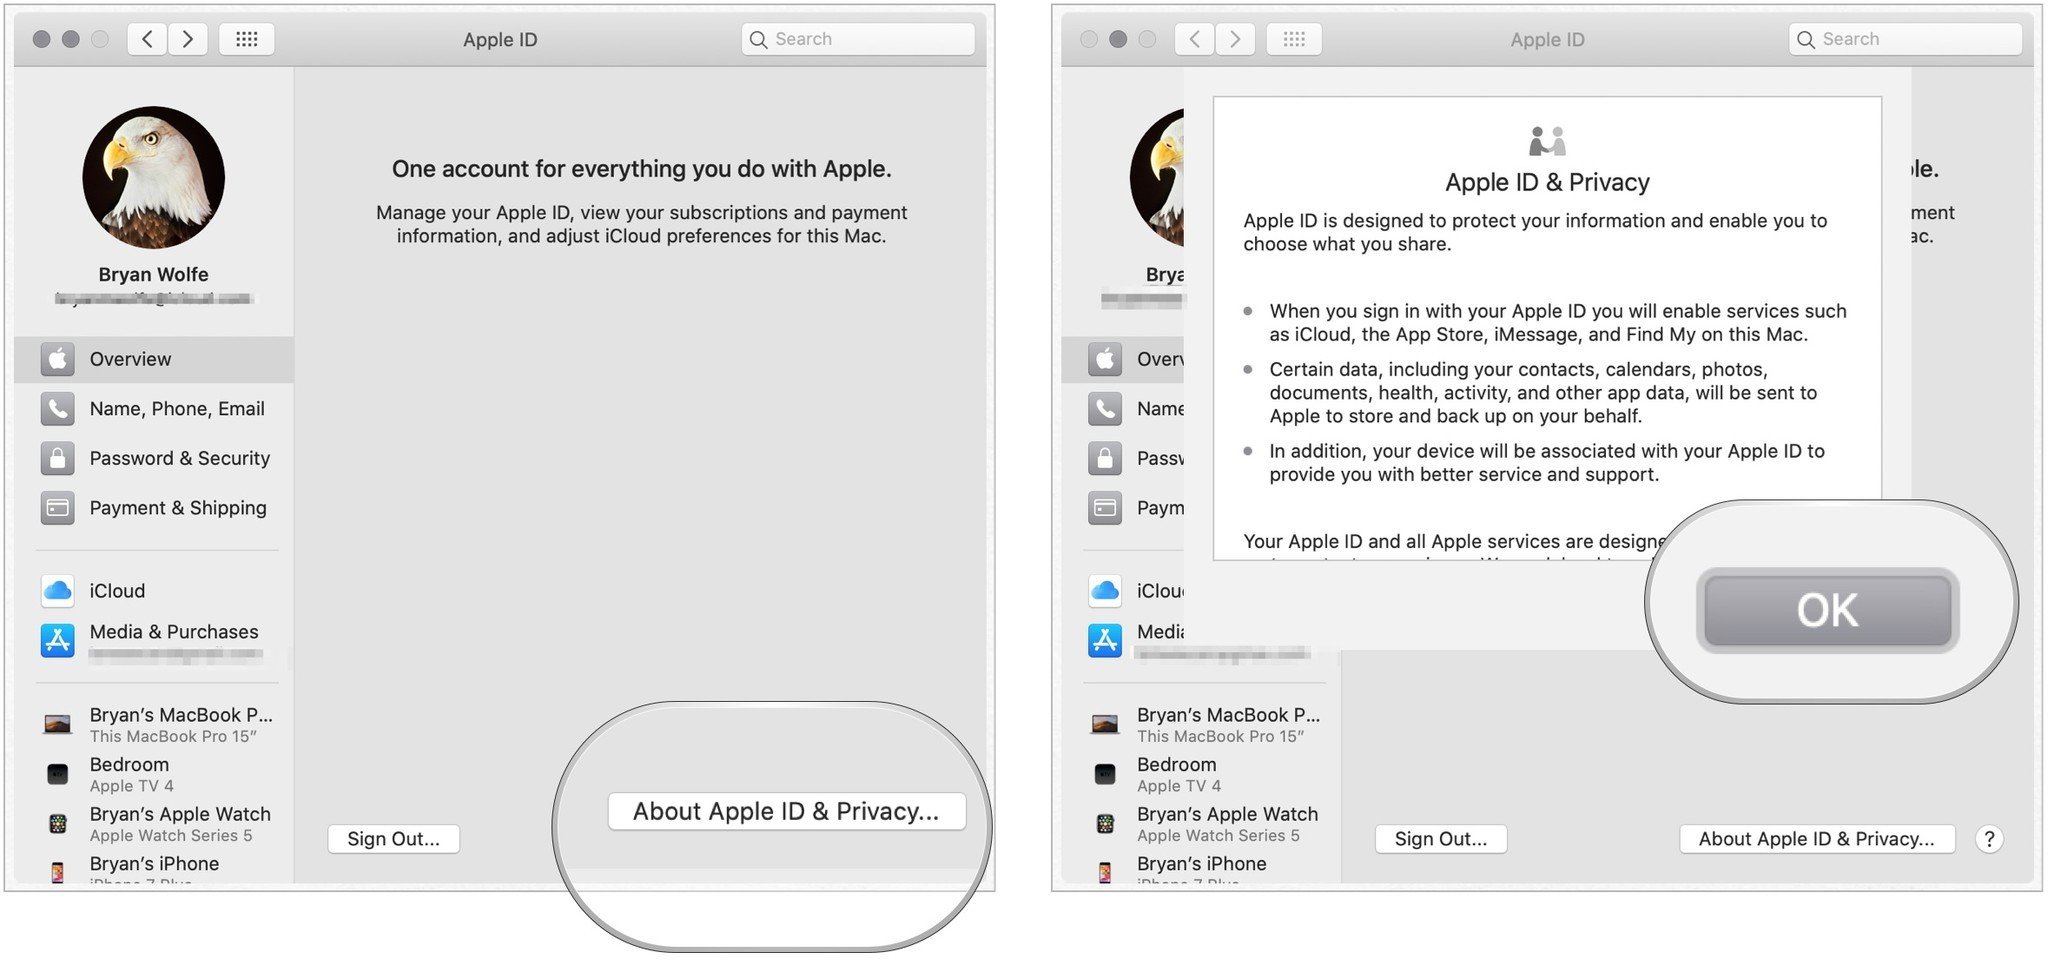
Apple has made it simple to access the Apple ID and privacy policy on Mac. To review it:
- Under Apple ID, click Overview on the left side of the window.
- Click on the box, About Apple ID & Privacy.
- Scroll to view policy.
- When complete, choose OK.
How to set up your Apple ID name, phone, and email information on Mac
You can change your Apple ID name, phone number, and email information directly from your Mac.
To change the name:
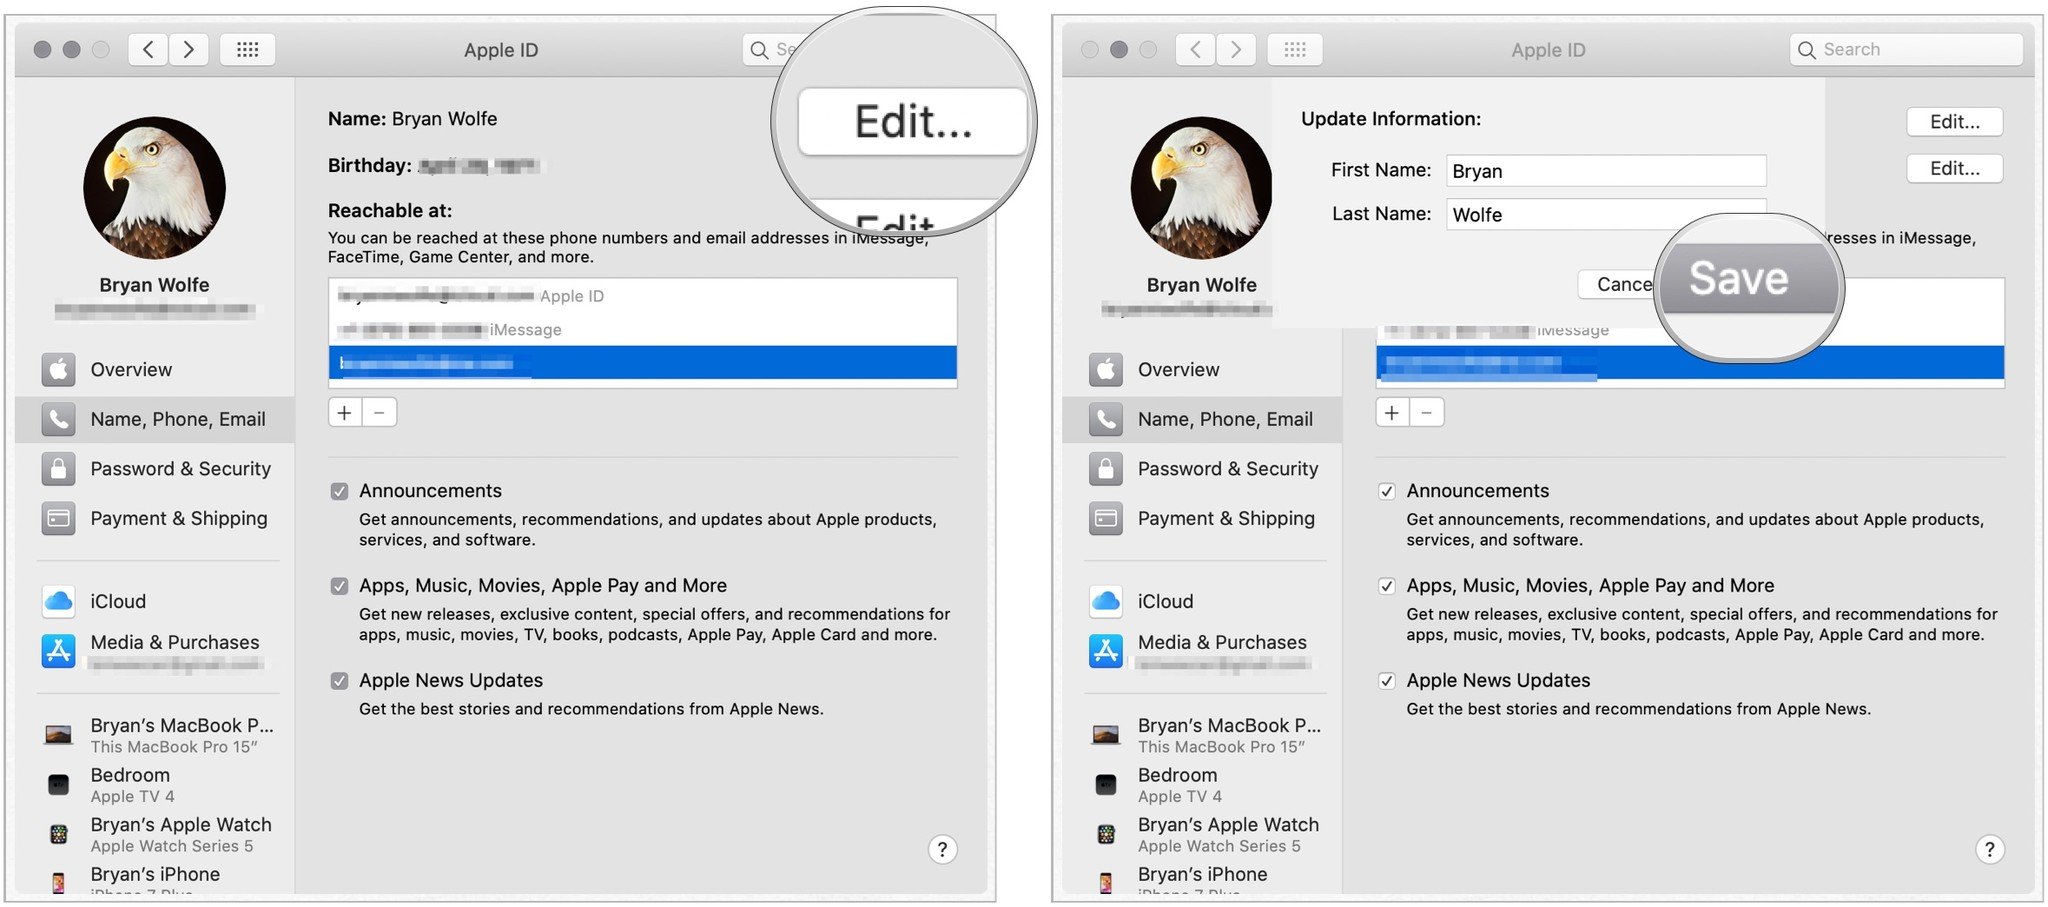
- Under Apple ID, click Name, Phone, Email on the left side of the window.
- Tap Edit next to Name to edit the first and last name on your Apple ID account.
- Change Name.
- Choose Save.
You can also change the birthday next to the account by clicking Edit next to Birthday.
Master your iPhone in minutes
iMore offers spot-on advice and guidance from our team of experts, with decades of Apple device experience to lean on. Learn more with iMore!
To add a phone number to your Apple ID:
- Under Apple ID, click Name, Phone, Email on the left side of the window.
- Click on the **+* under the Reachable At box.
- Toggle Phone Number.
- Add the Phone Number.
- Click Next.
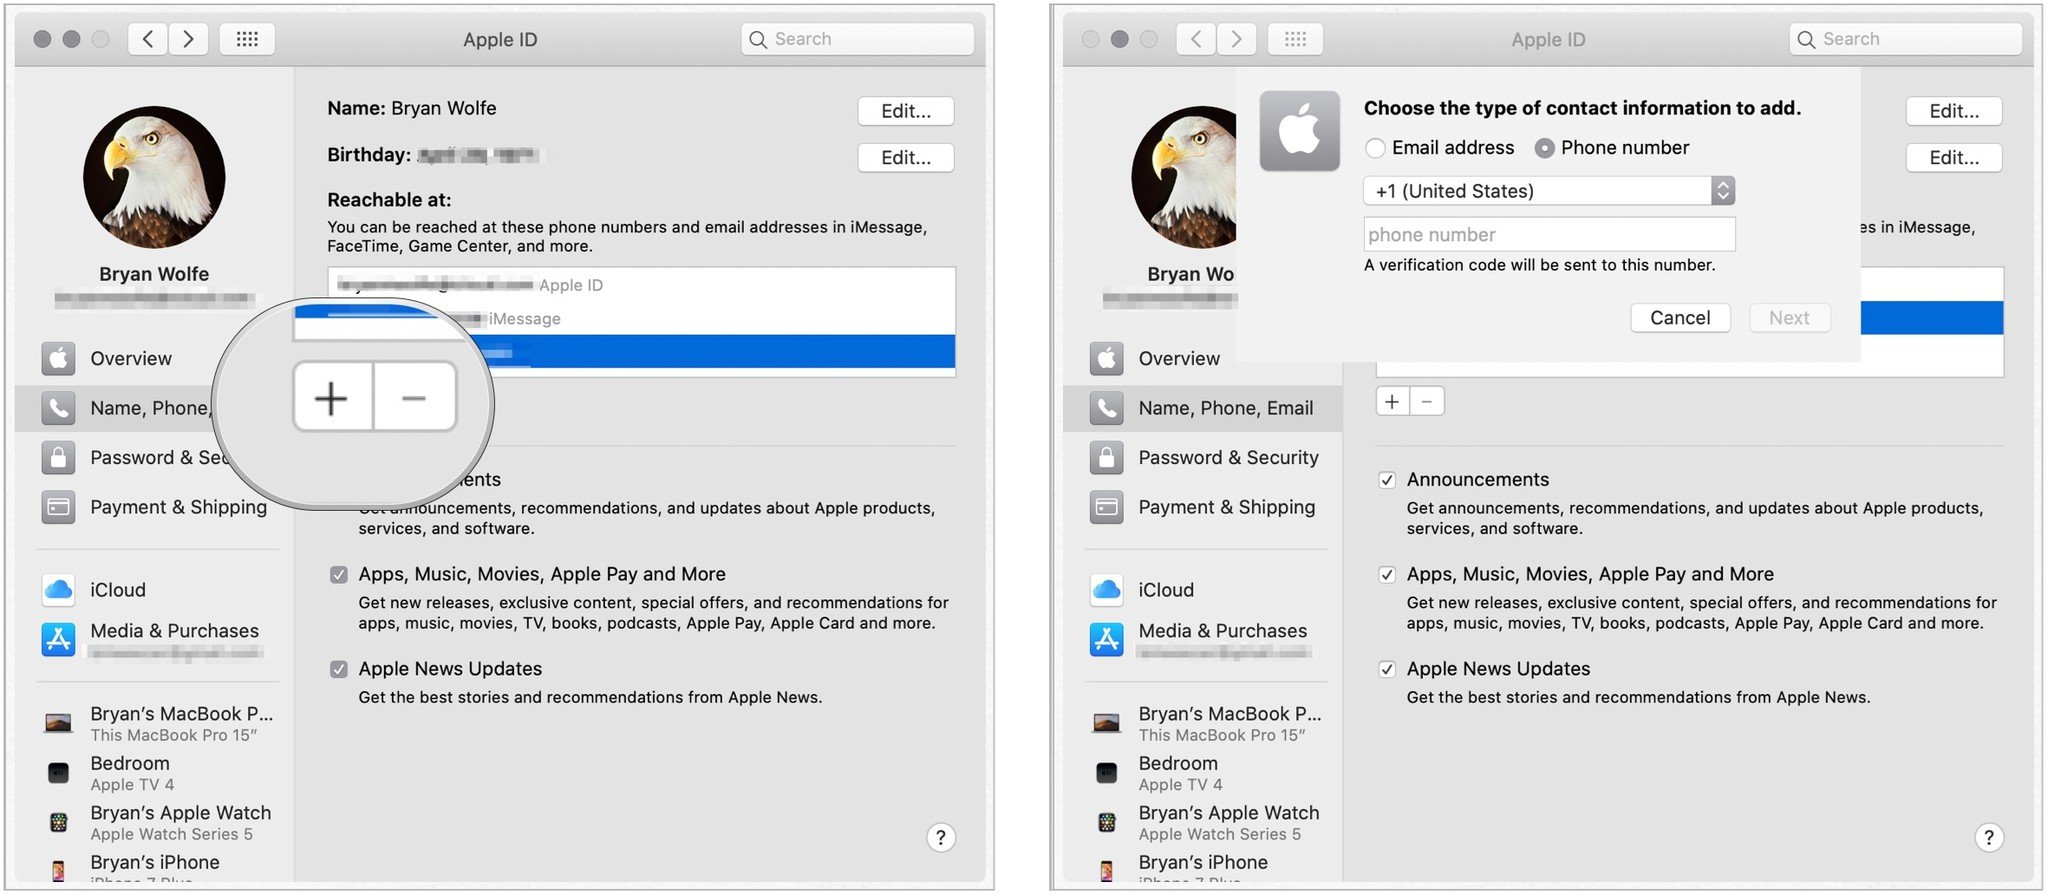
You'll receive a verification code at your phone number to confirm the addition of the new digits.
To add an email to your Apple ID:
- Under Apple ID, click Name, Phone, Email on the left side of the window.
- Click on the **+* under the Reachable At box.
- Toggle Email Address.
- Add the Email Address.
- Click Next.
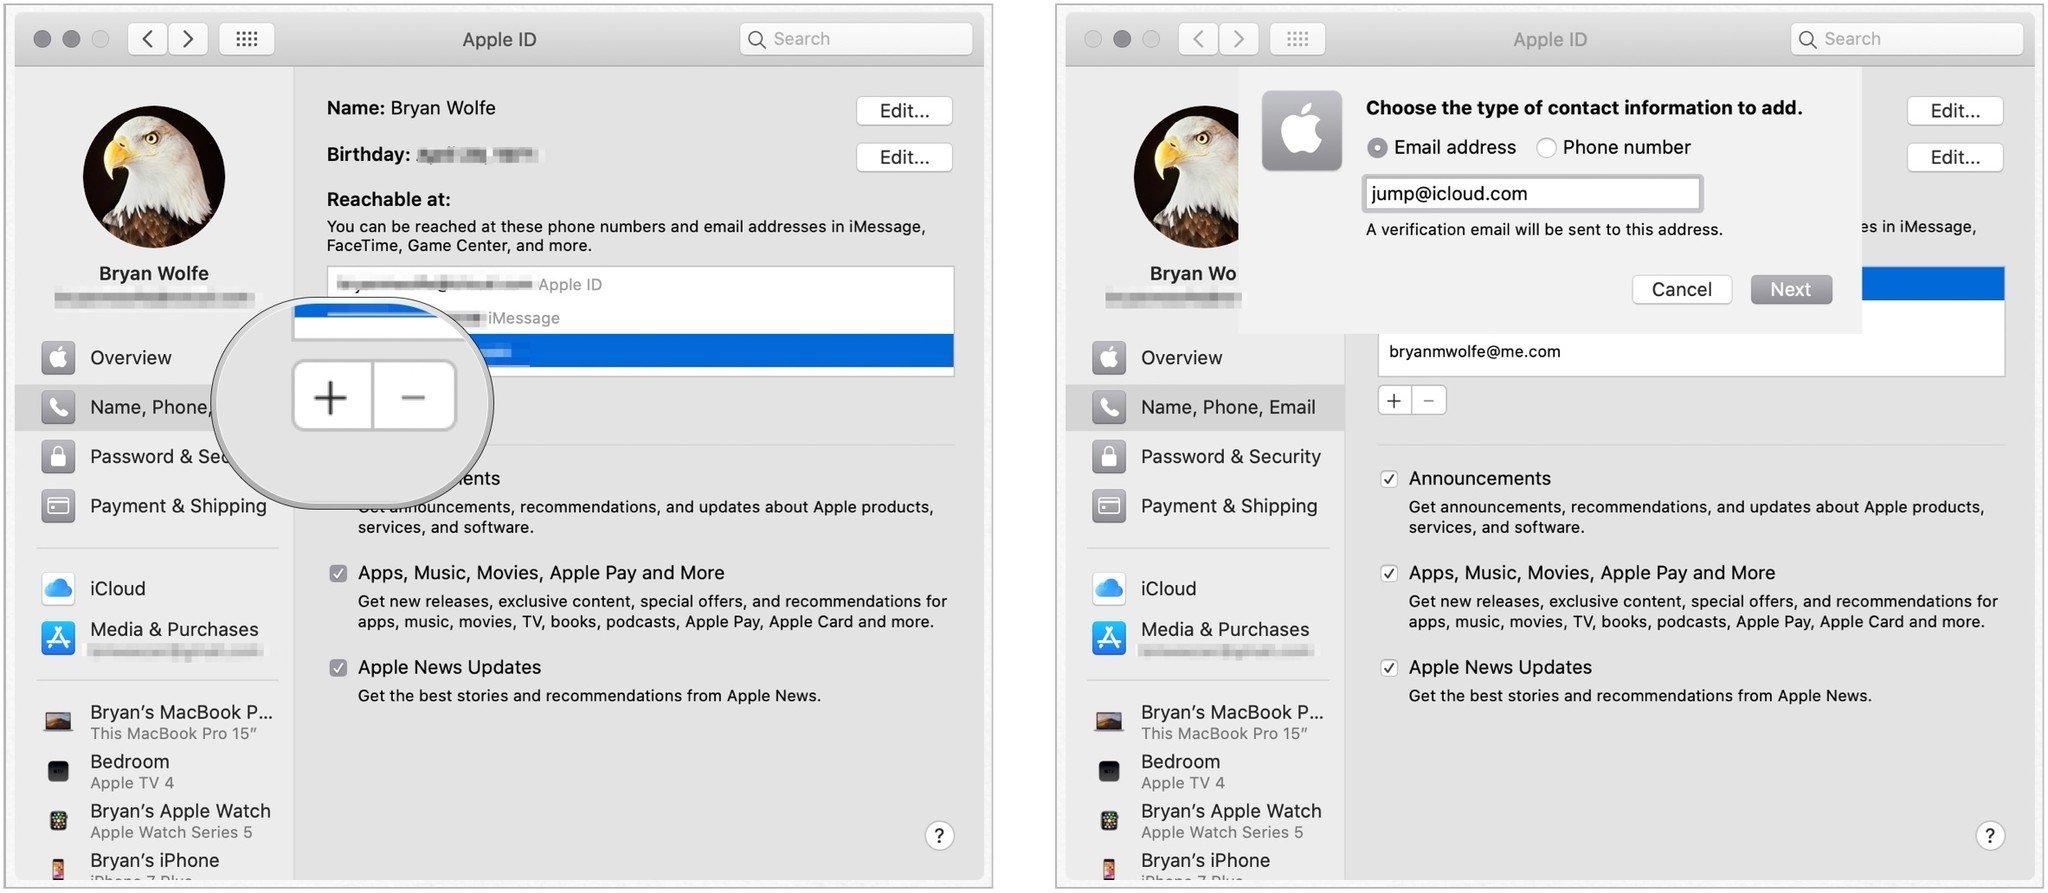
You'll receive a verification code at your email to confirm the addition of the address.
How to set up your Apple ID password and security information on Mac
You can change both your Apple ID password and security information on Mac.
To change your Apple ID password:
- Under Apple ID, click Password & Security on the left side of the window.
- Click Password box. Notice the last password change date.
- Enter your current password or computer password, depending on what the popup message says.
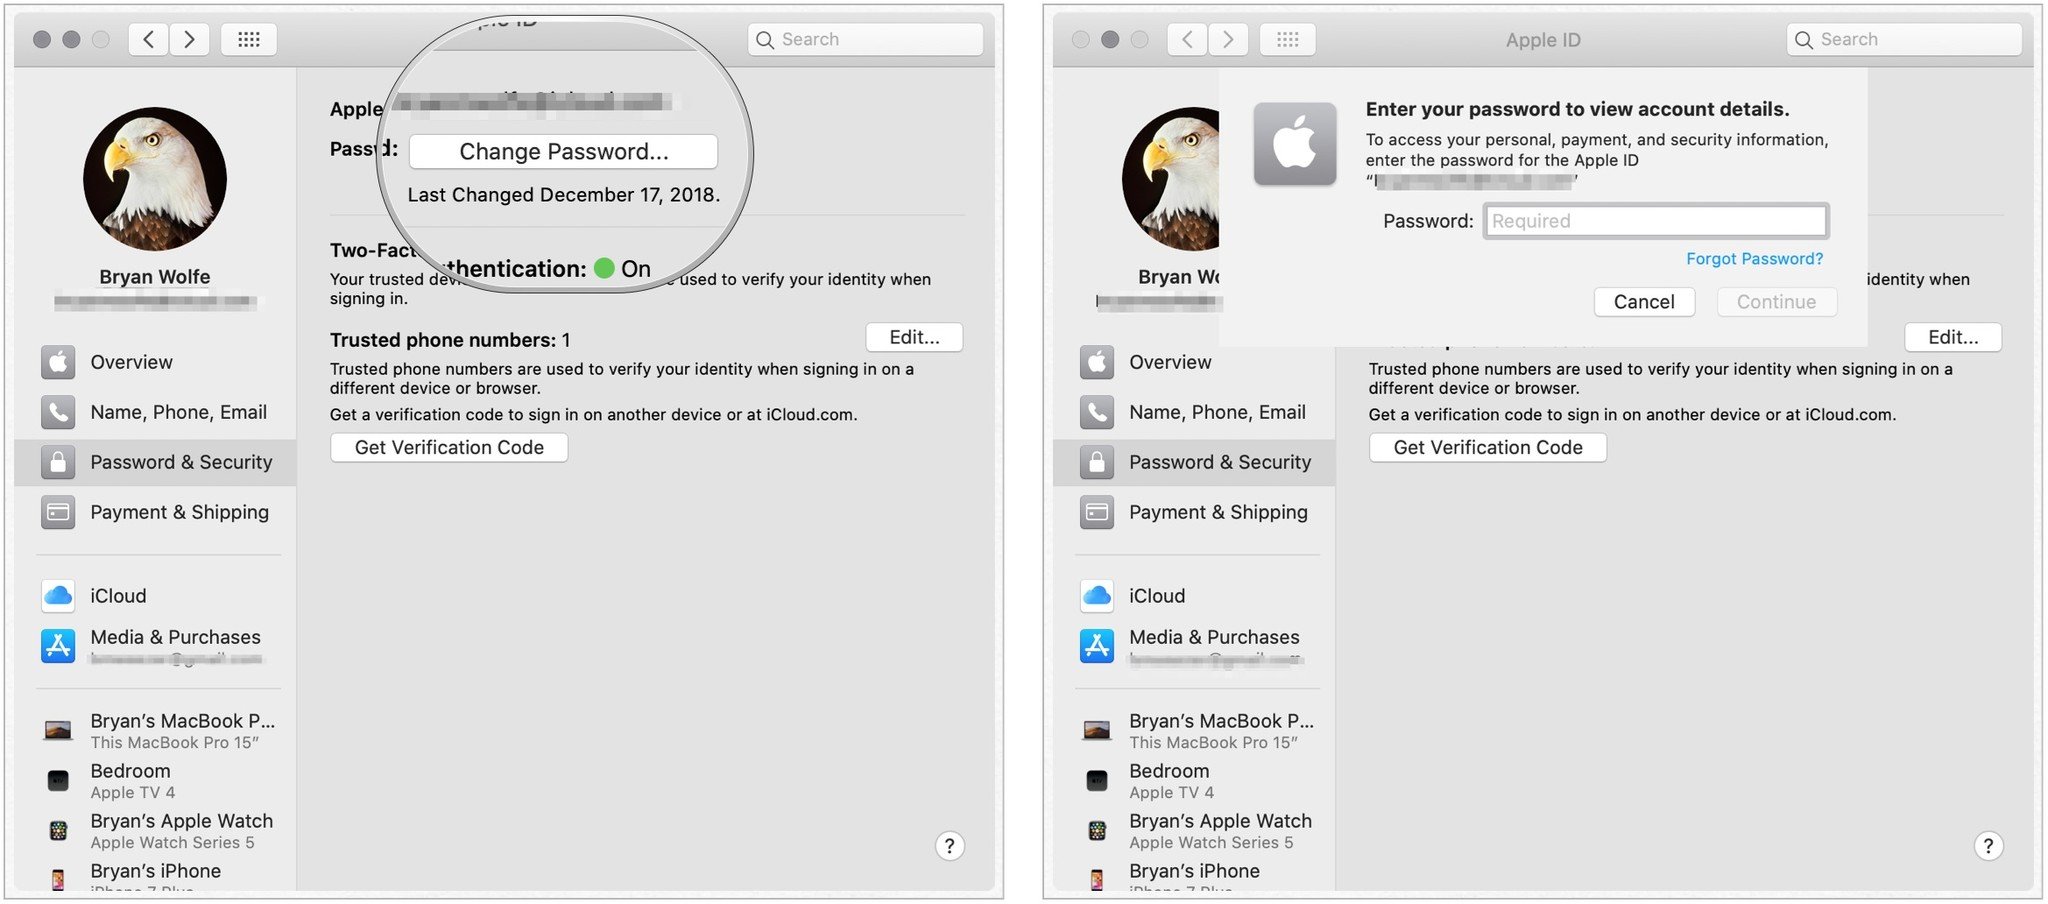
- Add new password.
- Verify new password.
- Click Change.
- Choose Sign Out or Don't Sign Out. Doing so will force all devices and websites that use your Apple ID to sign out.
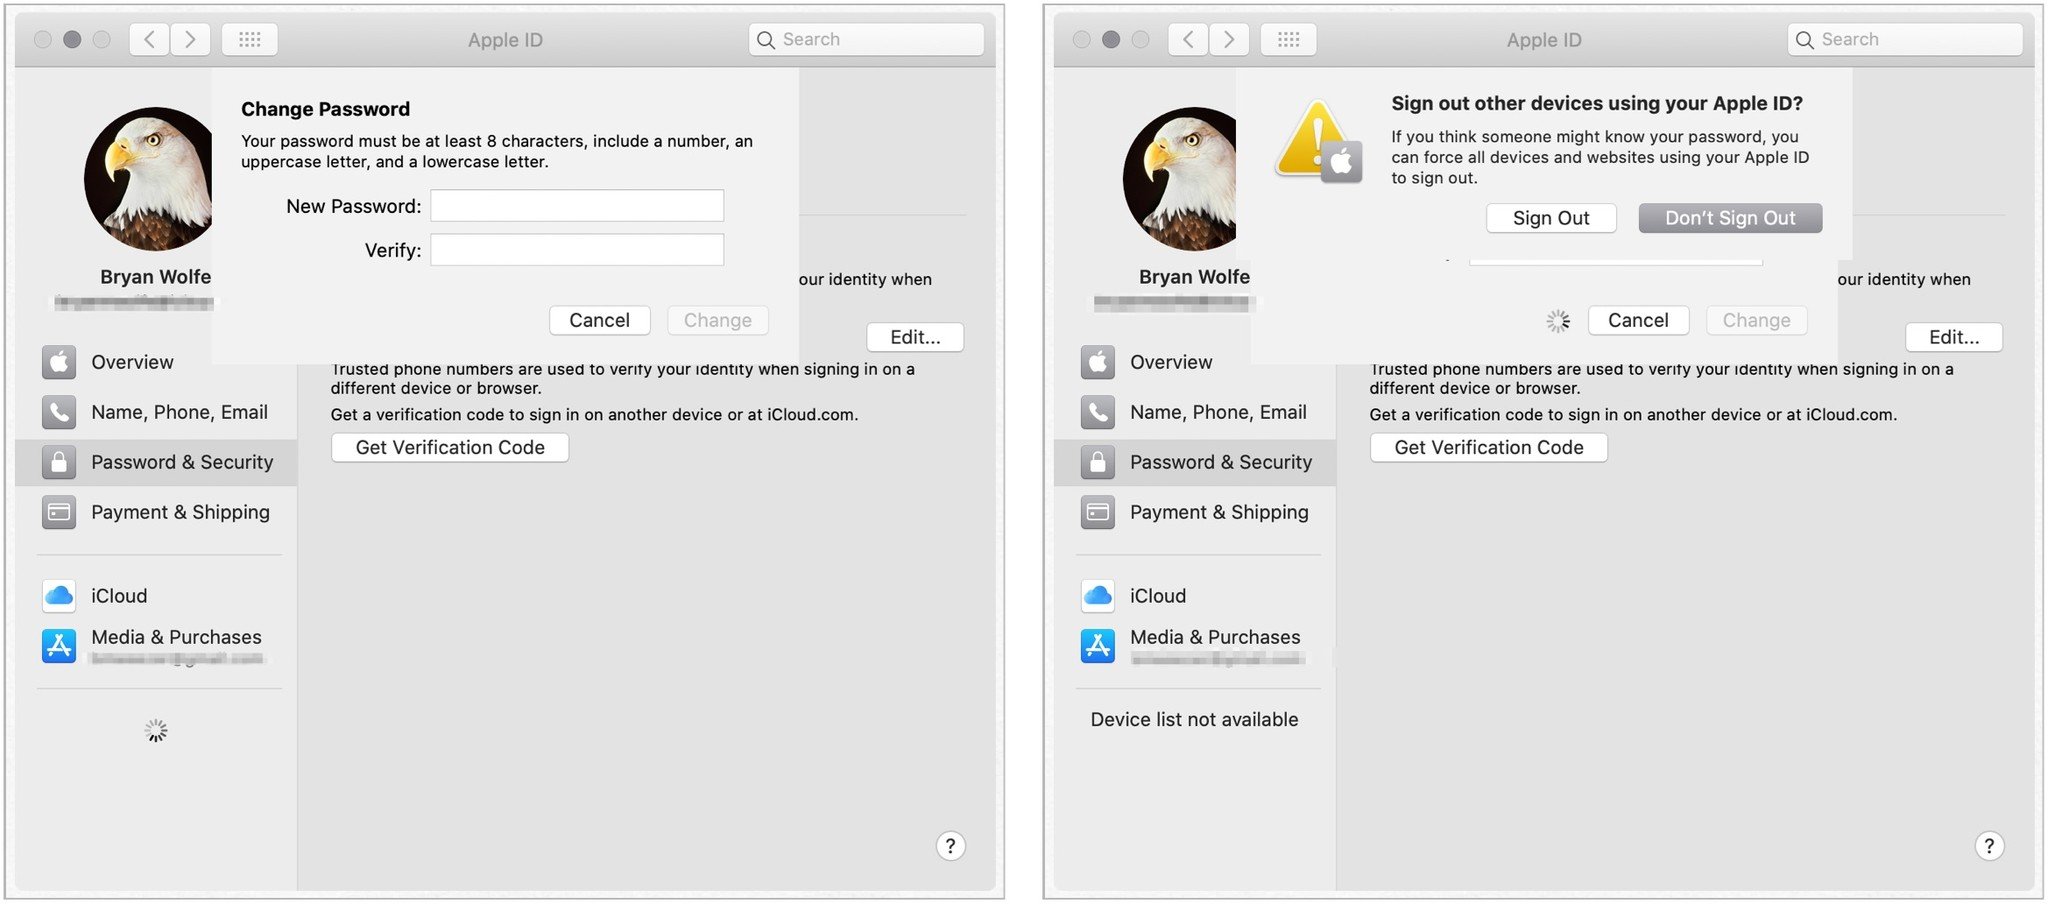
Your Apple ID password has been changed. You may need to log into your account again on other Apple devices.
If you have Two-Factor Authentication, you can edit your trusted phone number and generate a verification code from the Apple ID settings on your Mac.
To add a new trusted phone number:
- Under Apple ID, click Password & Security on the left side of the window.
- Click Edit next to Trusted phone numbers.
- Click +.
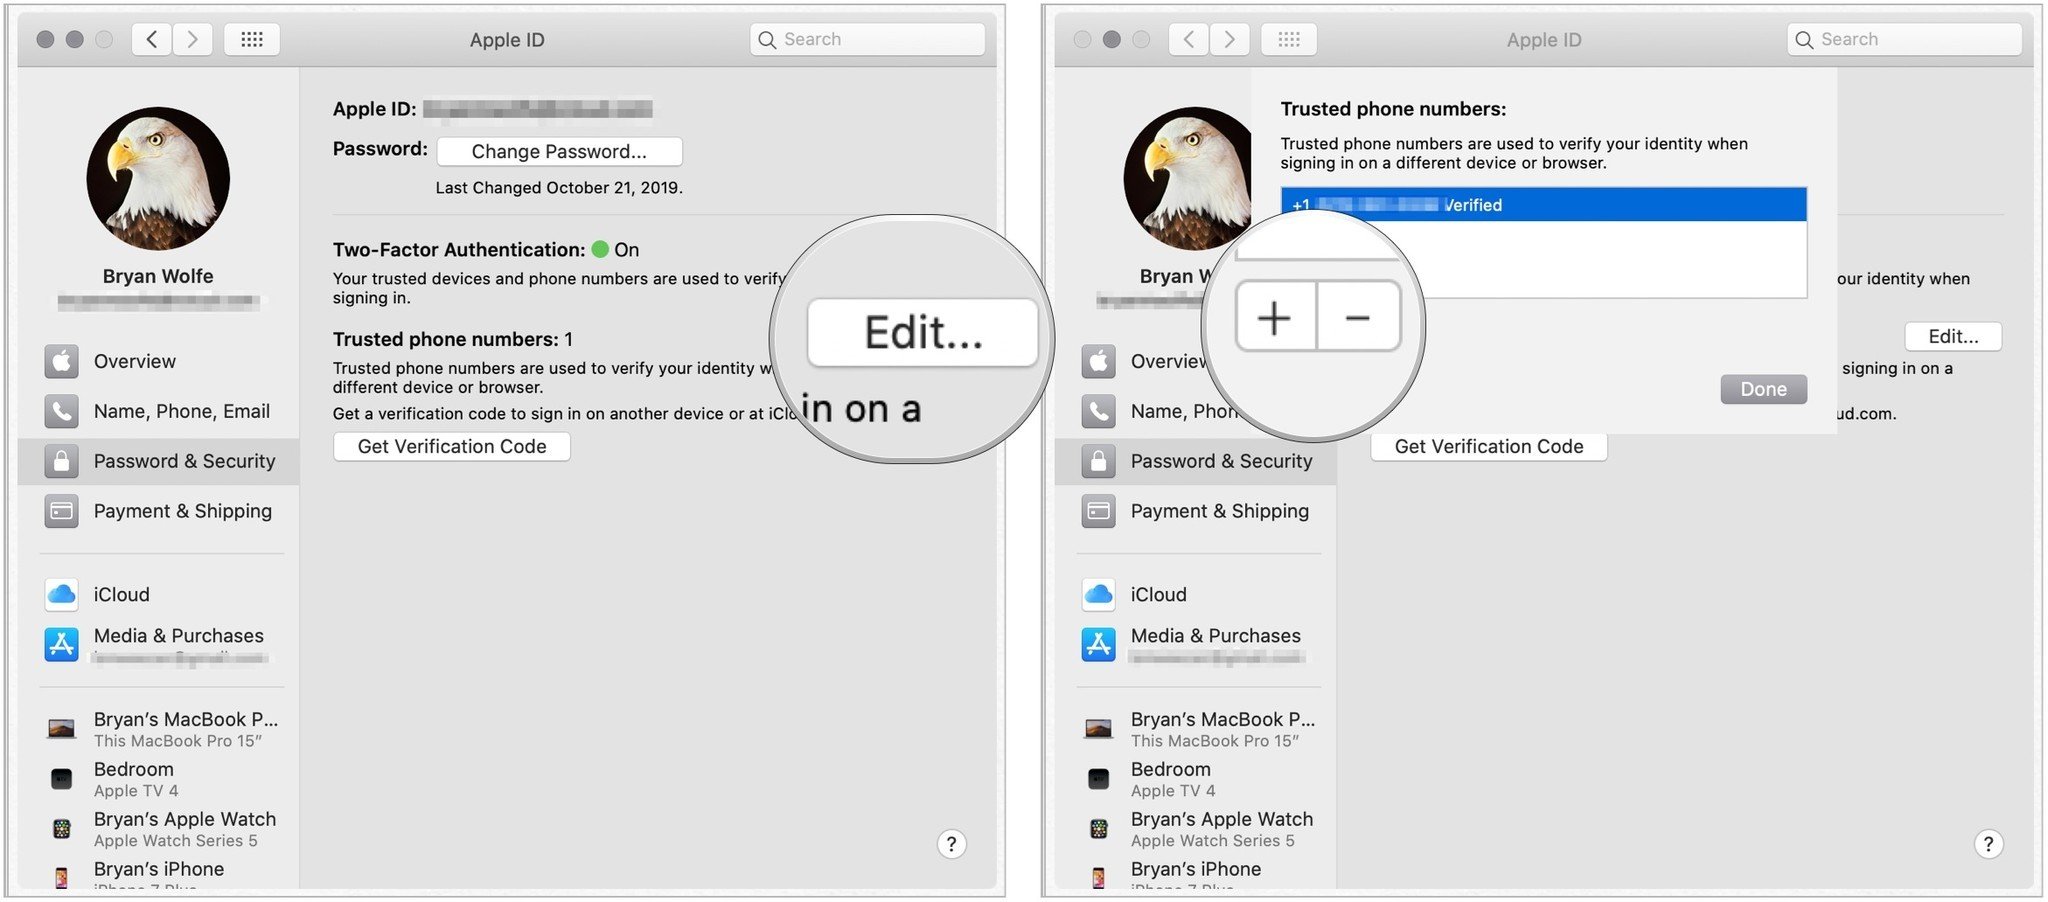
- Confirm your computer password, when applicable.
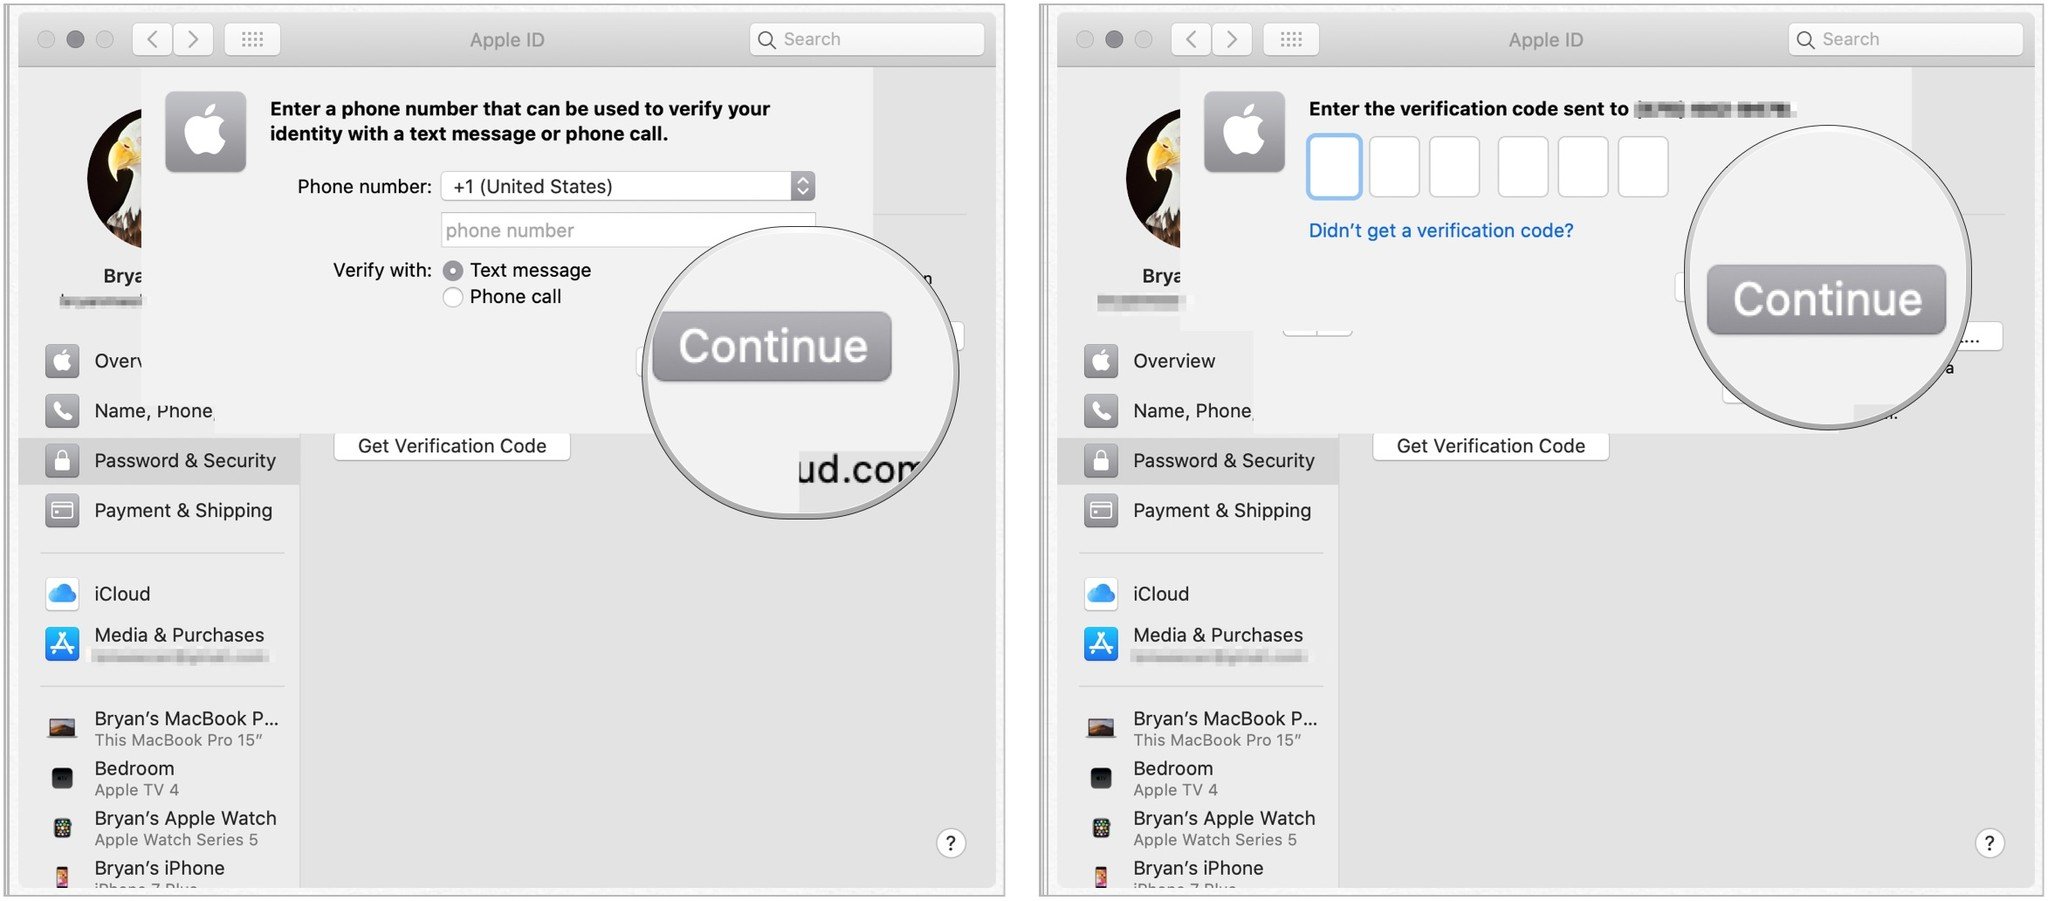
- Added new phone number.
- Toggle how you want to verify the new number, either through a text message or phone call.
- Click Continue.
- Add the verification code you receive.
- Click Continue.
To delete a trusted phone number:
- Under Apple ID, click Password & Security on the left side of the window.
- Click Edit next to Trusted phone numbers.
- Highlight the number to delete.
- Click -.
- Confirm the deletion.
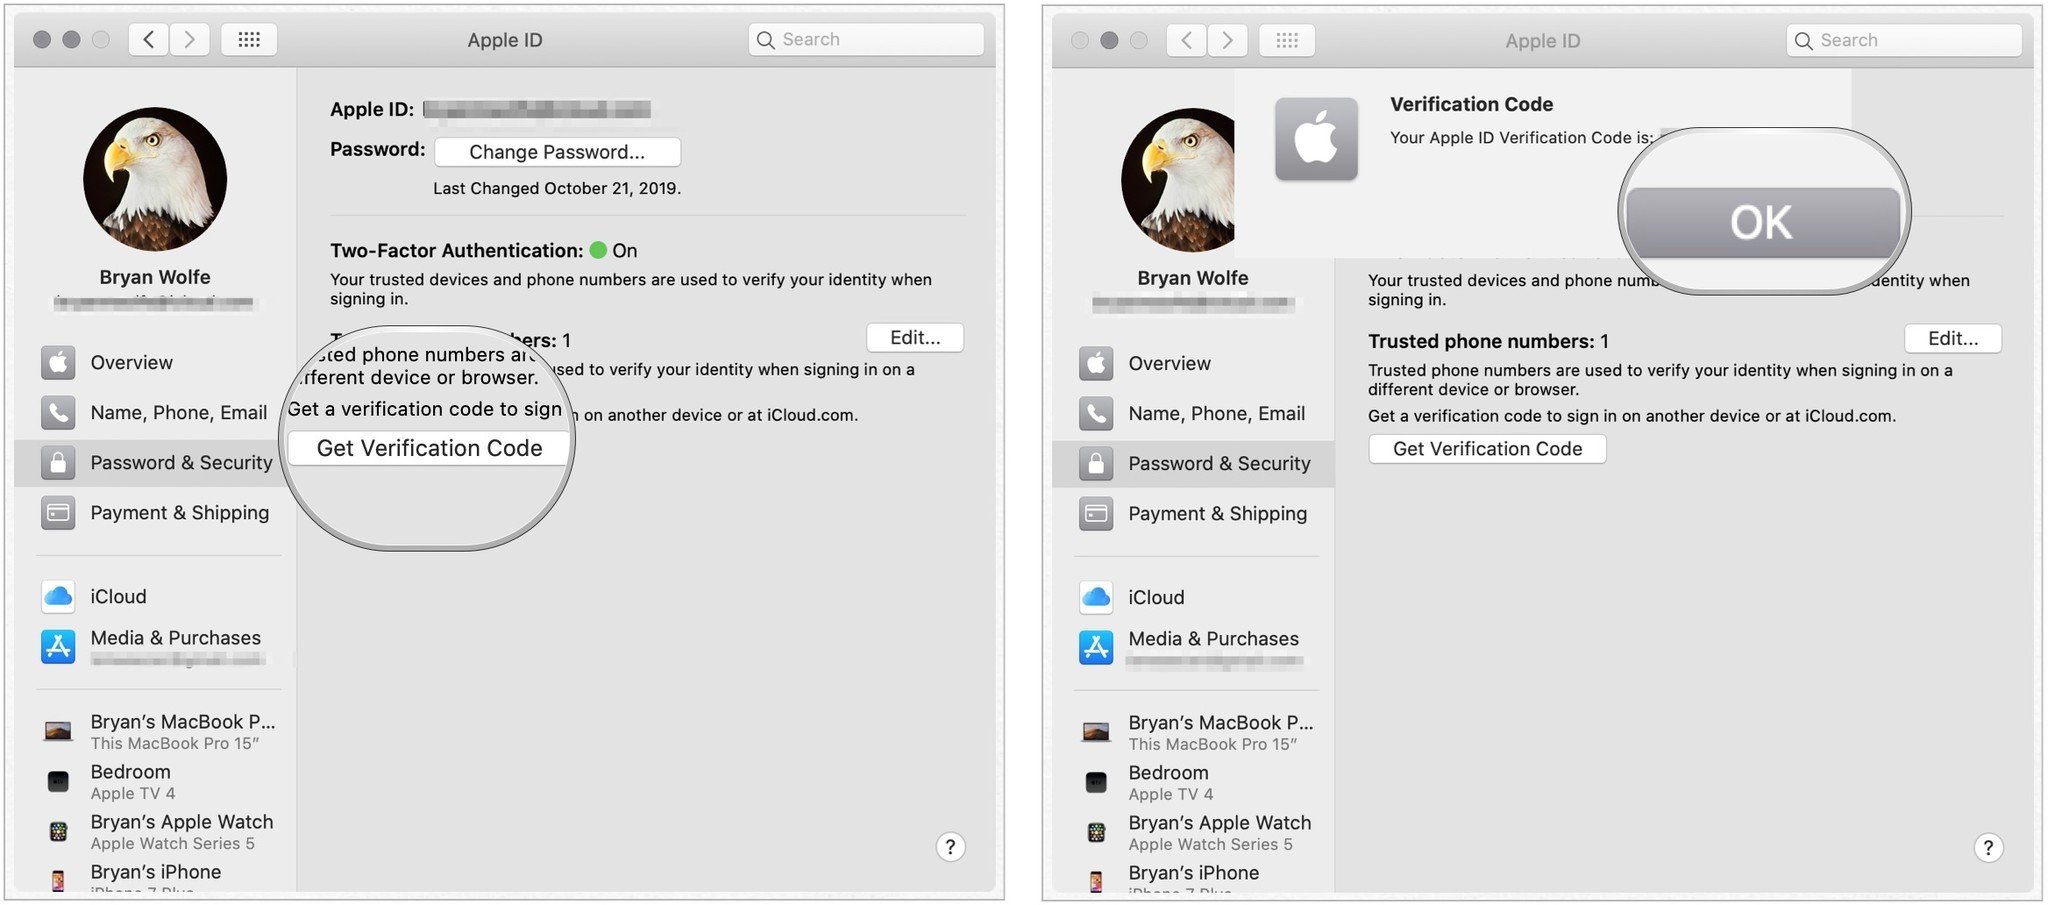
To generation a verification code:
Trusted phone numbers are used to verify your identity on other devices. You can generate a code to sign in to another device or at iCloud.com. To do so:
- Under Apple ID, click Password & Security on the left side of the window.
- Click Get Verification Code.
- Note the code.
- Click OK.
How to set up your Apple ID payment method and shipping address on Mac
You use the payment and shipping preferences in macOS to change the payment and shipping information associated with your Apple ID.
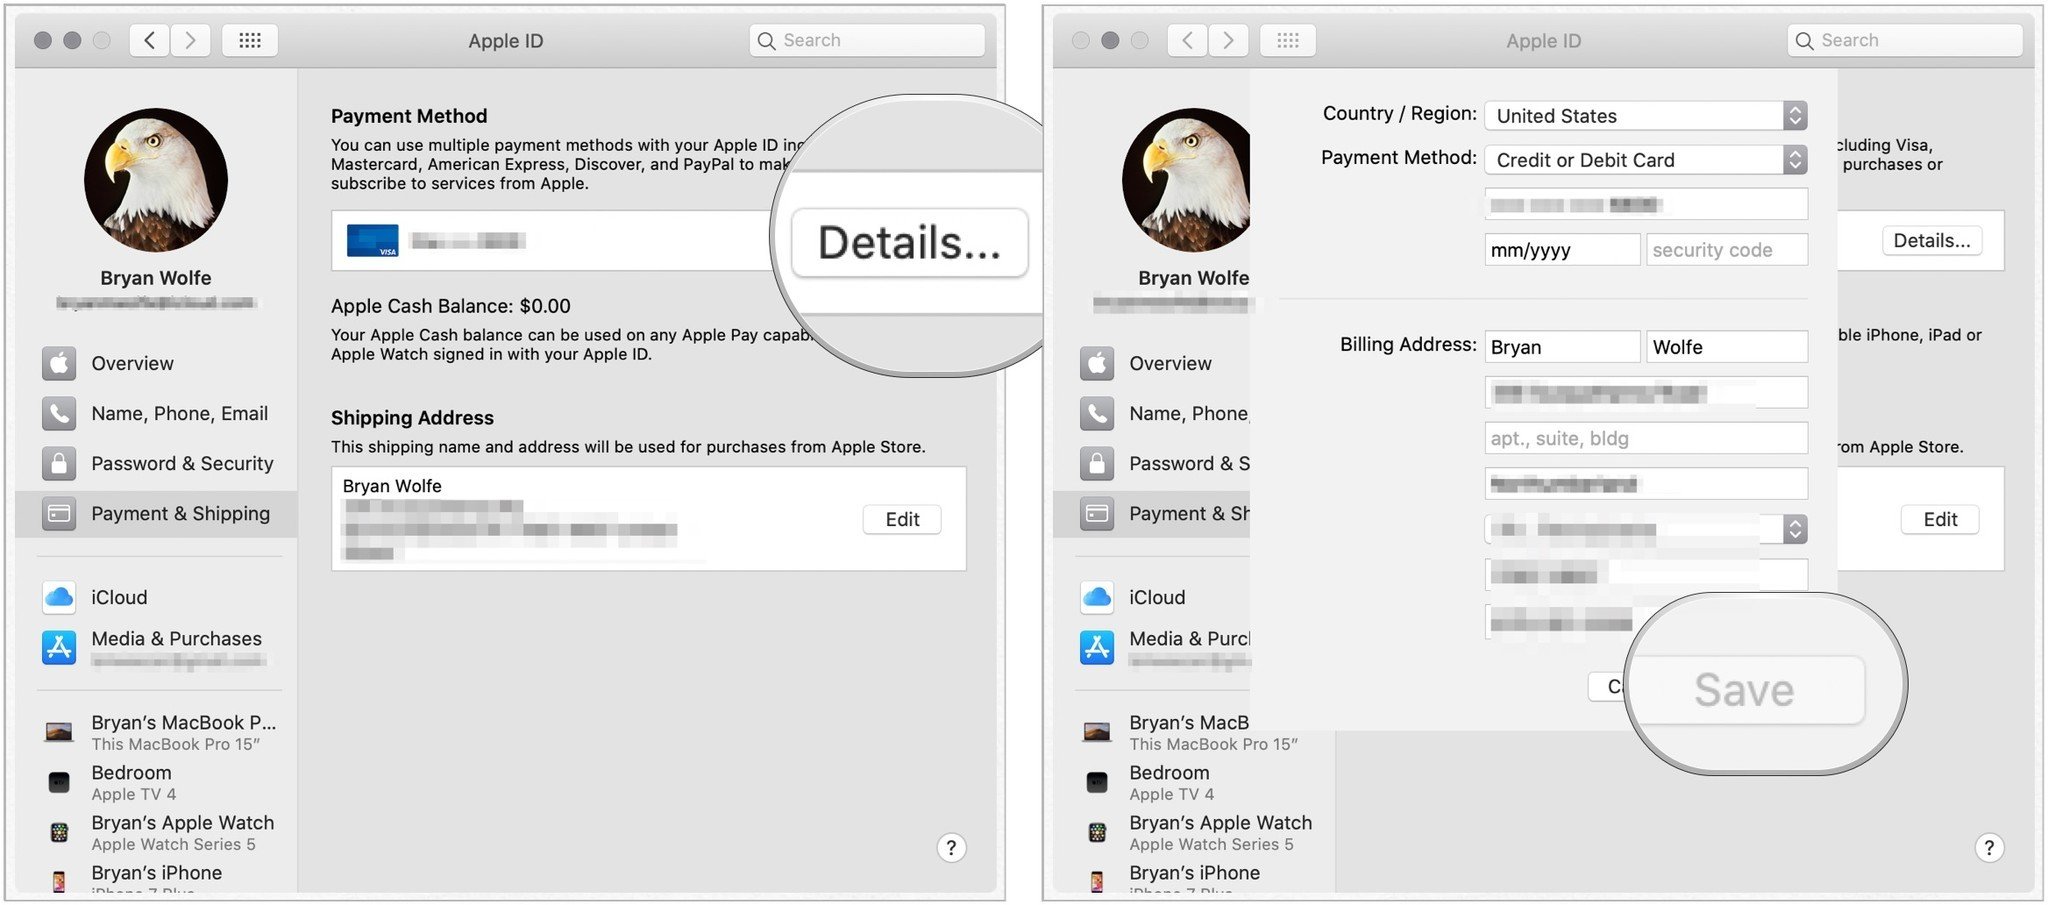
To change payment information:
- Under Apple ID, click Payment & Shipping on the left side of the window.
- Click Detail to change your credit or bank card information.
- Add the payment method and billing address.
- Click Save to confirm.
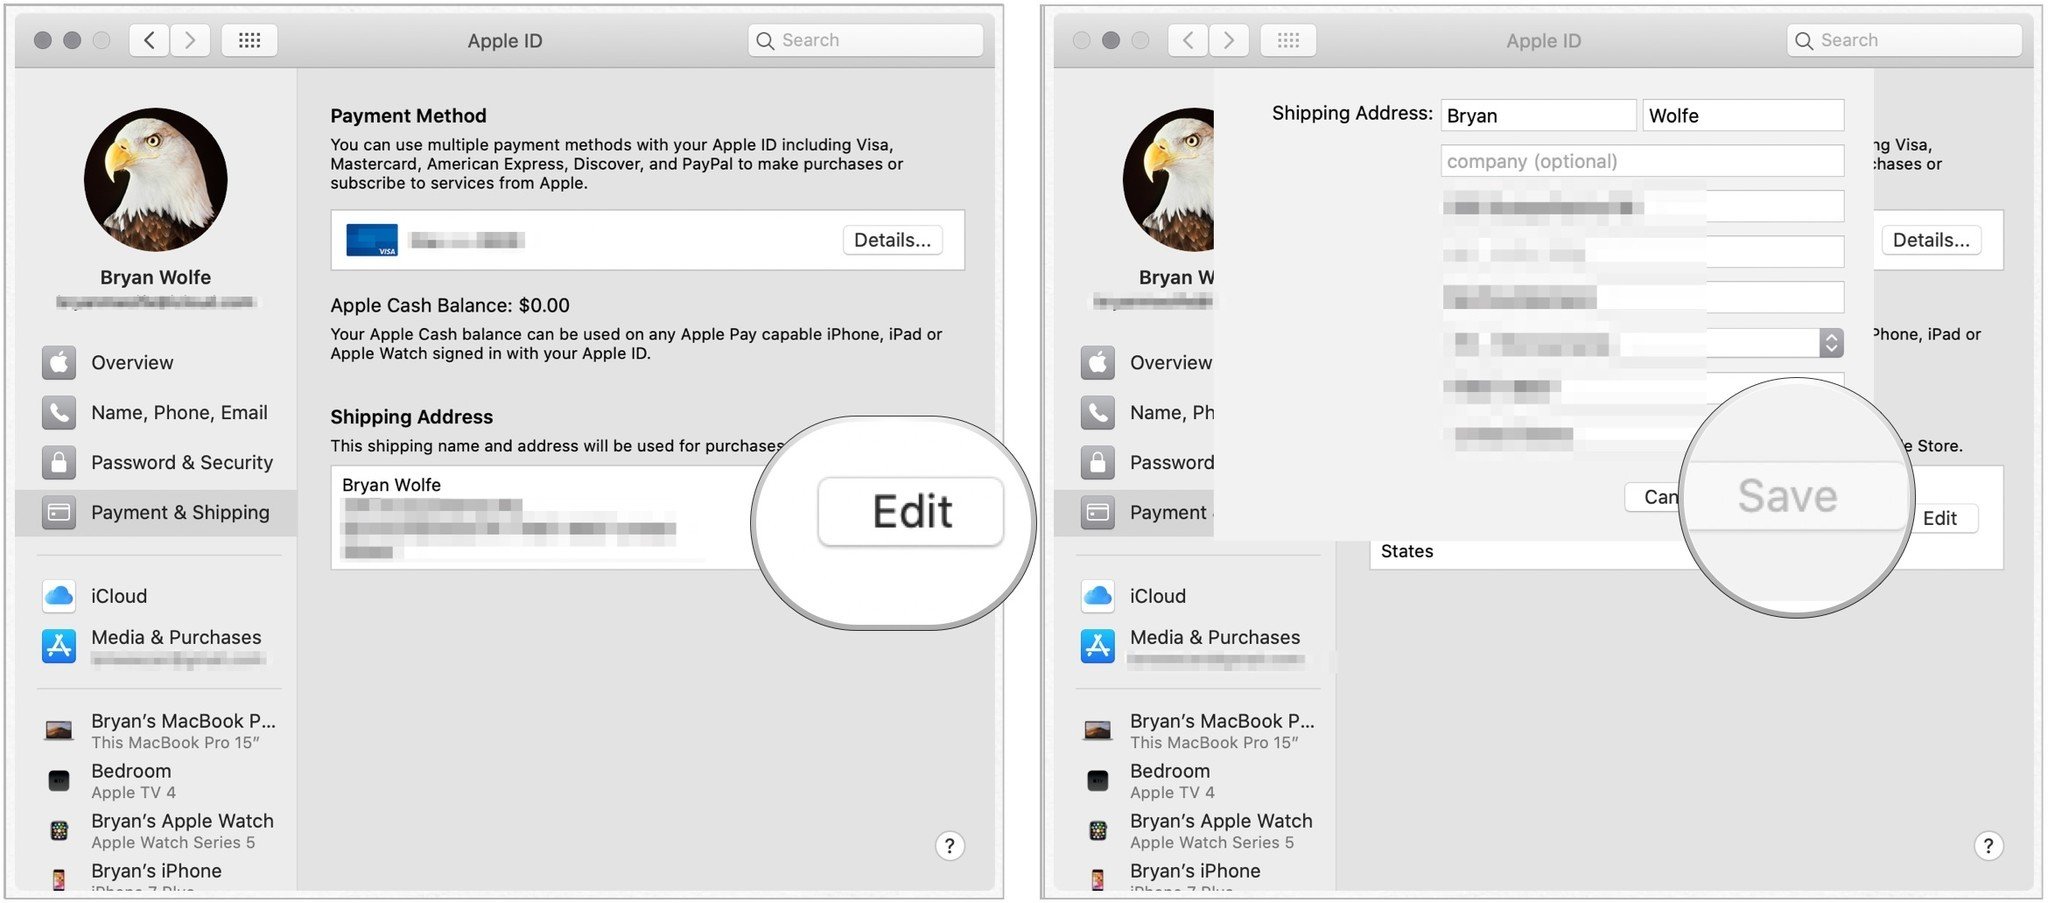
To change the shipping method associated with your Apple ID:
- Under Apple ID, click Payment & Shipping on the left side of the window.
- Click Edit to change your address.
- Add the address.
- Click Save to confirm.
How to set up your Apple ID iCloud settings on Mac
You can organize which of your Mac apps use iCloud and also examine and change iCloud Storage under Apple ID on your computer.
To add or remove Mac apps that use iCloud:
- Under Apple ID, click iCloud on the left side of the window.
- Check the Apple Mac apps to use with iCloud.
- Click Options or Details buttons next to any app that has additional settings.
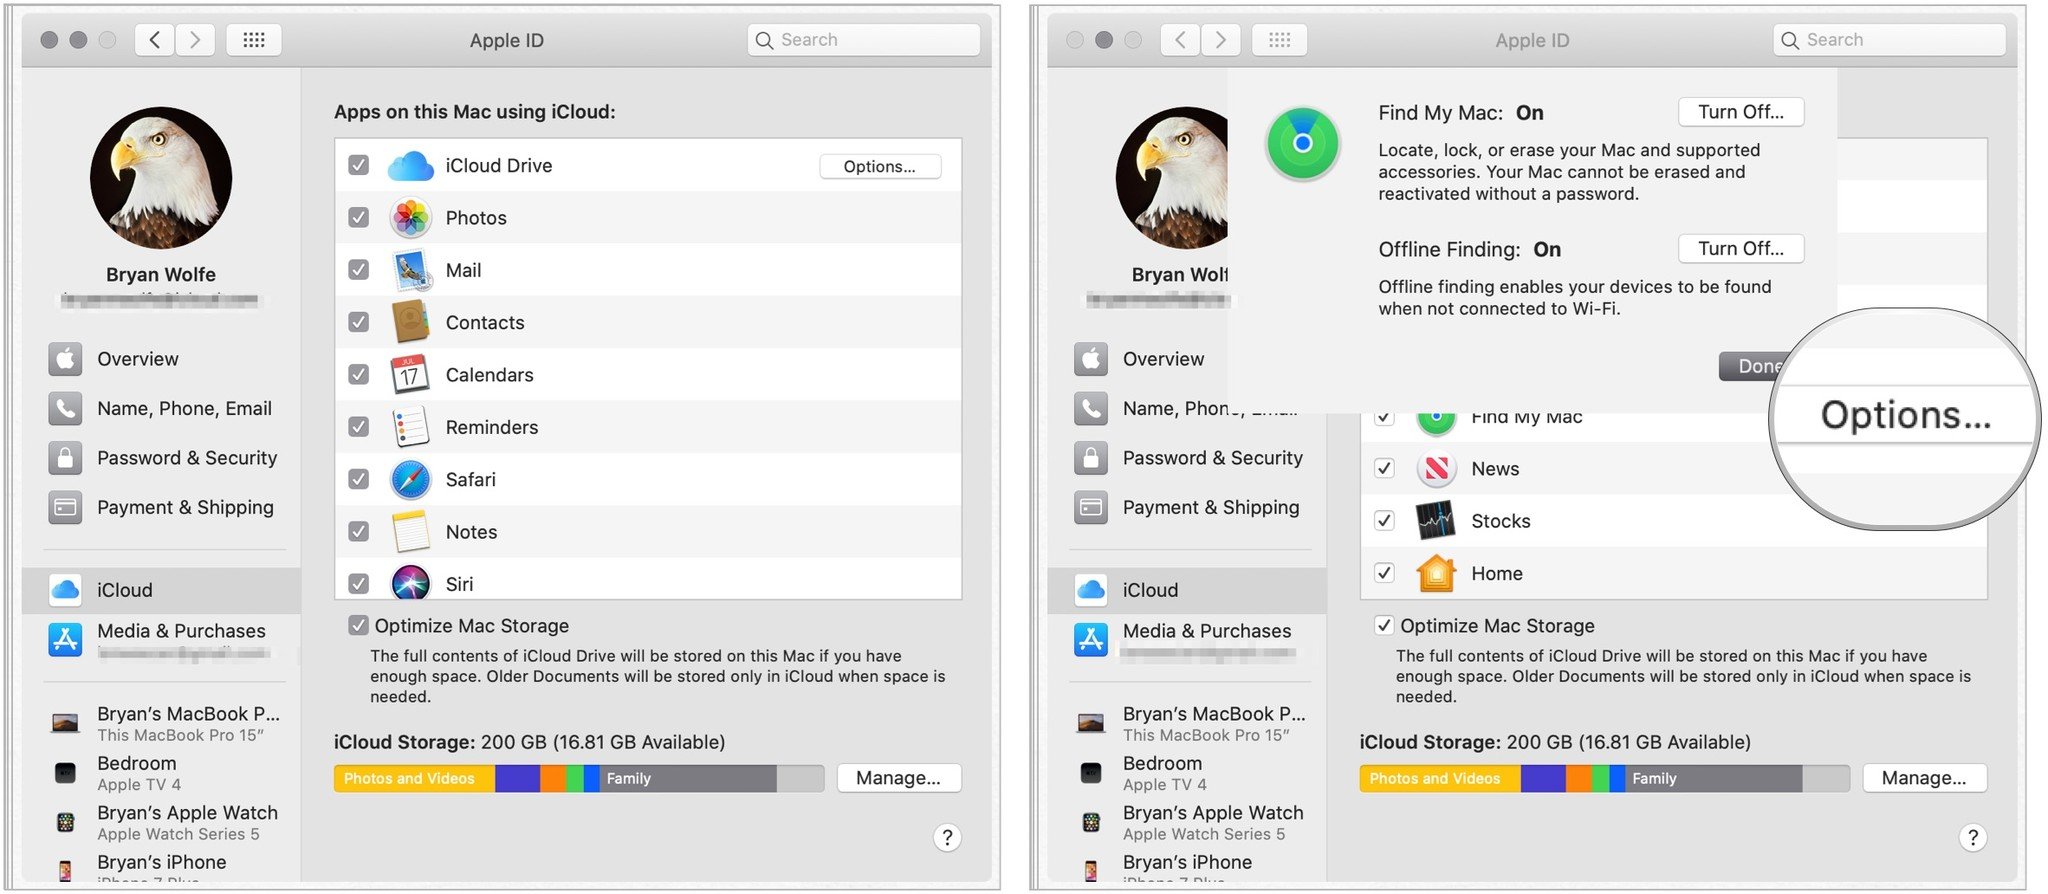
The following apps may have an Options or Details button in this location:
- iCloud Drive: You'll find information on the apps that store data and documents in iCloud.
- Photos: When iCloud Photos are turned on, you'll see further details.
- Keychain: An option button appears when you aren't using two-factor authentication. Click the button for more information.
- Find My: Use this to turn Find My on/off.
Optimize Mac Storage: Select this checkbox to store the full contents of iCloud Drive on your Mac if there is enough disk space. Older documents are stored only in iCloud when disk space is needed.
To review and change iCloud storage:
- Under Apple ID, click iCloud on the left side of the window.
- Check the Apple Mac apps to use with iCloud.
- Click Manage next to iCloud Manage.
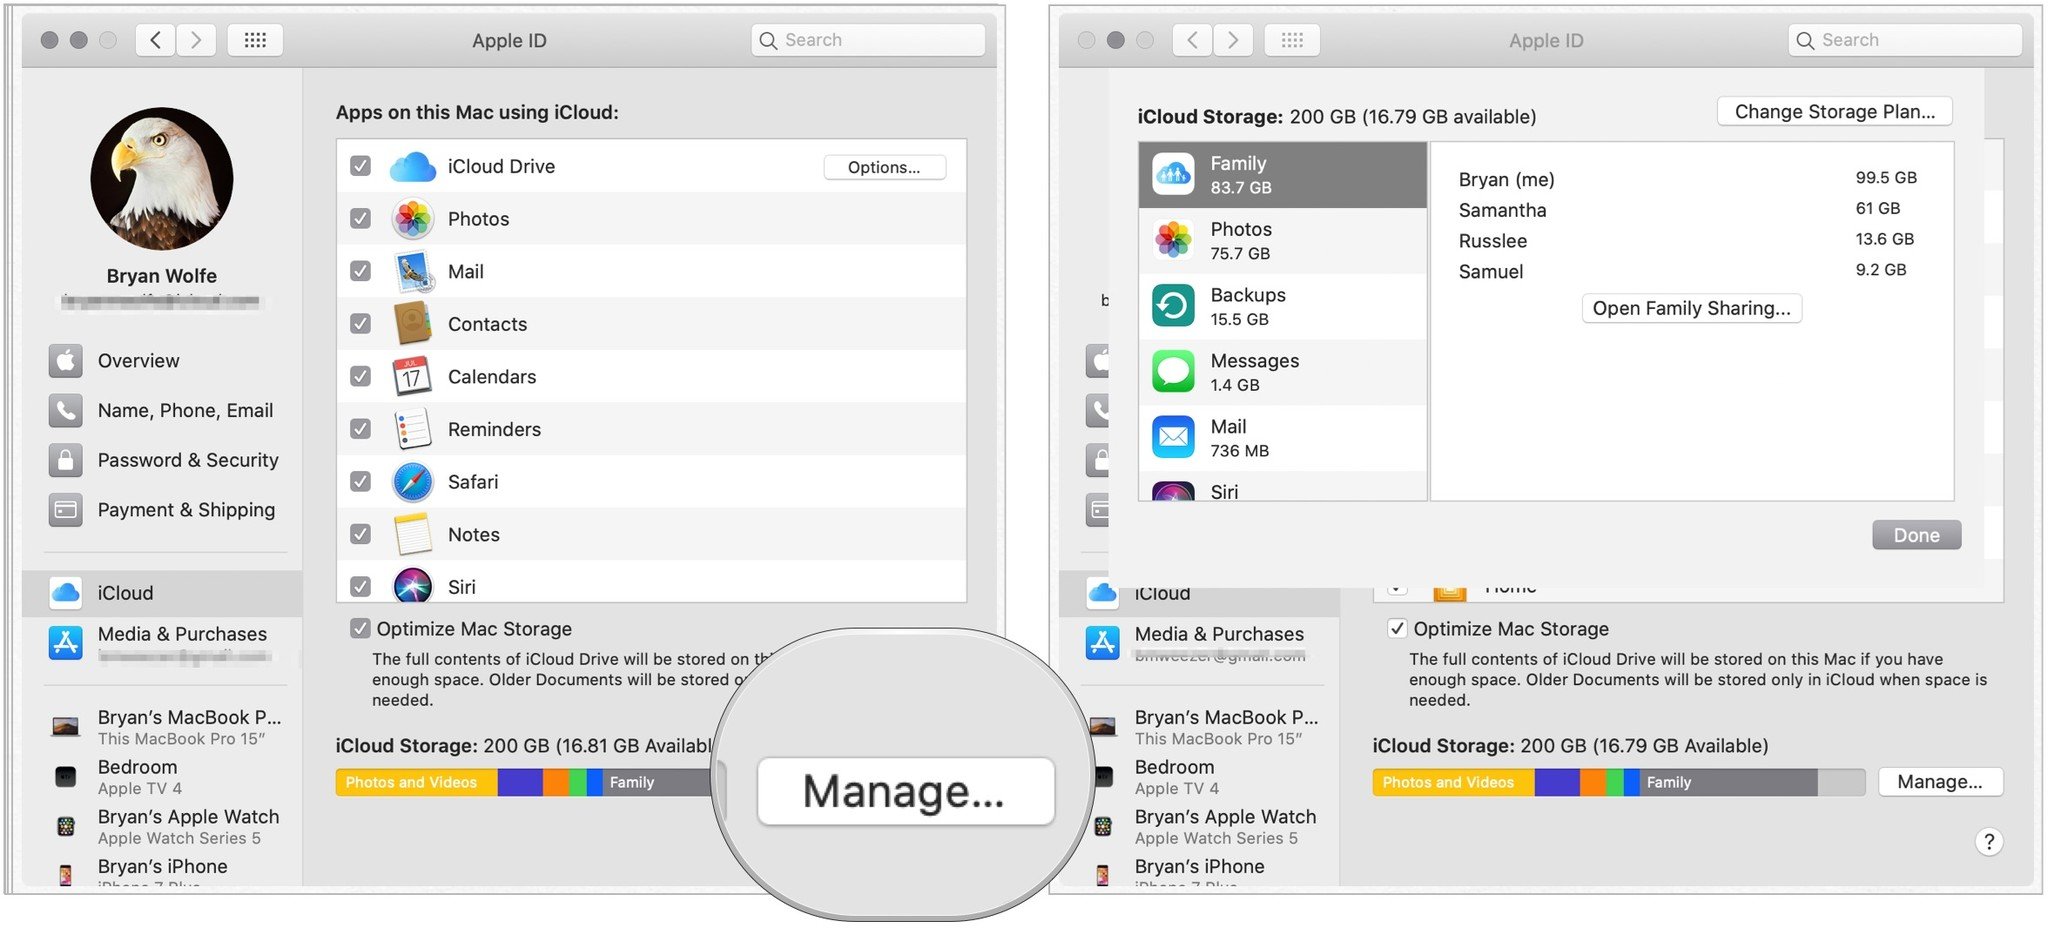
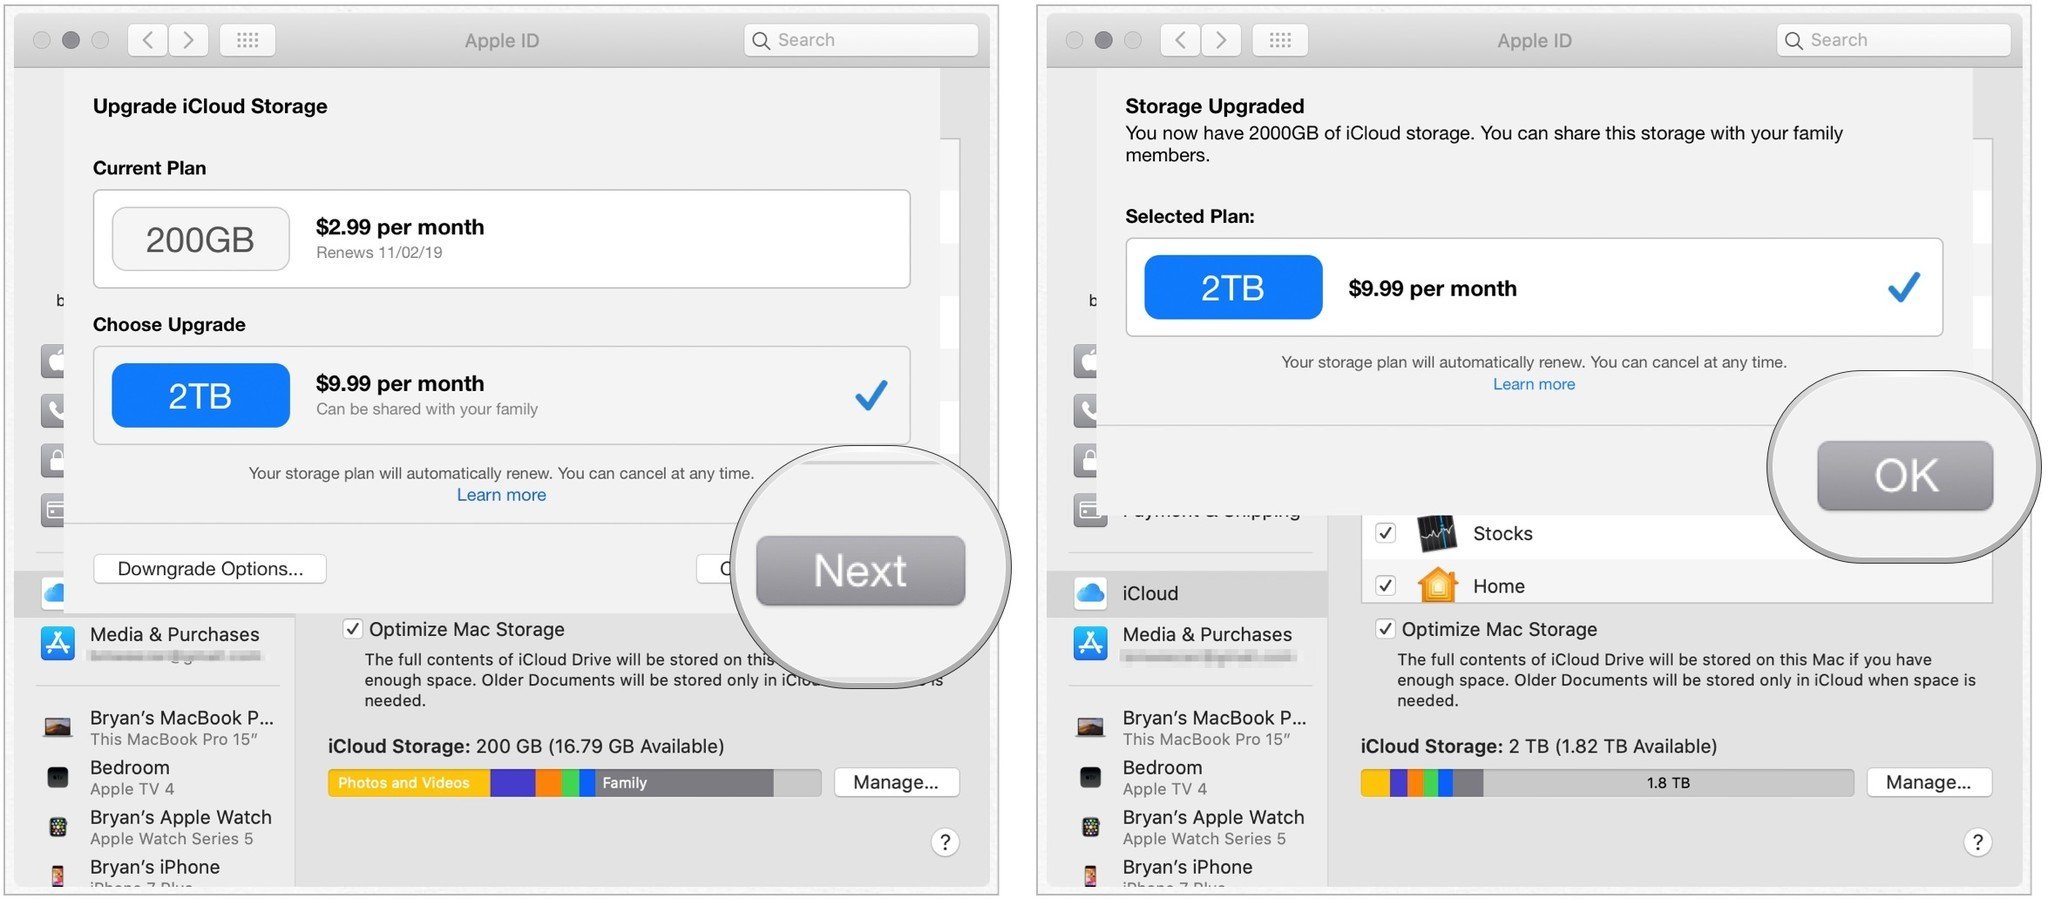
- Click Change iCloud Storage Plan to review and change your plan.
- Choose a new storage plan.
- Click Next.
- Confirm your iCloud login, when applicable.
- Click OK.
To review iCloud storage details:
- Under Apple ID, click iCloud on the left side of the window.
- Click Manage next to iCloud Manage.
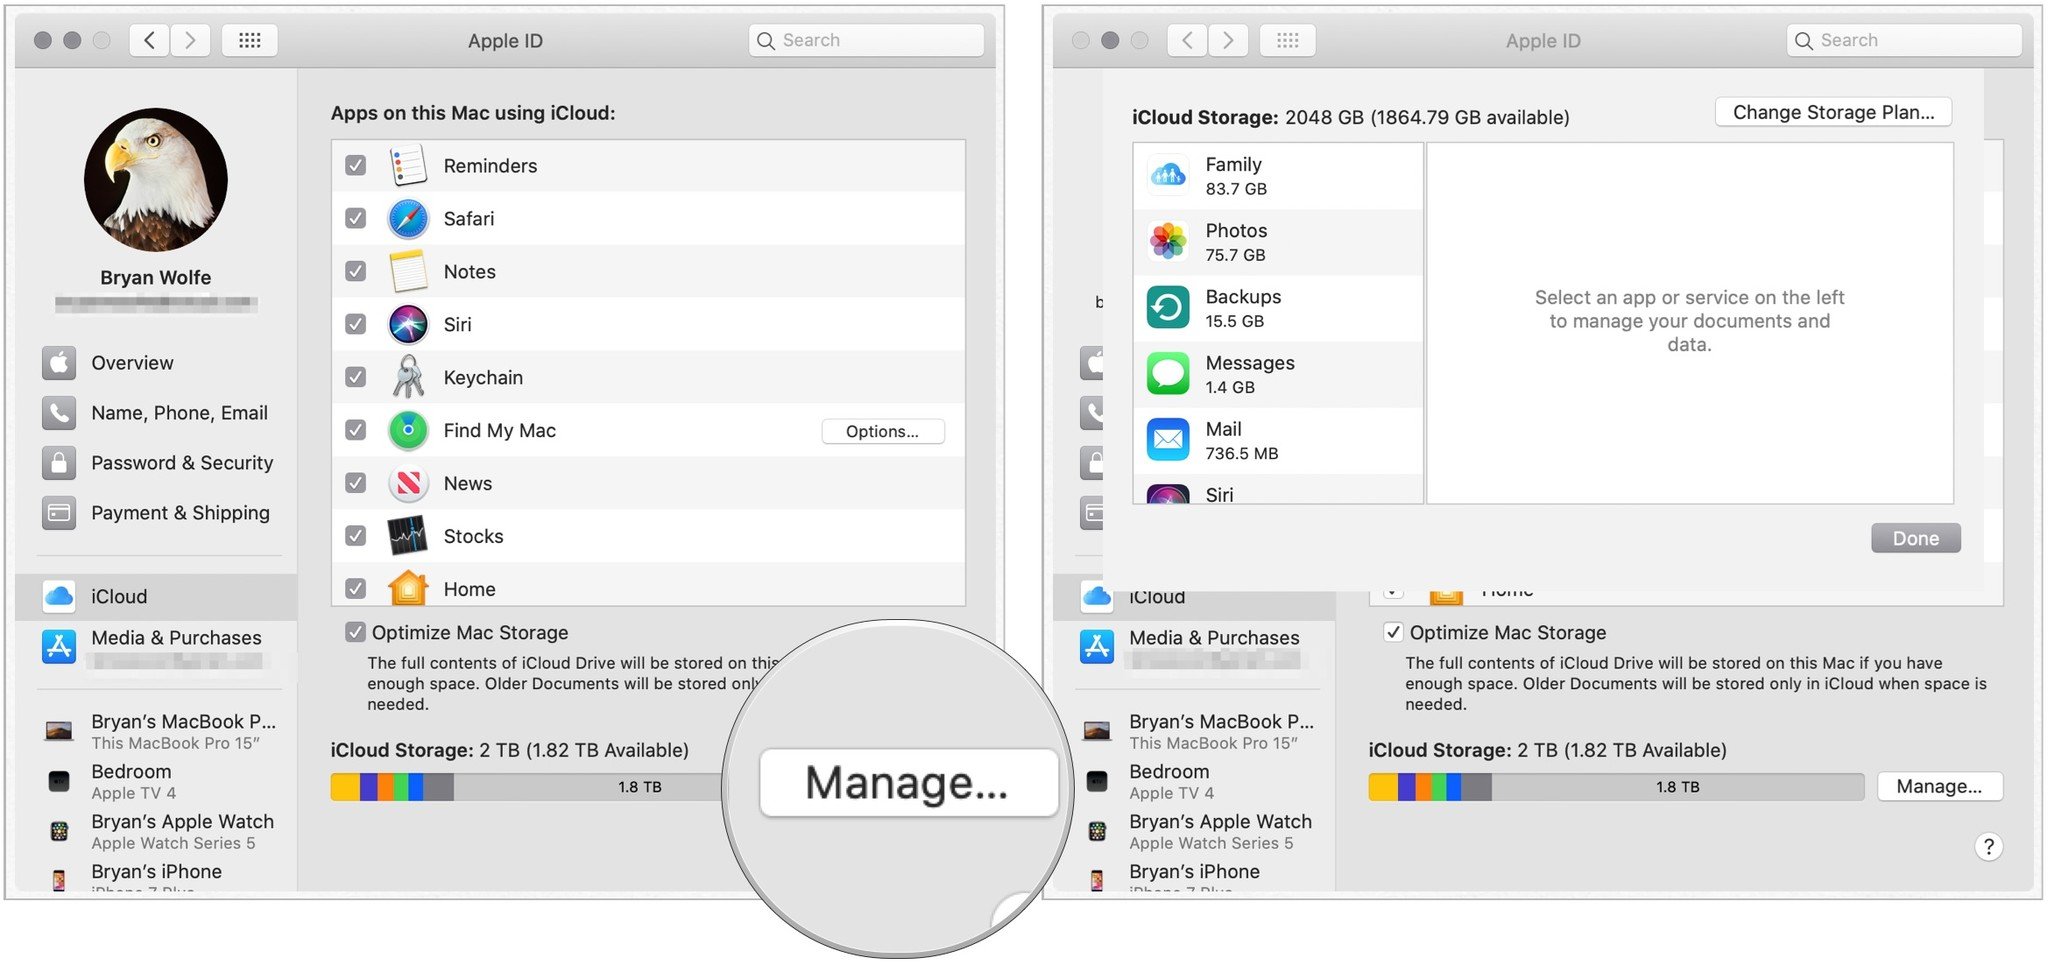
On the left side of the screen, you can adjust the following settings:
- Family: View members of your family and the amount of iCloud storage each is using; click Open Family Sharing for more information.
- Photos: You can turn off iCloud Photos by clicking Turn Off and Delete.
- Backups: Locate the latest backup information for each device; highlight, then click - to delete the backup.
- Messages: To stop using Messages in a Cloud, click Turn Off and Delete.
- Mail: Select Open Mail.
- Siri: Choose Disable and Delete to stop using the Apple voice assistant on Mac.
How to set up your Apple ID media and purchase settings on Mac
To change your Apple ID media and purchase settings on Mac:
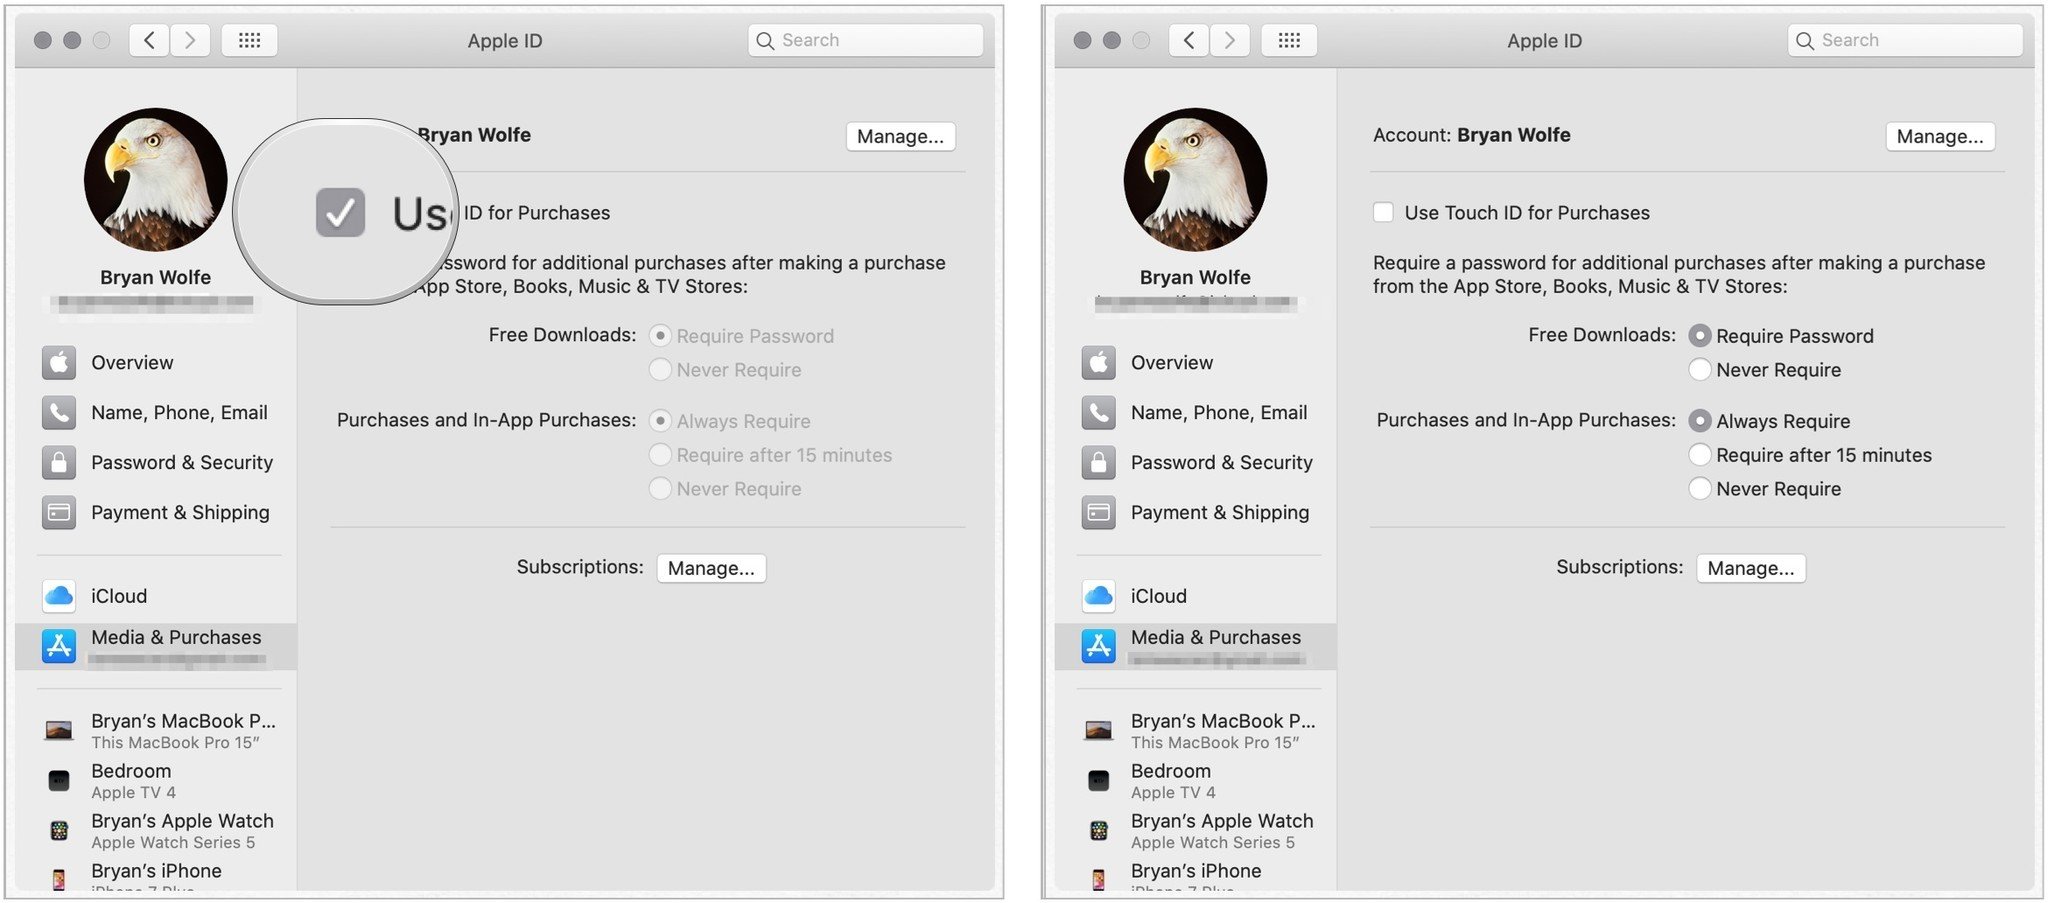
- Under Apple ID, click Media & Purchases on the sidebar.
- Check the Use Touch ID for Purchase, if applicable. Otherwise, you can decide when to require a password for purchases made on the App Store, Books, Music. and TV Stores
- For free downloads, the choices are Require Password, or Never Require Password.
- For purchases and in-app purchases, the options are Always Require Password, Require after 15 minutes, and Never Require.
You can click Manage next to your account name to review your App Store account. You can also select Manage next to Subscriptions to look at your current App Store subscriptions.
How to view and manage your Apple ID trusted devices on Mac
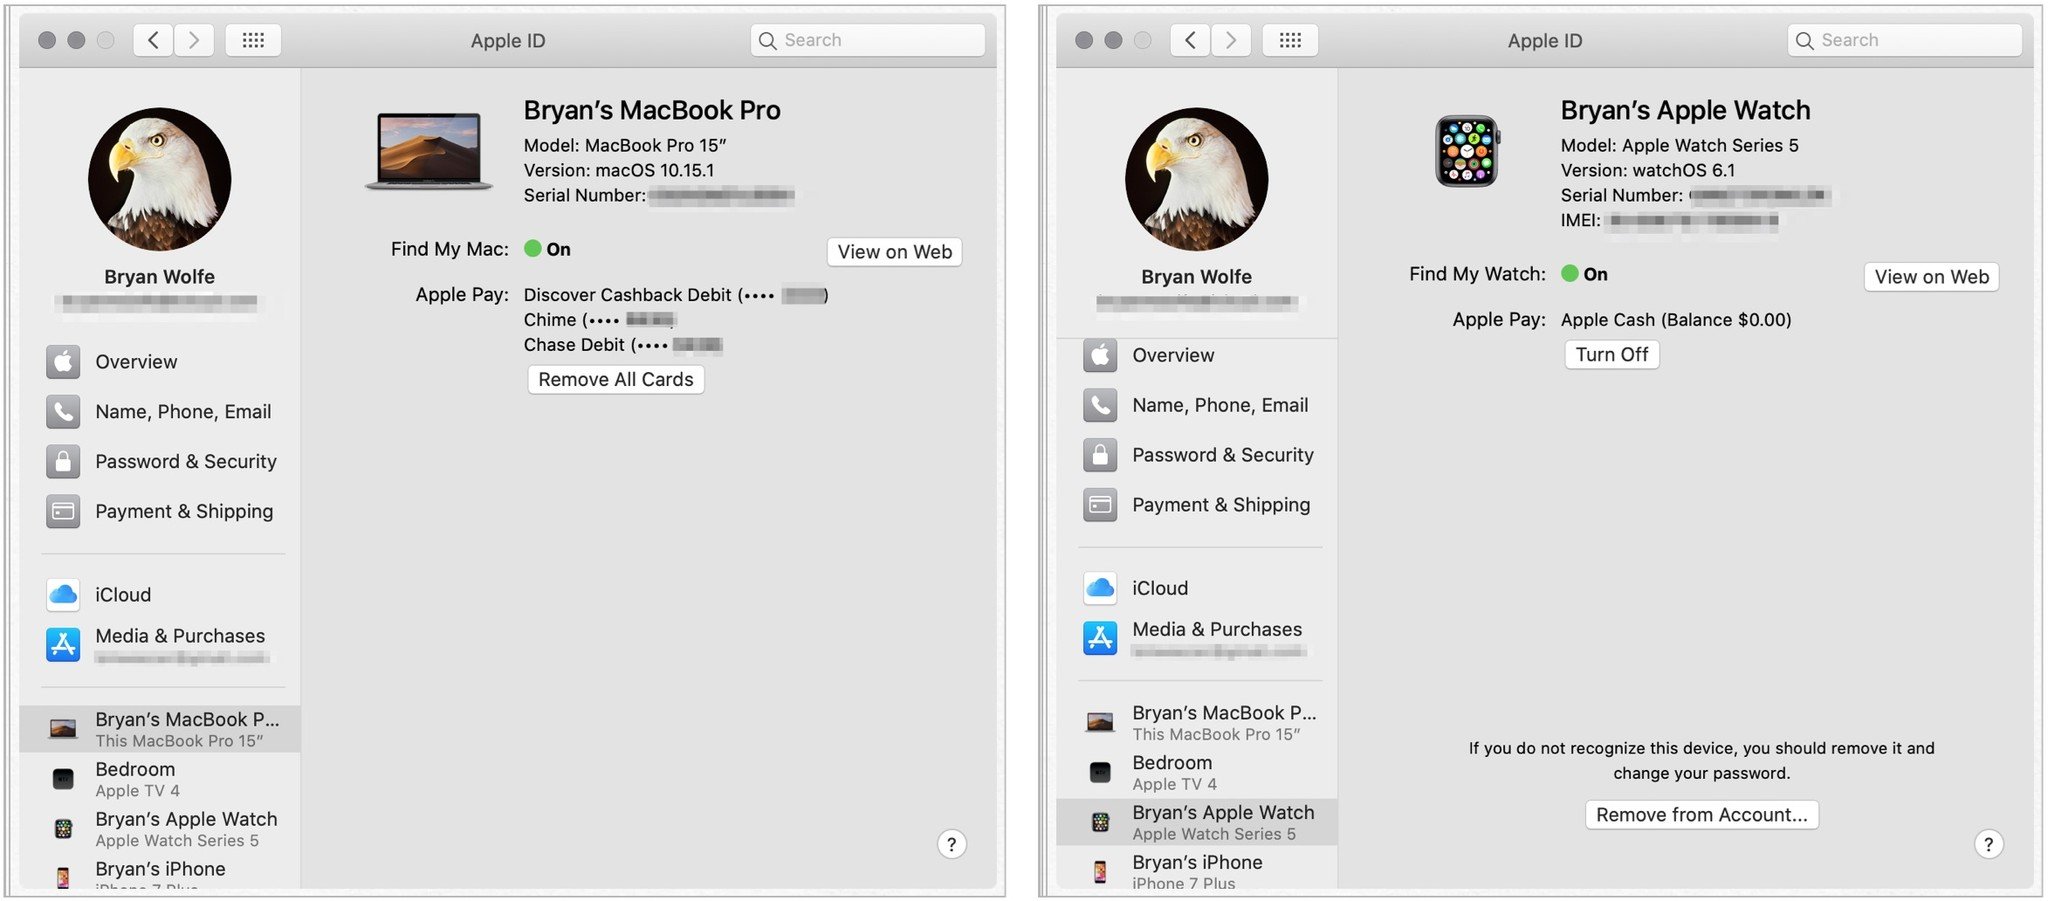
Your trusted Apple devices are available to review under Apple ID on Mac. For each, you'll find a link to Find My on the web. There's also a button to use to remove Apple Pay from the device(s), when applicable. You can also remove the devices from the same location.
Questions?
Leave your questions and comments about macOS Catalina or Apple ID below.

Bryan M. Wolfe has written about technology for over a decade on various websites, including TechRadar, AppAdvice, and many more. Before this, he worked in the technology field across different industries, including healthcare and education. He’s currently iMore’s lead on all things Mac and macOS, although he also loves covering iPhone, iPad, and Apple Watch. Bryan enjoys watching his favorite sports teams, traveling, and driving around his teenage daughter to her latest stage show, audition, or school event in his spare time. He also keeps busy walking his black and white cocker spaniel, Izzy, and trying new coffees and liquid grapes.
