How to move an iMovie project from your iPhone or iPad to your Mac

I've been editing quite a few movies on my iPhone 6s and 6s Plus since first picking up Apple's latest smartphones: The Retina screen makes viewing and cutting 4K footage easy, and iMovie for iOS's smart trim tools and easy-to-use interface can do a lot. But it can't do everything, and that's where the Mac comes in. Thanks to iMovie 10.1, you can now move projects you've started on your iPhone or iPad to the Mac for more in-depth edits. Here's how to go about it.
How to move an iMovie project from your iPhone or iPad to your Mac
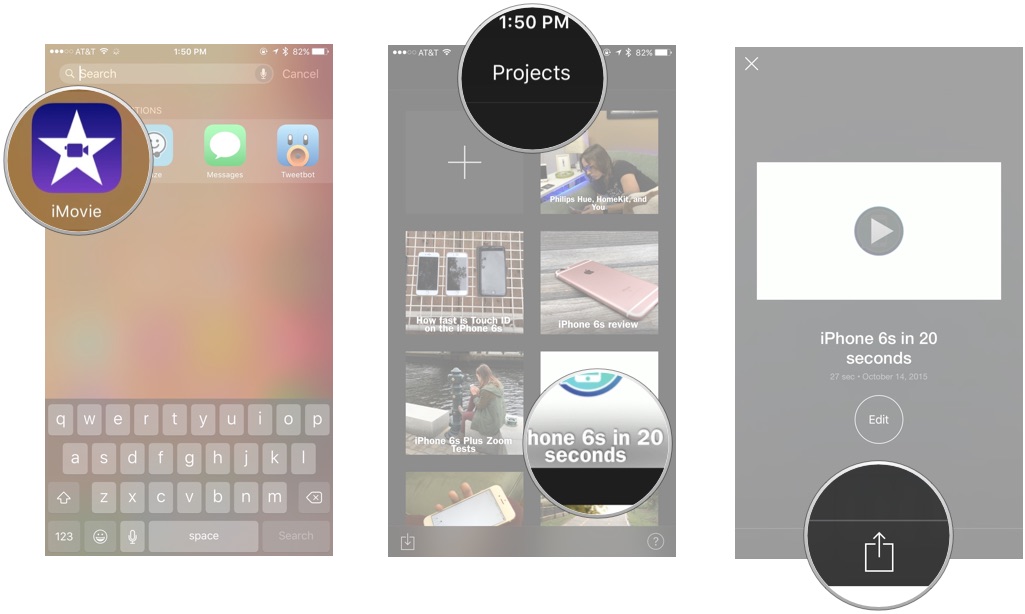
- Open iMovie for iOS on your iPhone or iPad.
- Tap the Projects tab and select the project you want to move.
- Select the Share button at the bottom of the screen.

From here, you have a few different options on how to get your project over to iMovie.
- You can send the project to iCloud Drive, where you can open it on your Mac. This is the slowest method I've found, but it also keeps that project in your iCloud Drive indefinitely.
- You can tether your phone to your computer via USB cable and use iTunes. Fast, but requires a USB cord.
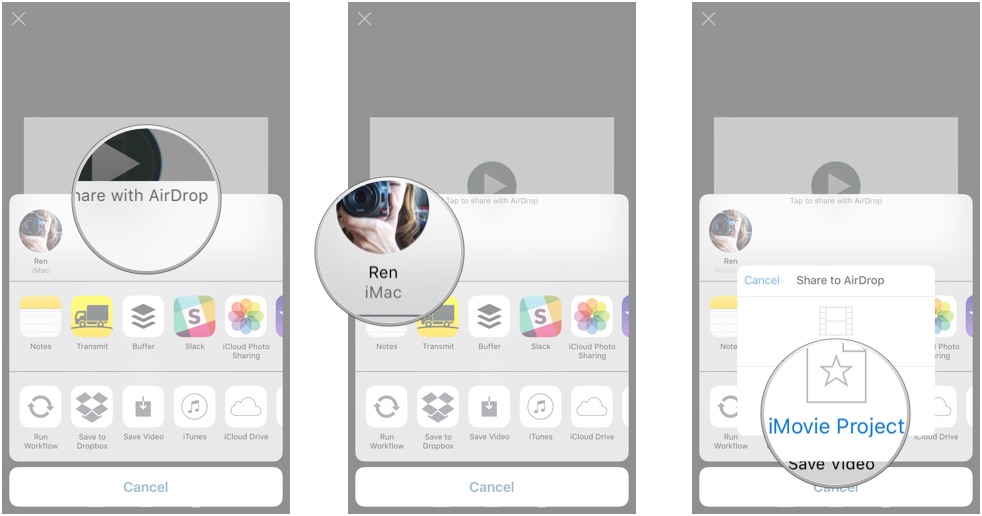
- You can share to your computer via AirDrop: If you have a 2012 or later Mac, you can use iOS-to-Mac AirDrop to wirelessly transfer the file from your iPhone or iPad to your Mac. This is my favorite method, and the one we'll talk about below.
- Wait for your Mac to show up under the AirDrop menu on the Share screen.
- Once it does, tap on the icon.
- Your project will first begin preparing; after it's finished, it will start sending it to your computer.

This might take a little while—especially if you have 4K footage!—so you may want to go find a tasty beverage while doing this.
How to open iMovie for iOS projects on your Mac
- Open iMovie for OS X on your Mac.
- If you used AirDrop or iTunes, you'll find your iMovie for iOS project in your Mac's Downloads folder. Otherwise, you can select the following menu in iMovie: File > Import iMovie iOS Projects.
- After a few minutes of import, your project should appear identical to its iOS form in the iMovie for OS X timeline: Everything gets transferred over, from video effects to audio clip placement. You'll also get the full versions of all clips you've used in your project, stored in the My Media browser.

Note: I've seen iMovie occasionally hang when trying to import new projects, which I expect is a tiny 4K-related bug; if it freezes for more than ten minutes on you, my best advice is to force quit the program and try re-importing.
How to move iMovie projects on your iPhone or iPad to Final Cut Pro
If iMovie for OS X won't cutting it, you can jump all the way up to Final Cut Pro. Here's how.
- Follow all the steps above to import your project into iMovie for OS X.
- Go to File > Send Movie to Final Cut Pro.
- Your film will then export and automatically open Final Cut Pro.

Can I move projects back to my iPhone or iPad?
Not at this time, sadly. You can keep working on the project file you exported—it opens in either iOS or OS X—but once you import it into iMovie on the Mac, you're stuck editing in the Mac environment.
Questions?
Let us know below and we'll try our best to address them.
Master your iPhone in minutes
iMore offers spot-on advice and guidance from our team of experts, with decades of Apple device experience to lean on. Learn more with iMore!
Serenity was formerly the Managing Editor at iMore, and now works for Apple. She's been talking, writing about, and tinkering with Apple products since she was old enough to double-click. In her spare time, she sketches, sings, and in her secret superhero life, plays roller derby. Follow her on Twitter @settern.

