How to share location, contacts, and more with iMessage on iPhone or iPad
iMore offers spot-on advice and guidance from our team of experts, with decades of Apple device experience to lean on. Learn more with iMore!
You are now subscribed
Your newsletter sign-up was successful
iMessage lets you send more than just text, images, and video. You can also send contact cards, voice memos, map locations, and more. You do have to go to other apps to fetch the information you want to send, but once you're there, the Share Sheet makes it easy.
- How to share a contact card via Messages using the Contacts app on iPhone and iPad
- How to send Map locations and directions via iMessage on iPhone and iPad
- How to send a voice memo through iMessage on iPhone and iPad
How to share a contact card via iMessages using the Contacts app on iPhone and iPad
Sharing contact information with friends has never been easier than with iMessage.
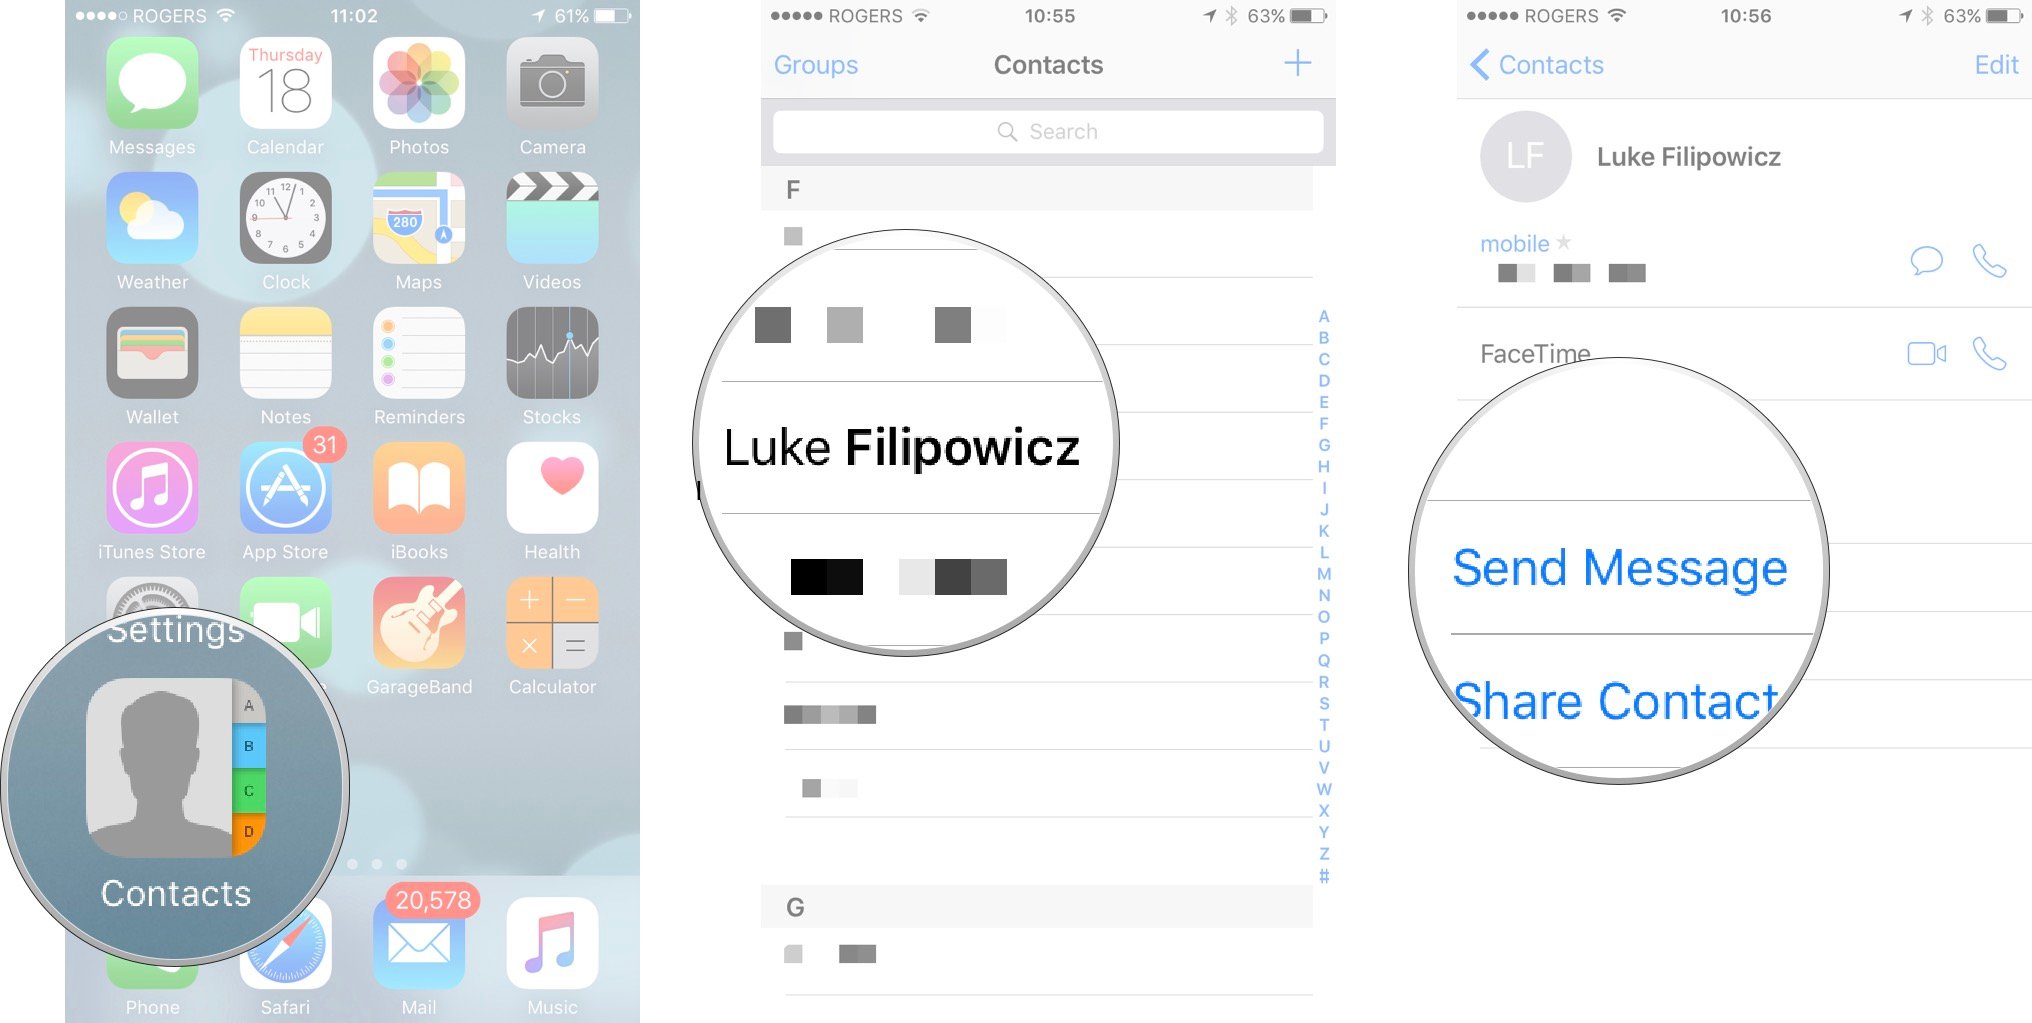
- Launch the Contacts app. On the iPhone you can alternately use the Phone app if you'd prefer.
- Find and tap the Contact you'd like to share.
- Now tap on Share Contact towards the bottom.
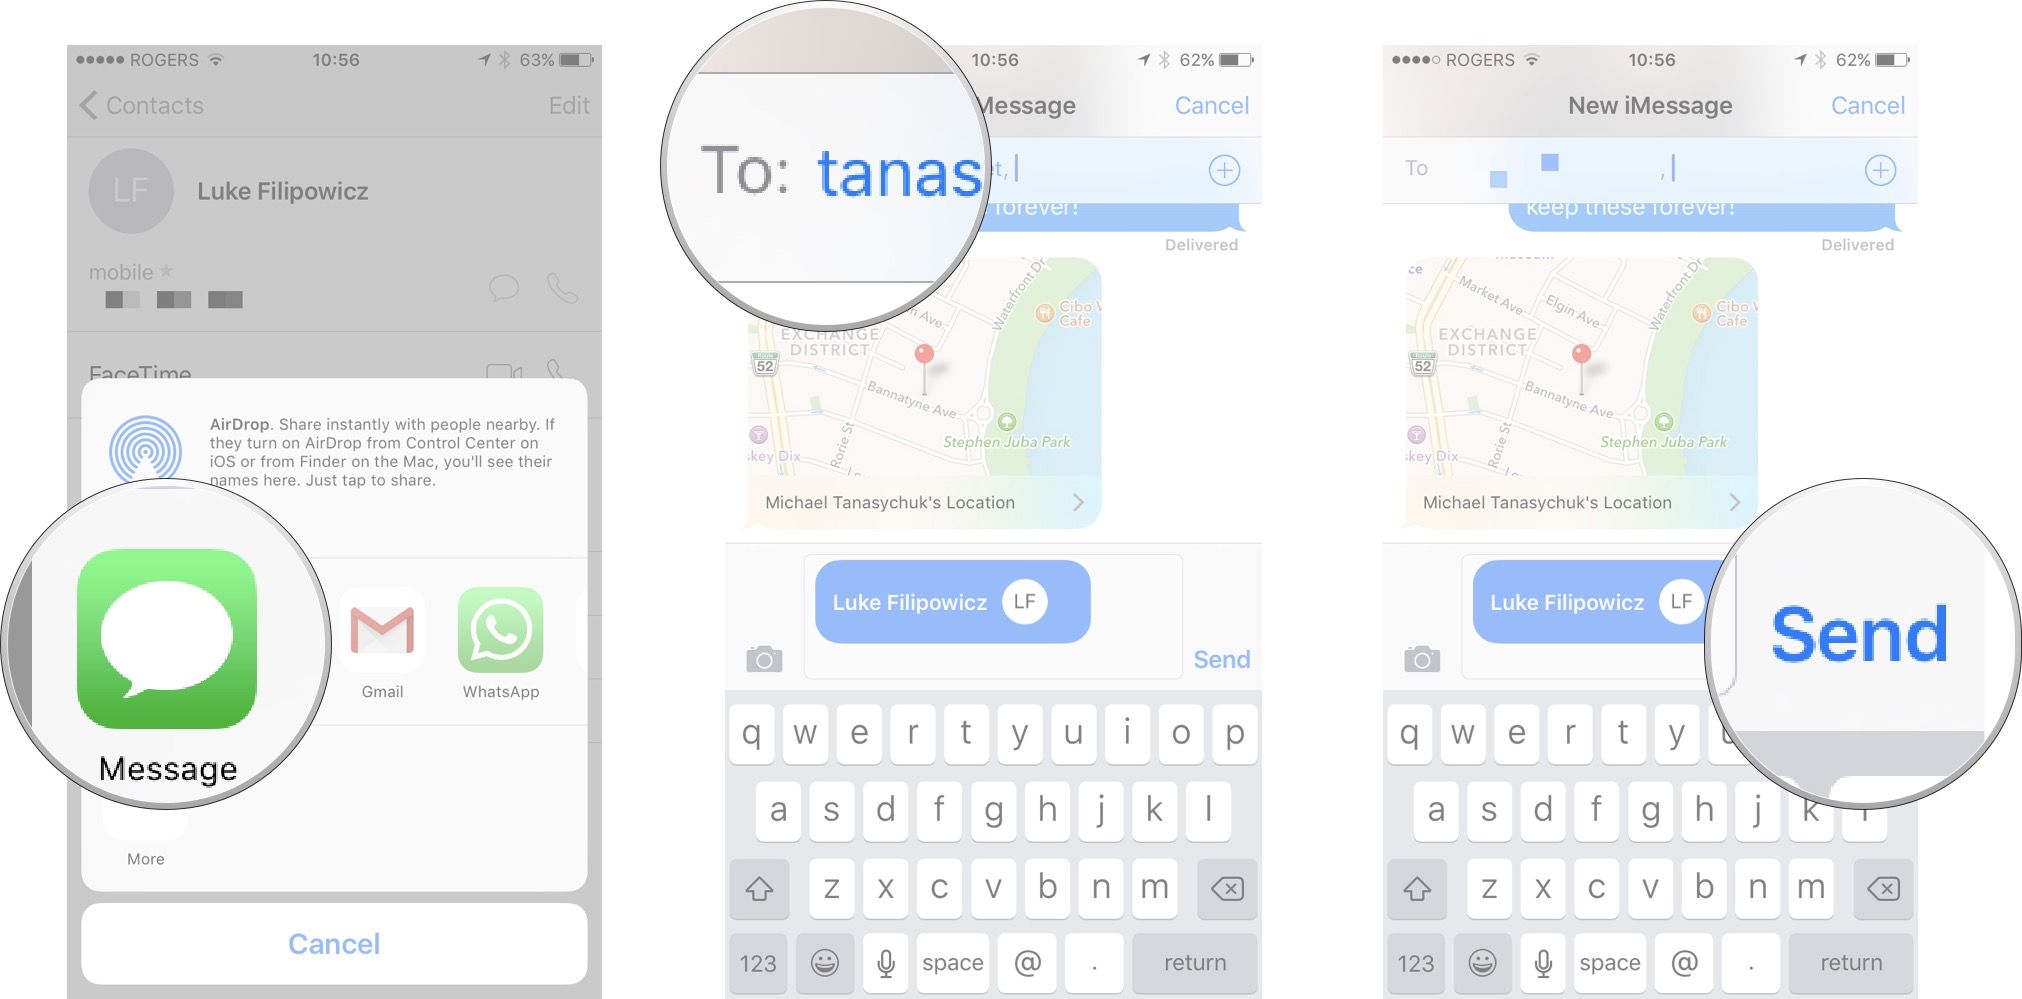
- Tap on Messages.
- Type the name of the person you'd like to share it with and select them.
- Now tap Send.
You've successfully sent a contact with iMessage! Way more efficient than copying and pasting a phone number, eh?
How to send and share location with iMessage for iPhone and iPad
iMessage integration with the Maps app means that not only can you send a map of a specific location to anyone in your contacts, but you can also send your current location or have your location sent to your contacts for a period of time. It's a feature that might come in handy if you're trying to meet up with friends at a festival or when traveling through an unfamiliar city.
How to send your current location with iMessage for iPhone and iPad
If a friend or family member is coming to meet you, you might want to send your current location so they can quickly and easily get to exactly where you are.
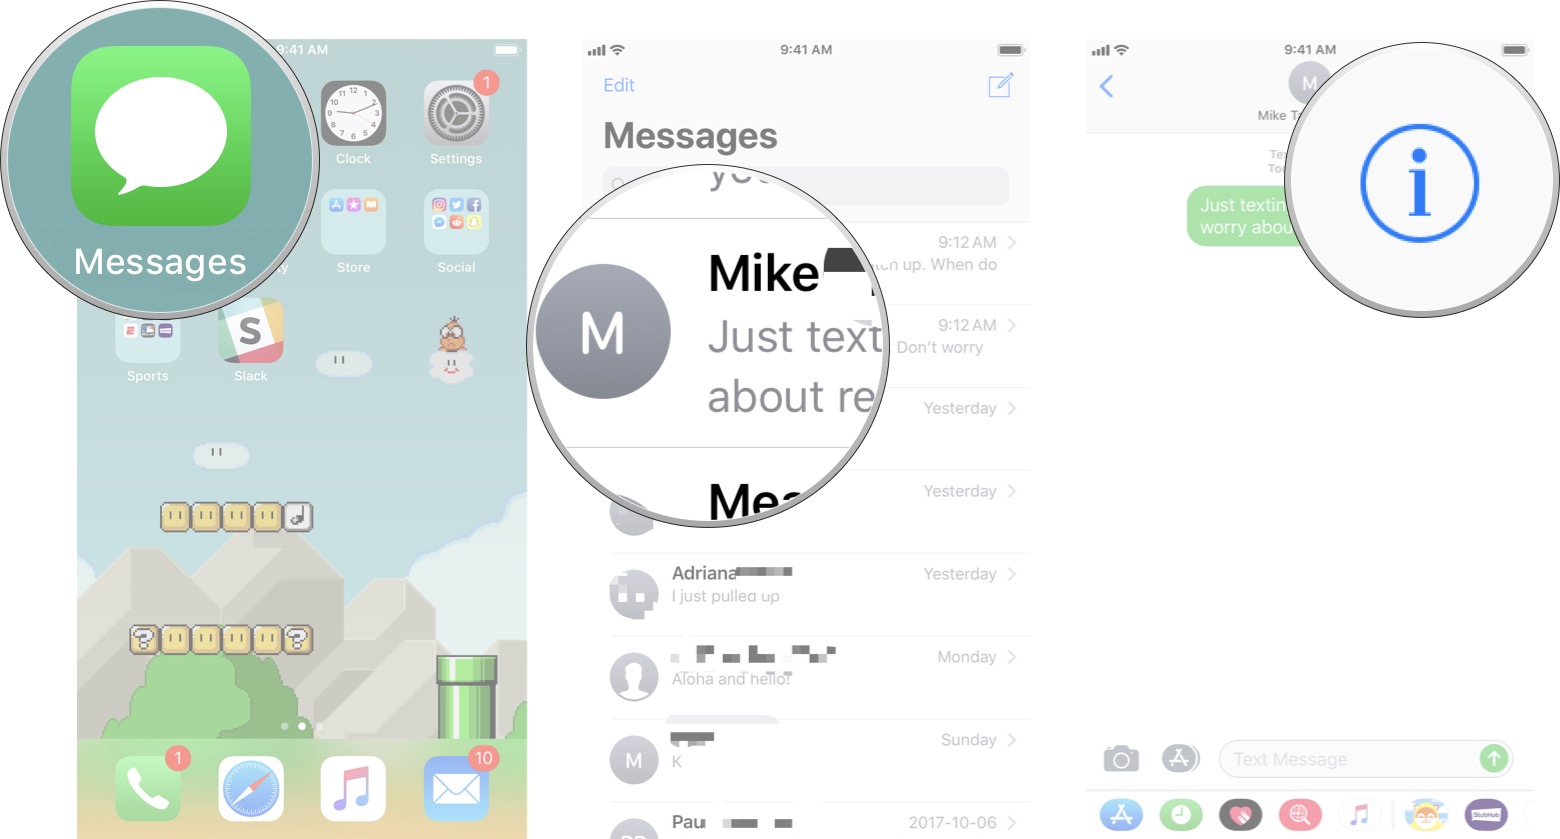
- Launch the Messages app.
- Tap on the conversation in which you'd like to send your location.
- Tap on the Infomation button in the upper right-hand corner.
- Tap on Send My Current Location.
The person on the other end will be able to see where you are and even tap to get directions.
How to share your location with iMessage for iPhone and iPad
Sometimes you'll want to share your up-to-the-minute location with friends or family members for an hour, for a day, or even forever. Maybe you're meeting somewhere for dinner or an event, maybe you're at a theme park together, maybe you just want to make sure you're loved ones are safe. Regardless, it's easy to do.
iMore offers spot-on advice and guidance from our team of experts, with decades of Apple device experience to lean on. Learn more with iMore!
- Launch the Messages app.
- Tap on the conversation in which you'd like to share your location. It can be with an individual person or with a group, as long as everyone in it is using iMessage.
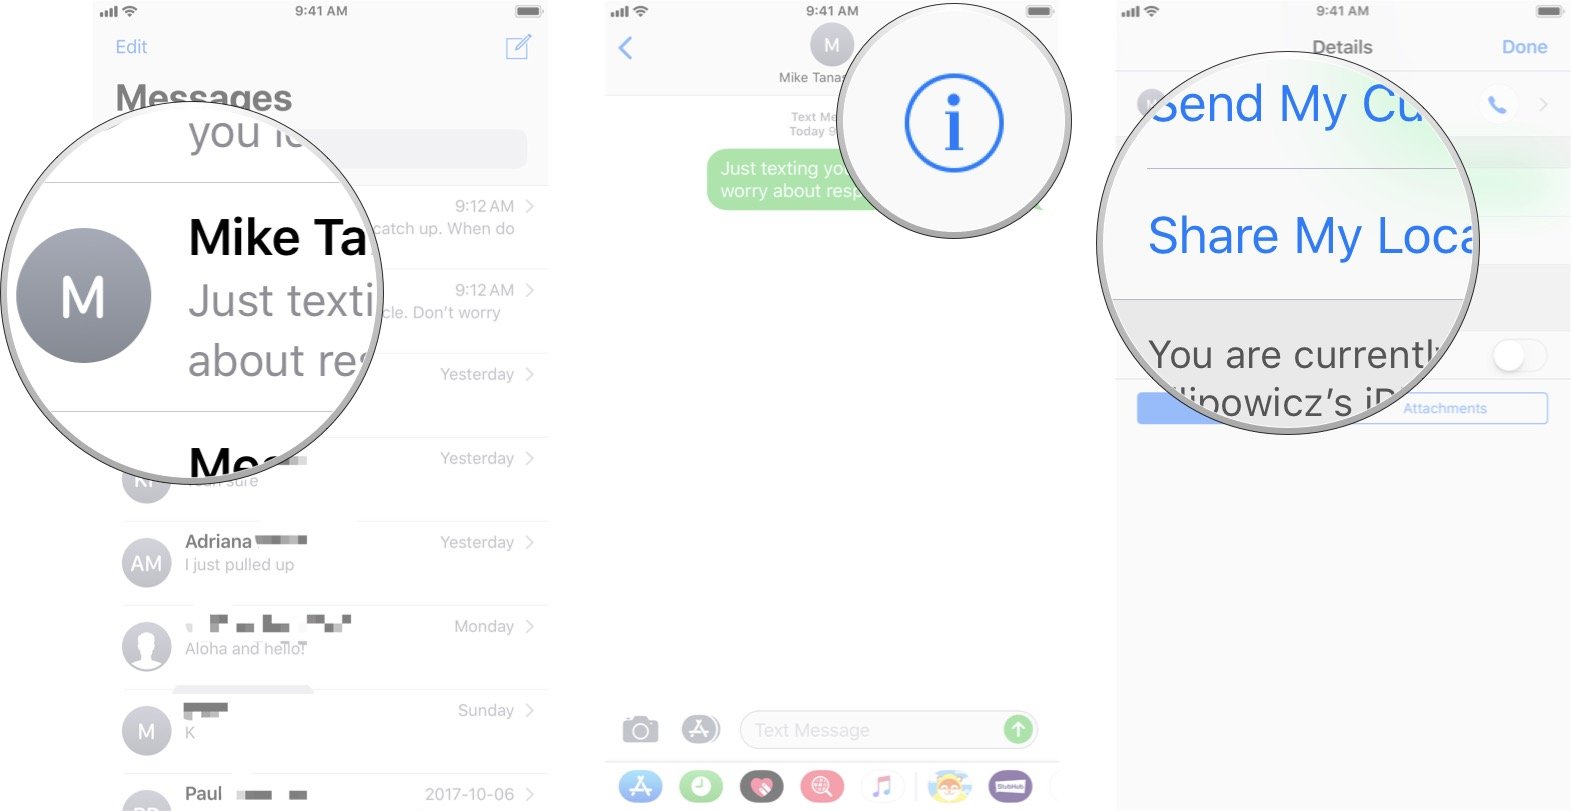
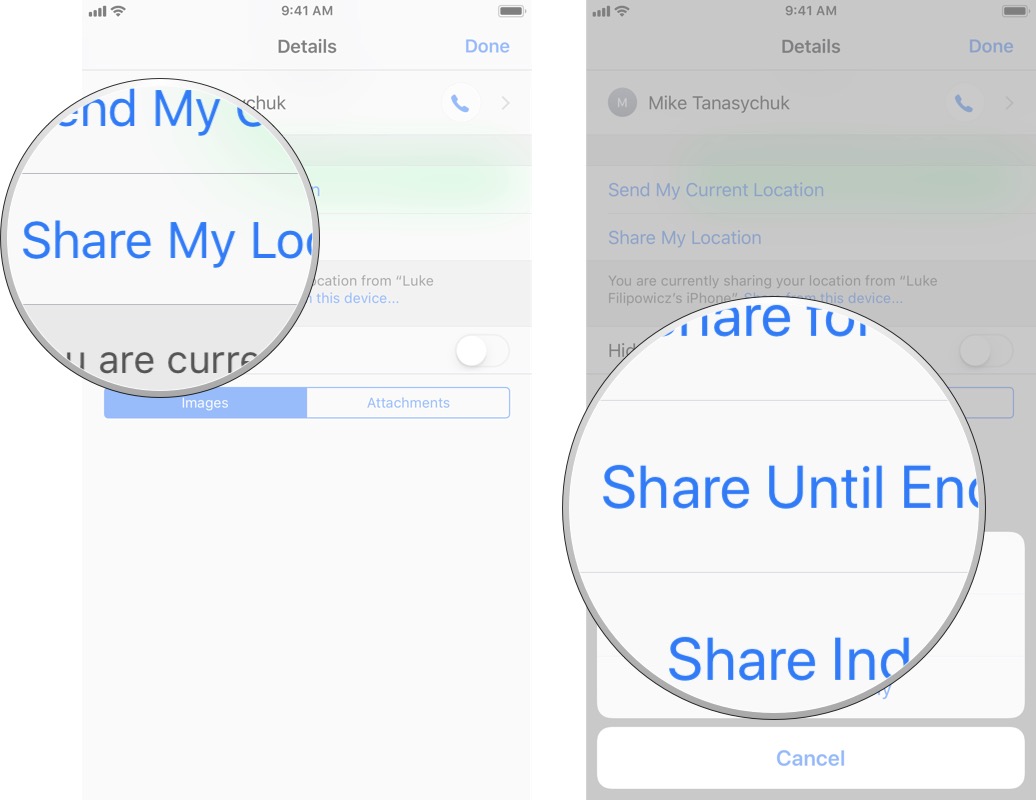
- Tap on the Information button in the upper right-hand corner.
- Tap on Share My Location.
- Choose the duration for which you'd like to share your location.
iMessage will then set up a temporary or permanent Find my Friends session, and you'll be able to see each other wherever you go!
How to send any location from the Maps app with iMessage
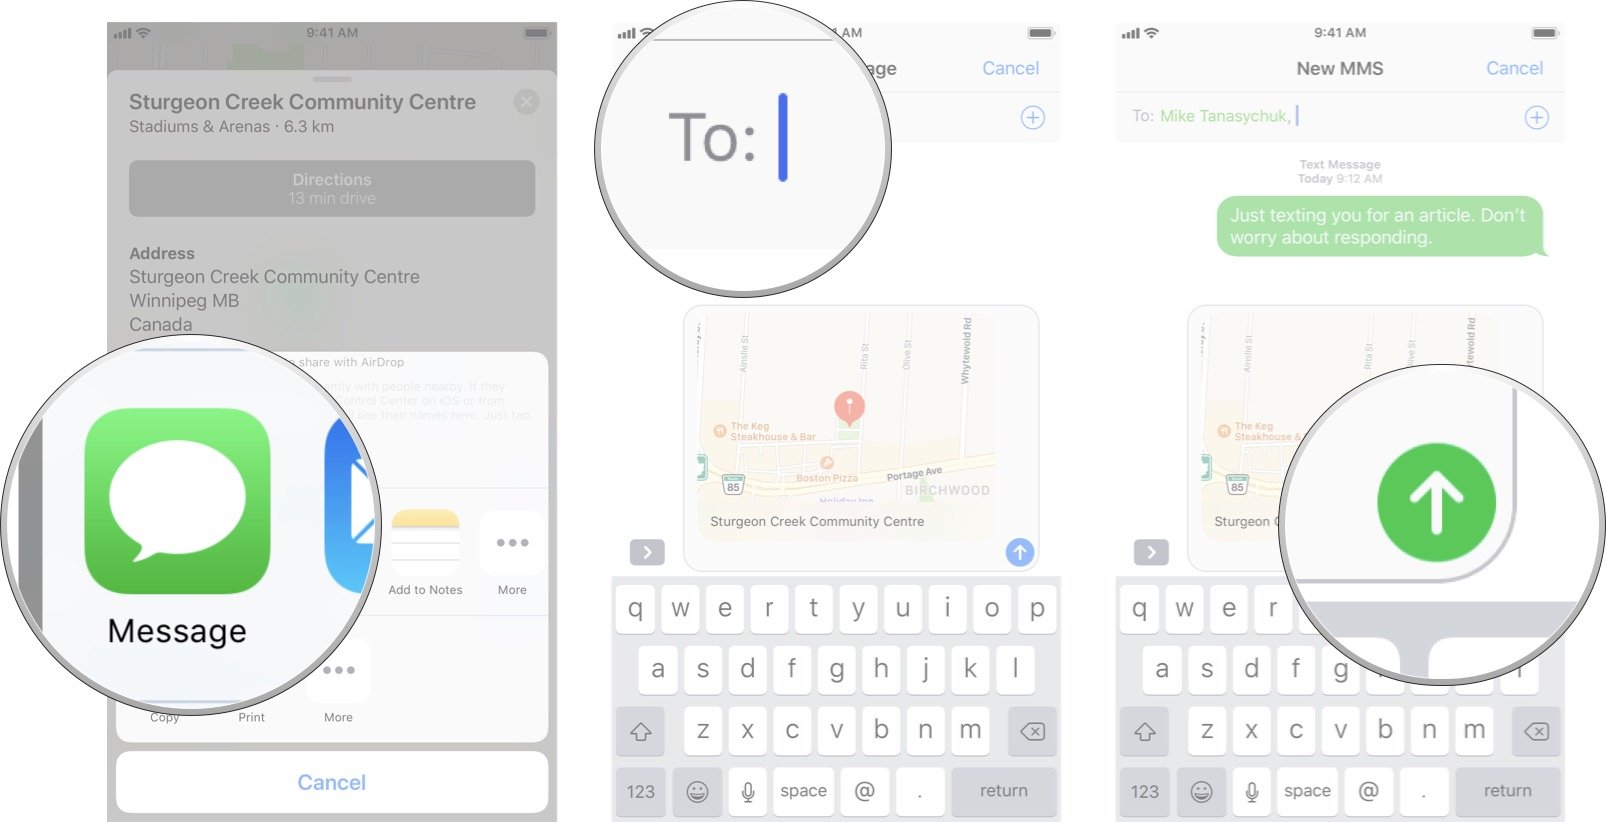
If you've just looked up a location in Maps for iPhone or iPad — a great place to eat or fun place to meet — and want to share it with someone else, you can send it right over with iMessage.
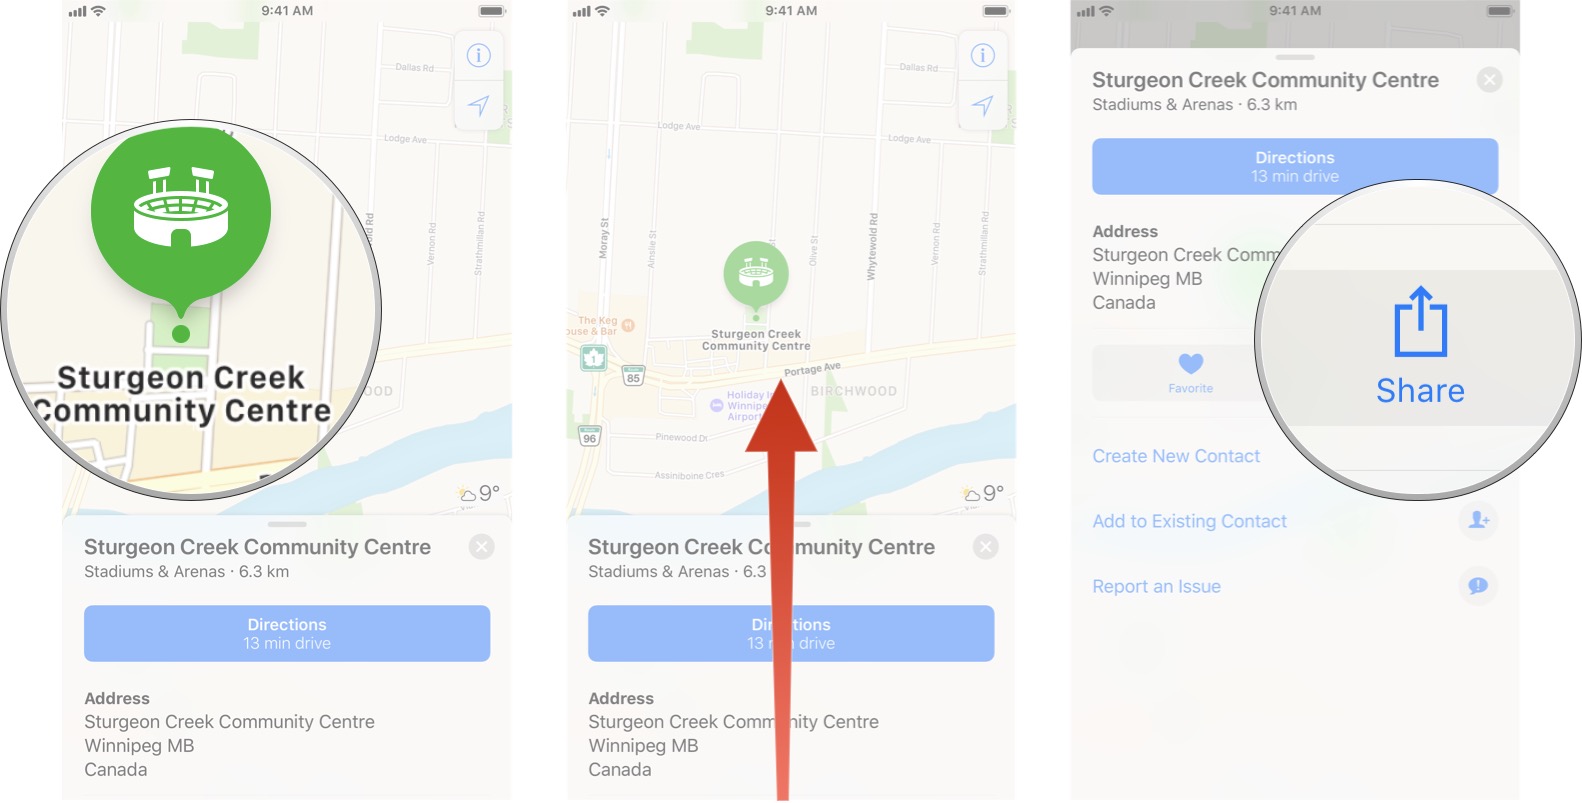
- Launch the Maps app on your iPhone or iPad.
- Find the location you'd like to share. If you'd like to share your current location, just tap on the location arrow in order to locate yourself.
- Swipe up on the bottom of the screen.
- Tap on the Share button.
- Tap on Message.
- Type the name of the person with whom you'd like to share your location.
- Tap Send.
How to send a voice memo through iMessage on iPhone and iPad
The built-in Voice Memo app can be handy for recording lengthy thoughts or instructions, and iMessage is a great way to share them.
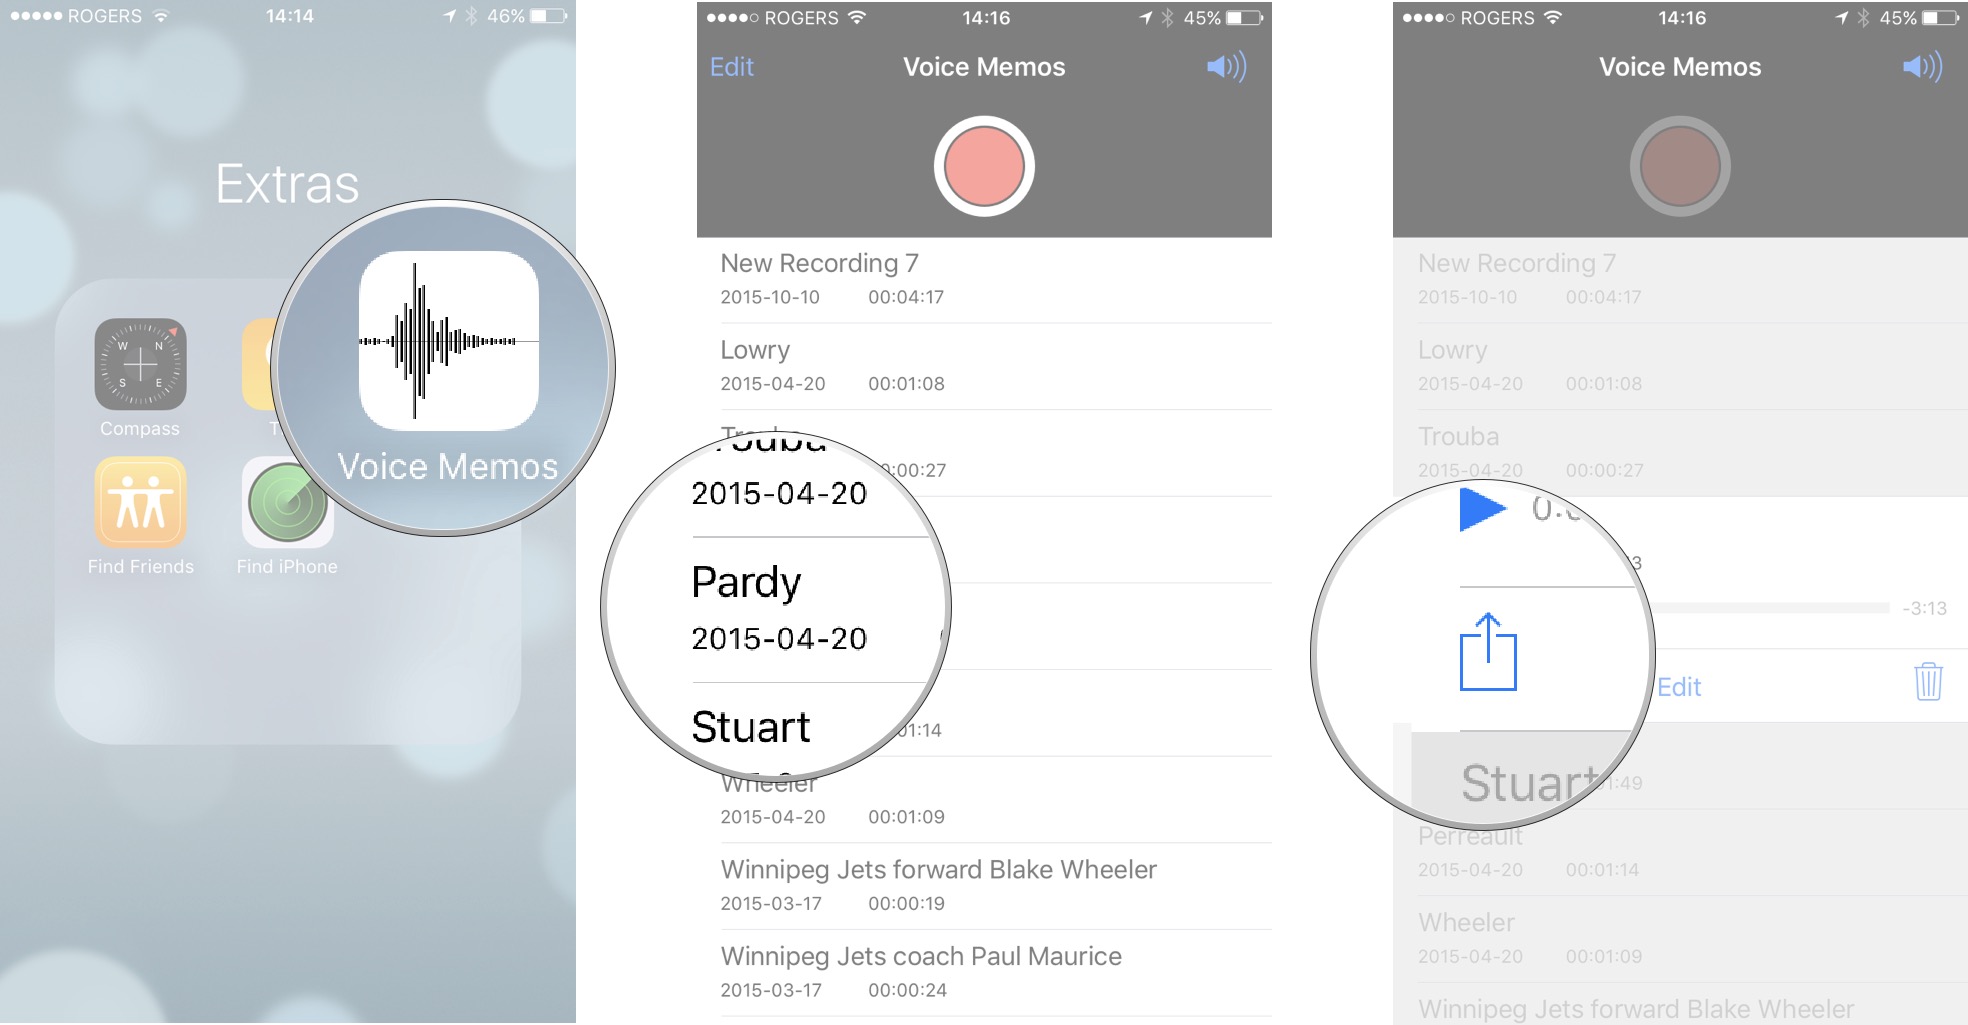
- Launch the Voice Memo app on your iPhone or iPad.
- Tap on the voice memo you'd like to send in order to expand it.
- Tap on the Share button.
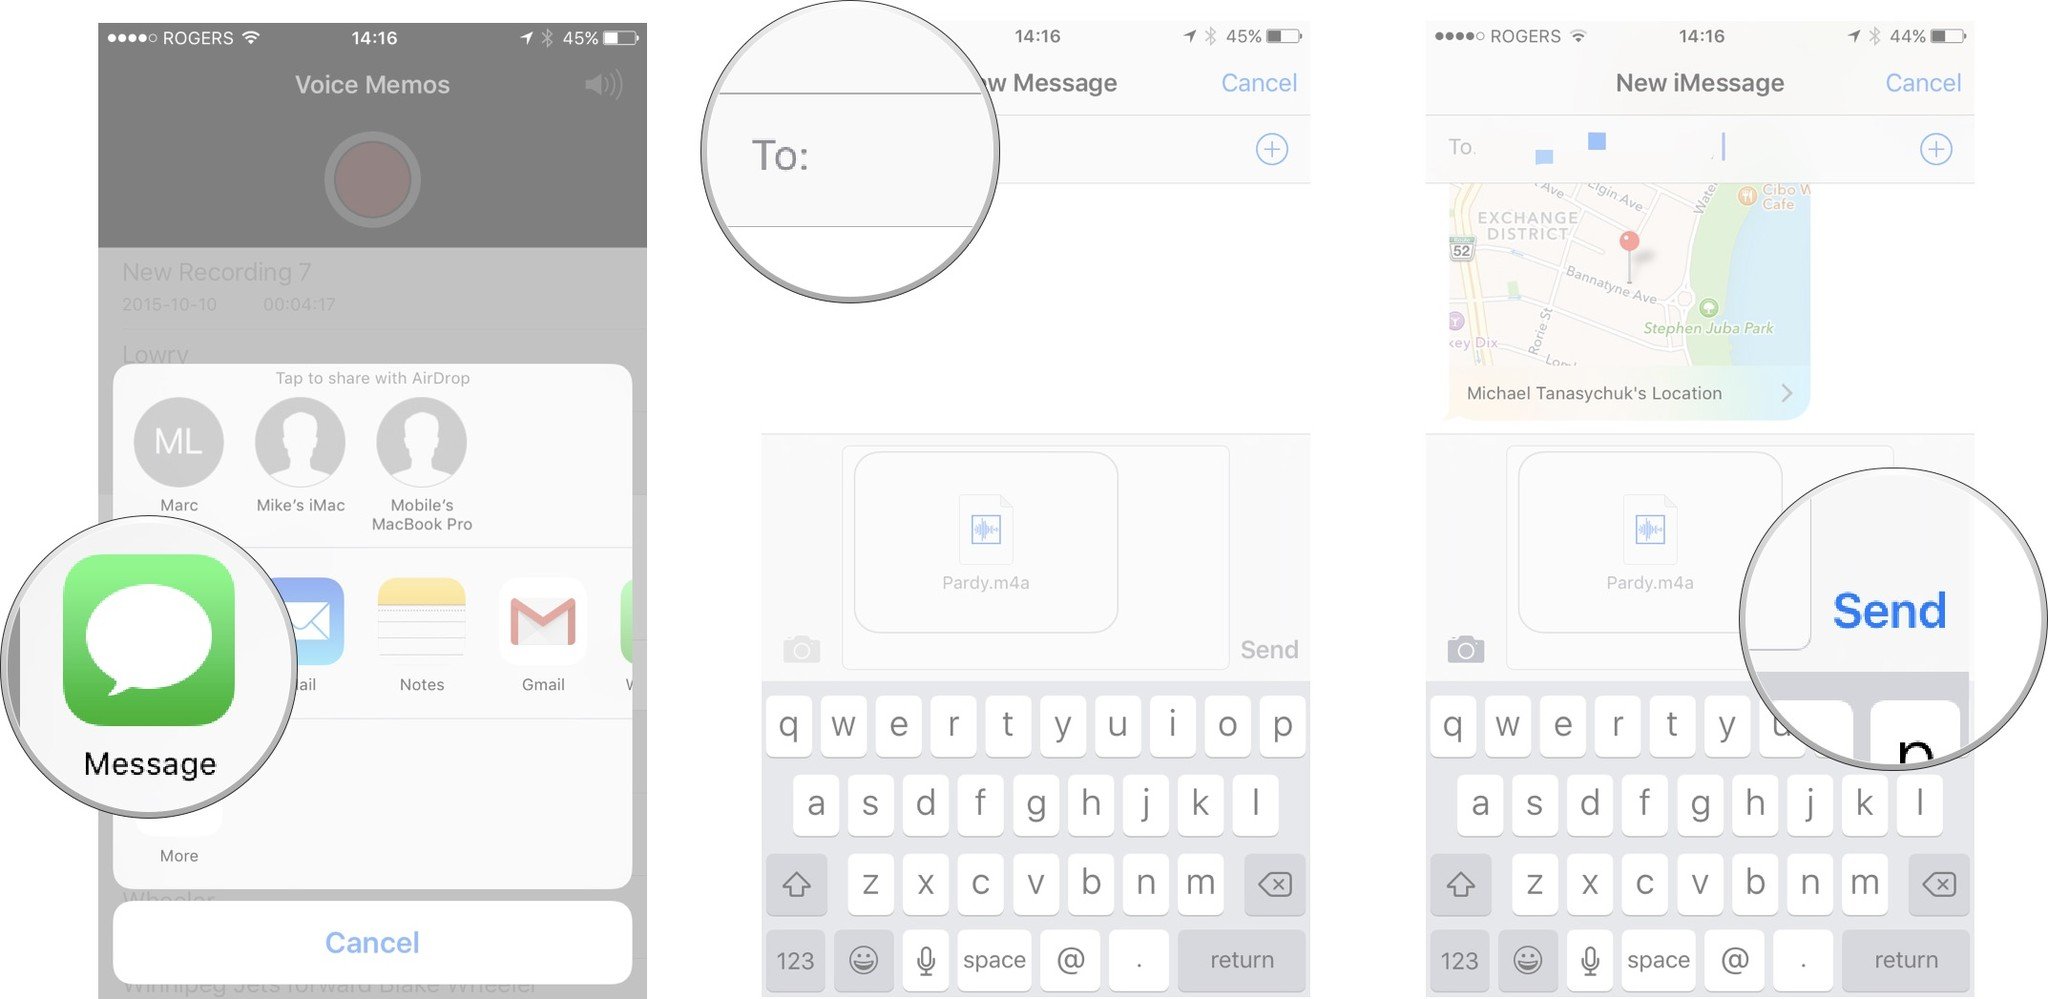
- Tap on the Message icon.
- Type in the name of the person you'd like to send it to and select them.
- Tap on the Send button.
Once received, the Voice Memo will play like any standard Apple audio file.
Updated July 2018: All the steps are the same for iOS 12.
Pop culture geek, hopelessly addicted to streaming movies, tv shows, and podcasts. Would be lost in life without unlimited data.
