How to Run Pi-hole on Your Mac

Web ads keep fine enterprises like this very site afloat. But there sure are a lot of them, right? They're not always pretty to look at, they devour bandwidth, and they slow download times for your favorite sites. You can install adblocker software on each individual web-connected device you use. But now there's Pi-hole, a way to automatically block web ads on every device across your entire network, for free.
This open-source app was originally designed for the Raspberry Pi, but you don't need one of those tiny, inexpensive computers to run it. Installation isn't easy, but it's not impossible, either. Let's walk through the steps you'll need to get it Pi-hole up and running.
What is Pi-hole?
Pi-hole sets itself up as a DNS server for your network, routing your requests for addresses to actual DNS servers elsewhere on the Internet. In the simplest terms, DNS servers are the phone books of the web, matching the domain name you type in to browse to a site with the matching IP number that'll actually get you there.
As your computer pulls in those sites, their data passes through Pi-hole. Thanks to its extensive blocklist of ad providers, Pi-hole plucks out all the incoming ads and punts them down its own sort of black hole. By the time a site reaches your screen, it's ad-free, and without ads' often snoopy and intrusive code, it'll load a whole lot faster.
Pi-hole blocks all kinds of ads across all kinds of devices, including video ads (that sound you hear is Hulu gently weeping) and smart TV apps.
Lest you get too excited, please remember that Pi-hole was written by Linux programmers, whose warm, generous community spirit is matched only by their apparent fondness for creating programs that require a computer science degree to set up and use.
If anything, it's easier to set up Pi-hole on a Raspberry Pi than on a Mac; there, a single terminal command will kick off the installation process. To make your Mac run Pi-hole, you'll need to follow a few more steps than that.
Master your iPhone in minutes
iMore offers spot-on advice and guidance from our team of experts, with decades of Apple device experience to lean on. Learn more with iMore!
What you need to run Pi-hole on your Mac
- An always-on Mac that's connected to your network, running Mac OS Sierra or later, with at least 4GB of RAM.
- A wired or wireless router that you can configure.
- Docker, a free and friendly app that lets your Mac run containerized software — prebuilt, self-contained packages of code designed to run on any Docker-enabled system. We've got a simple guide for how to run Docker on your Mac.
- Kitematic, an easy-to-use graphical interface for managing Docker packages. You can install it through the Docker app; check out the instructions above for details.
How to install Pi-hole on a Mac
If you're nervous about UNIX commands, steel yourself: We'll be using Terminal a lot. But nothing you type into Terminal here will remotely endanger your machine. Mostly we'll just be asking it to tell us stuff we need to know. Otherwise, we'll be entering Docker commands. And if you mess up with Docker, you can just delete the container and start again – no harm, no foul.
Before you start installing software, you'll need to check and adjust a few things on your Mac. Take a deep breath. Ready? Here we go.
1. Give your Mac a static IP address
Every device on your network, even one connected via Wi-Fi, has an IP address. This isn't a great metaphor, but if your router's the big-box store where you go to get The Internet, your device's IP address is its designated space in the parking lot outside.
Most routers use a technology called DHCP to hand out IP addresses to the devices that connect to them — kind of like being able to park in any free space in the lot. As devices disconnect or reconnect, they give up their IP addresses and get handed new ones.
But the Mac on which you'll be running Pi-hole needs to park in the same spot every time so that your network always knows where to find it. You need to give this Mac a static IP address.
Open Terminal and type in this command:
arp -a
Terminal will spit out a list of information about every device connected to your network, including IP addresses, which will appear in (parentheses). IP addresses come in blocks of four numbers separated by periods. On my network, they look like:
10.0.1.x
… where the "x" changes depending on the device. Your numbers might look different, but they should follow the same pattern: The first three numbers are always the same, and the last one changes.
Write down those addresses, then pick a number that isn't being used. (So if your devices have IP addresses of 10.0.1.1, 10.0.1.2, and 10.0.1.4, you could use 10.0.1.3, or 10.0.1.5, or 10.0.1.20, or any final number that wasn't 1, 2, or 4.) That'll be your static IP.
You can reserve this IP one of two ways: on your Mac, or on your router. Either one will work, and you don't need to do both.
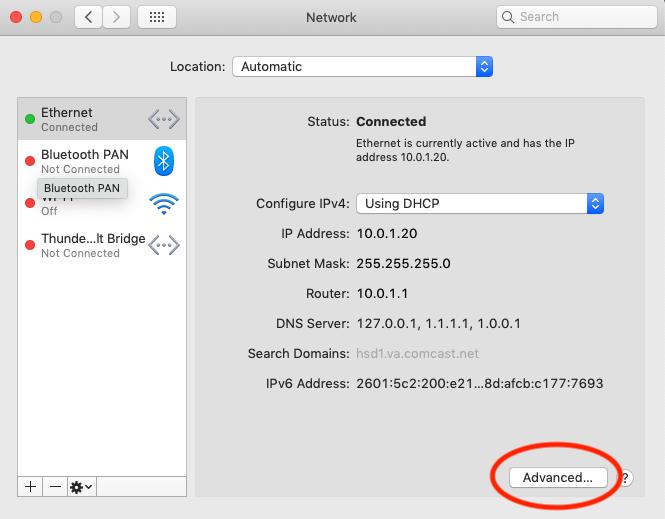
To set a static IP directly on your Mac, open System Preferences > Network. Select the kind of connection you're using from the list at left — probably Ethernet for a wired network, or Wi-Fi for a wireless one. Then click the Advanced… button in the lower right.
Now click the TCP/IP tab in the pane that appears. Write down the numbers next to Subnet Mask and Router — you'll need them in a second. Then change the Configure IPv4 dropdown menu from "Using DHCP" to Manually.
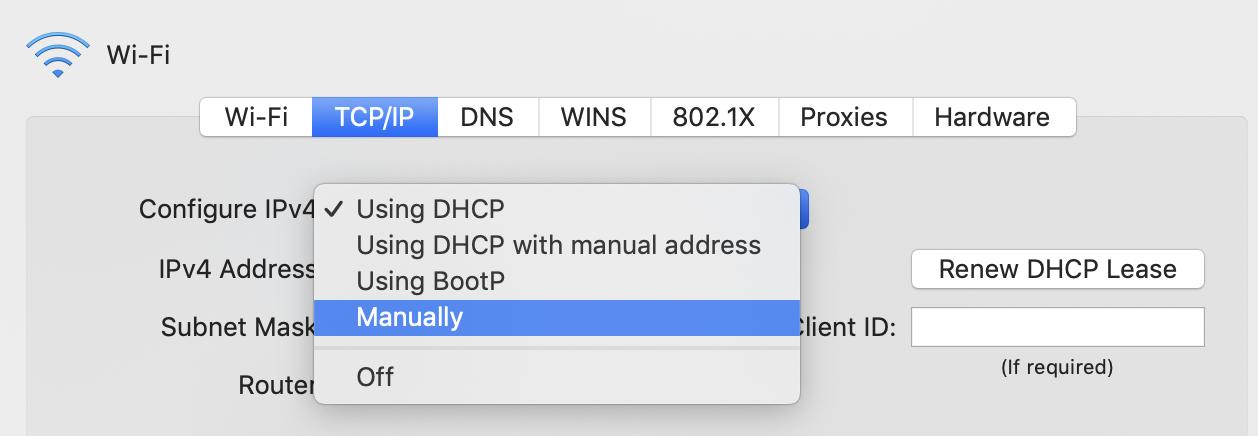
Enter your new static IP address in the IPv4 Address box, and restore the Subnet Mask and Router addresses to their respective boxes. Then click OK, and when you get back to the main Network pane in System Preferences, click Apply to make the changes. Voila! You've got your very own static IP address.
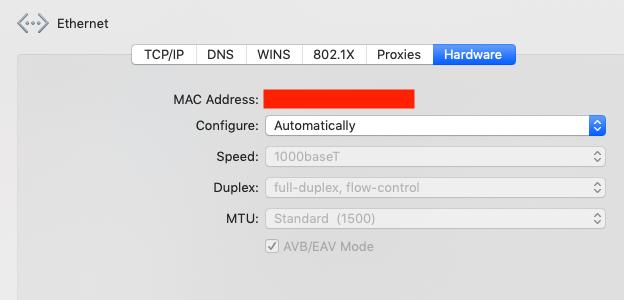
To create a static IP address through your router, check your router's instructions on how to set DHCP reservations. You'll probably need your computer's MAC address, a different set of numbers that identify it on the network. You can find that under System Preferences > Network > Advanced… > Hardware. (It'll be where the red box is in the image below.)
If you're using AirPort, setting a DHCP reservation is fairly easy. Open AirPort Utility, select your main base station, and click Edit. In the screen that appears, click the Network tab and look for DHCP Reservations. Click the little + button to add a new one.
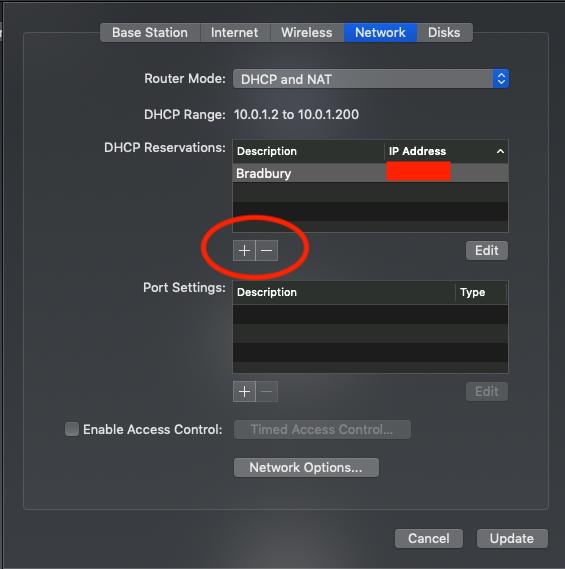
Give your Mac a name in the Description box, make sure you're reserving your address by MAC address, then paste the MAC address into the designated box. In the IPv4 Address box, either paste your preferred static IP or use the one AirPort assigns you. (It won't give you one that's already in use.) Either way, remember that static IP address, because you'll need it later.
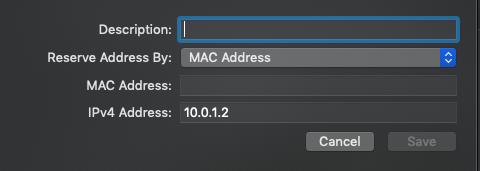
Click Save, then click Update to make the changes and reboot your router.
Again, if you don't have an AirPort router, but you want to use this method, you probably still can. Just check your router's instruction manual.
Keep your static IP address handy! You're going to use it twice more before you're done: once when setting up Pi-hole, and again to tell your router which DNS server to use.
2. Make sure you have the right ports available
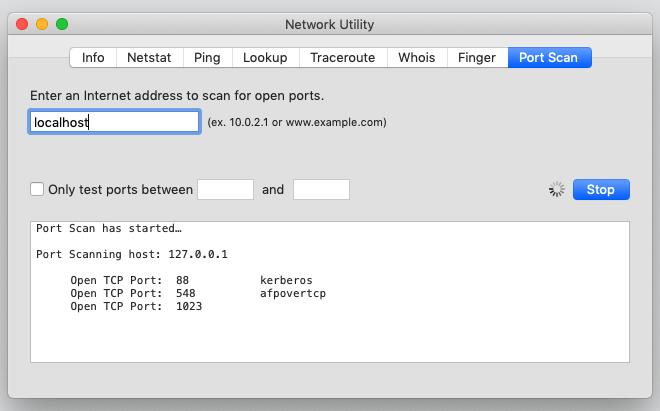
Pi-hole will need to use ports 53, 80, and 443 on your network. That shouldn't be a problem even with Mac OS X's Firewall turned on, but there's a tiny, highly unlikely chance that another application might be using those ports.
Just to be safe, open Network Utility and select Port Scan. Where you're asked to enter an address to scan for open ports, enter localhost. Check the box next to Only test ports between and specify a range of 53 to 443. (No point scanning ones you're not interested in, right?) Then click the Scan button. If ports 53, 80, and 443 don't appear in the list, you're good to go.
3. Install Docker and Kitematic
Visit our instructions for how to run Docker on a Mac, then come back here.
4. Install Pi-hole
Is Docker running? Got Kitematic installed? Excellent! Let's do this thing.
Open Terminal again. We're going to tell Docker to download the Pi-hole container and get it ready for us. Enter this command:
docker pull pihole/pihole
Now we'll give Docker instructions on how we want to get Pi-hole running. Copy this command into a text editor, not the Terminal, because you'll need to customize a few parts first:
docker run -d --name pihole -e ServerIP=your_IP_here -e TZ=time_zone_here -e WEBPASSWORD=Password -e DNS1=1.1.1.1 -e DNS2=1.0.0.1 -p 80:80 -p 53:53/tcp -p 53:53/udp -p 443:443 -v ~/pihole/:/etc/pihole/ --dns=127.0.0.1 --dns=1.1.1.1 --cap-add=NET_ADMIN --restart=unless-stopped pihole/pihole:latest
(This command was adapted from Redditor dudutwizer's instructions, with a few added pieces recommended by the official Pi-hole for Docker setup guide.)
Phew. That's a lot, right? Let's quickly review a few key parts of that magnificent word salad up there:
-e ServerIP=your_IP_here
Replace "your_IP_here" with the static IP address you gave your Mac back in step 1. Pi-hole needs to know where to find your server.
-e TZ=time_zone_here
Replace time_zone_here with your time zone from this list. You'll want to use the TZ database name -- so, for example, if you're in Eastern Standard time, you'd use America/New_York.
-e WEBPASSWORD=Password
Pi-hole's Web-based admin panel needs a password before it'll let you adjust settings. It generates a random password during installation, but it, uh, doesn't tell you what that password is. (At least, not on a Mac, using Docker, in Terminal.)
You can find that random password by looking through the Pi-hole container's logs using Kitematic, but who has time for that? Replace Password above with a password of your choosing to set your own password right away.
Even if you add this step, Pi-hole still might not acknowledge that you've changed your password. It happened to me. A lot. If that happens to you, don't worry. We'll fix it later in one easy step.
--dns=127.0.0.1 --dns=1.1.1.1
The first of these numbers always has to be 127.0.0.1 — which is computer-speak for "the same machine this program is running on," also known as "localhost." But the second number's a backup, and it can point to any DNS server you choose. I used Cloudflare's 1.1.1.1 server, which claims to find addresses faster than the competition without selling your data to advertisers. But if you've got a particular favorite, sub it in here.
--restart=unless-stopped
This tells Pi-hole to always start up automatically whenever Docker opens — say, if your Mac crashes and needs to reboot – unless or until you say otherwise.
Once you've customized that mighty slab o' code with your static IP and preferred password, copy and paste the whole command back into Terminal and run it.
Wait a minute or two while Pi-hole gets moving, then use this command to make sure everything's kosher:
docker ps -a
It'll spit out information about Pi-hole and how it's running. If you see the word "healthy" in there, you're good. If you see "unhealthy," something went wrong. You probably won't see that, but if you do, that's okay! Use Kitematic to delete Pi-hole's container, then try these instructions again from the beginning of this step.
5. Tell your router to use Pi-hole for DNS
Now that Pi-hole's running on your Mac, you need to tell your wireless router to use that Mac as its DNS server. That will ensure that every device connected to your router enjoys Pi-hole's ad-blocking goodness.
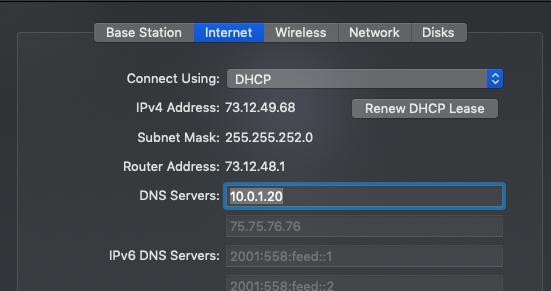
You'll need to replace whatever DNS server numbers your router has with the static IP address for your Mac that you set back in step 1. And while most routers have room to enter more than one DNS server, that static IP address needs to be the only DNS server your router uses. Otherwise, you'll still see web ads.
Setting your router's DNS info shouldn't be too hard — you'll basically just type numbers in the correct box, then click a button. Check your instructions for details.
If you have an AirPort router, the process is quick and painless. Open AirPort Utility again, select your base station, then click Edit. Under the Internet tab, find the boxes for DNS Servers. Clear them out, and paste your Mac's static IP address in the first box. Leave the second box blank. Then click Update and let your router reset.
6. Do some quick troubleshooting
Once your router resets, any device that connects to it should be able to browse the Web ad-free. If Pi-hole's running fine, but a given device still shows you ads, you might have manually set its DNS servers at some previous point. To fix this…
- On a Mac: Go to System Preferences > Network > Advanced > DNS, and make sure you have nothing entered in the DNS Servers box. (Grayed-out text is fine — that means you're getting your DNS information from your router.) If this isn't the problem, go to the TCP/IP tab, and click the Renew DHCP Lease button, which might nudge your Mac to recognize the new DNS servers.
- On iOS: Go to Settings > Wi-Fi and click the "i" icon to the right of your selected wireless network. Scroll down to Configure DNS and make sure it's set to Automatic. If not, tap it, select "Automatic," then tap "Save." To renew the DHCP lease, go back to the information screen about your wireless network, and find and tap Renew Lease.
7. Log in to Pi-hole
You'll find Pi-hole's admin page by visiting http://pi.hole/admin in your browser of choice. It can take a few minutes after you've updated your router for that address to work, so don't fret if it doesn't come up right away.
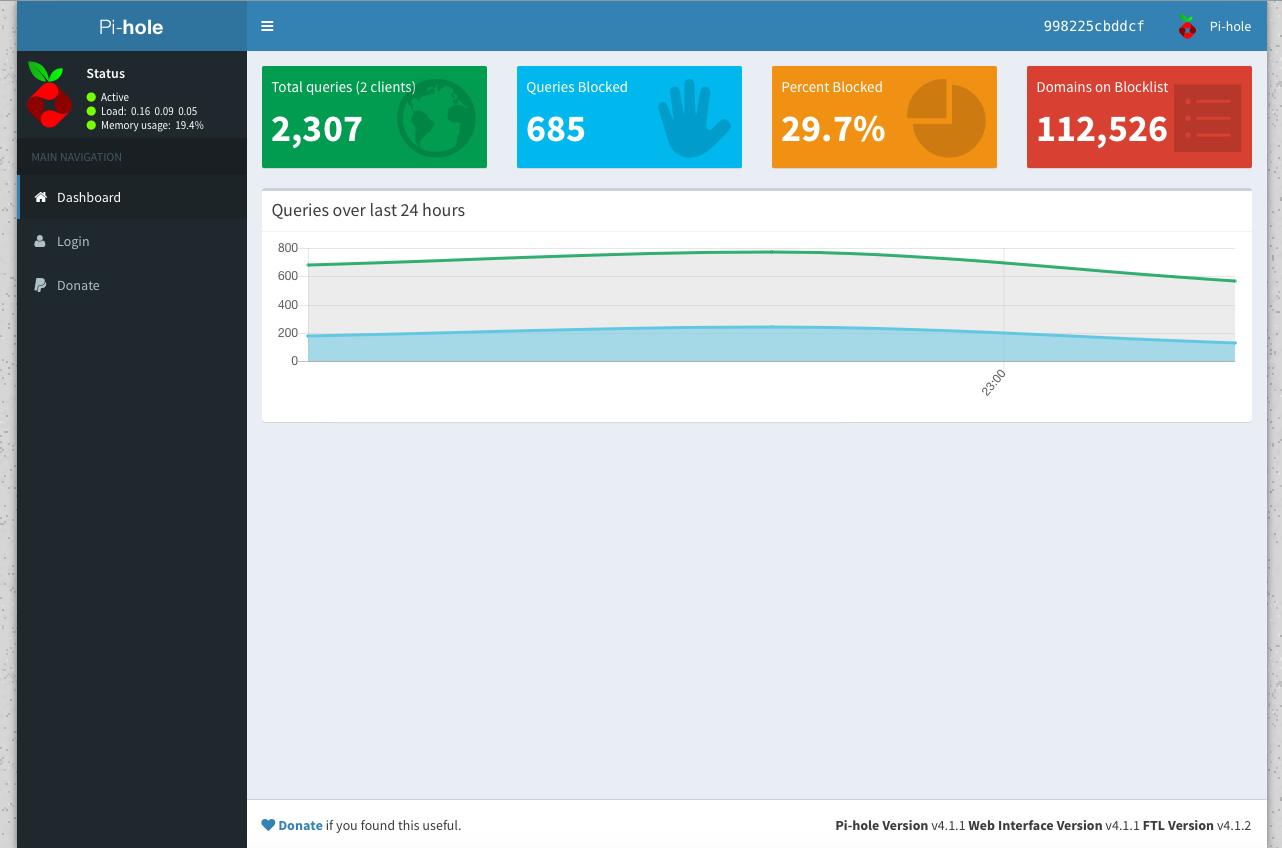
To fully explore Pi-hole's abilities, you'll need to log in. Click "Login" on the left side of the screen:
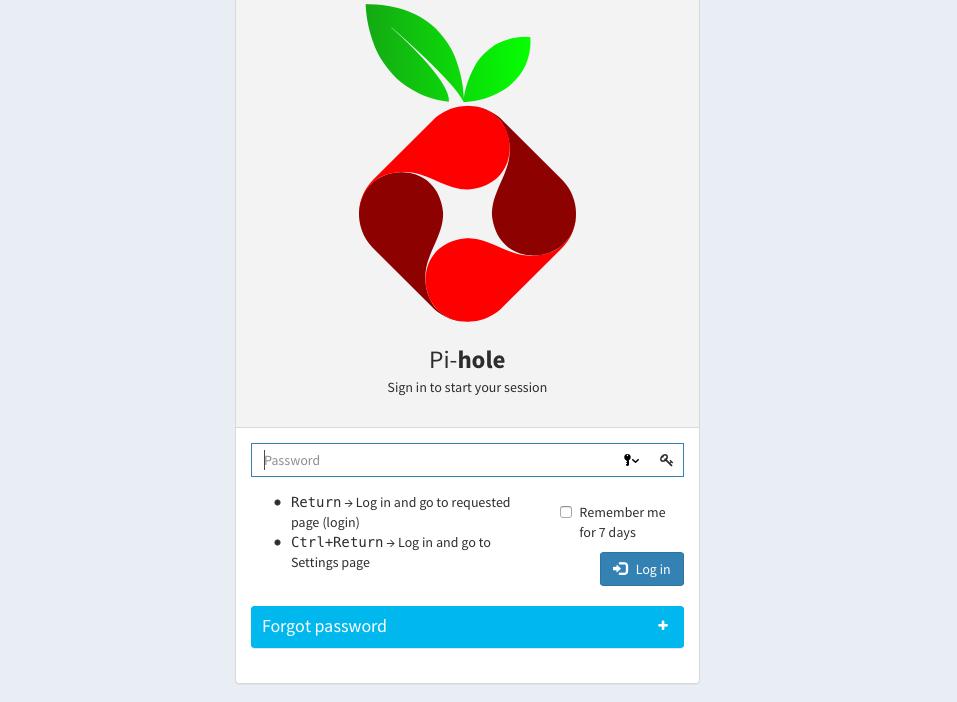
Enter the password you specified when you set up Pi-hole. Like I said, it might not work; it often didn't for me. Luckily, you can change the password for good by opening Terminal and entering this command:
docker exec -it pihole pihole -a -p your_password_here
… where your_password_here is the password you want. Terminal will confirm that your password's changed, and you're all set.
Feel free to explore Pi-hole's different settings. If you mess something up beyond repair, you can always delete the container and start again from step 4. You shouldn't need to muck with any of these settings to enjoy ad-free browsing, though.
A quick caveat (and a way to fix it)
Like any black hole, Pi-hole can behave in baffling and unpredictable ways. After I first set it up, it would stop working unexpectedly after 24 hours or so, leaving every device on my network unable to connect to the Web until I got it restarted. That didn't seem to be Docker's fault; it could have been some glitch in Pi-hole, or possibly something wrong with my router.
If that happens to you, try this fix that worked for me, suggested by the intrepid Dr. Drang. Basically, you want to make sure that the static IP your server uses isn't within the range of IP addresses your router's handing out.
- Look for your router's DHCP range, the number of different "parking spaces" it makes available on your router via DHCP. (With AirPort, you can see this under the Network tab when you configure a base station, and edit it by clicking the Network Options button at the bottom of the tab.) Most of the routers I've seen have a range from 2 to 200, meaning they can hand out nearly 200 spots on the router to different devices in your home that want to connect.
- Use
arp -ain the Terminal one more time to double-check the IP addresses on your network. Since you probably won't have 199 different devices connected to your router, look for the highest IP number that ends with something less than 200. You may see some IP numbers higher than 200, but don't worry about those. - Pick a new static IP number that's not already in use, is higher than the highest current IP number less than 200, and leaves some growing room for you to add more devices to your router in the future. For me, that was 50, but feel free to adjust that based on your own setup and networking needs.
- Using that new number, set your server's static IP directly on the Mac itself, not on the router, via
System Preferences > Network, following the instructions in Step 1 above. If you used your router to give your server an IP reservation, turn that off. - On your router, edit the DHCP range to end at one less than the new IP address you've chosen – so, if you chose 50, the DHCP range would end at 49. Then change the DNS server on your router to match that new IP address. Don't update or reboot the router yet.
- Point Pi-hole to your server's IP address. You can do this by deleting the container and re-running the installation instructions in Step 4 with the new server IP address, but there's an easier way. Open Kitematic and select the pihole container from the list of running containers on the left. When Kitematic brings up its logs, look for the "Settings" tab over on the right side of the screen. Under Settings, you'll see a list of many of the same variables you used when setting up Pi-hole. Find ServerIP, change the number next to it to your new IP address, then click the Save button at the bottom of the list of variables. Once it's saved, Kitematic will restart Pi-hole to make the new variable take effect, and you can close Kitematic.
- Now reboot your router. When the new DHCP range and DNS server take effect, Pi-hole should be up and running, with no unexpected outages ahead.
Troubleshooting aside, for an hour or less of minor inconvenience you can free every device in your household from the aggravation of Web ads. If you're feeling grateful, maybe make sure to whitelist iMore.com (and your other favorite sites) in Pi-hole's admin panel, okay? Our servers, alas, won't pay for themselves.

Nathan Alderman is an iMore contributor. He’s been using Apple computers since his first Apple IIe in 1985, and writing professionally about Macs and their software since 2005. During his 12 years freelancing for Macworld, he covered email clients, web browsers, web design programs, writing apps, and games, and he’s continued to follow those interests at iMore since 2017. An editor and writing coach in his full-time career, he spends his dwindling spare time writing fiction for fun, volunteering for democracy, and contributing to podcasts on The Incomparable Network. Nathan adores his wife and wrangles his alarmingly large children in bucolic Crozet, VA.
