How to use symbolic links in macOS to load balance your data

Running out of disk space is bad. Having multiple disk drives and not using them to their full potential is worse. Some applications have preferences that can be changed to have data stored in any location or disk drive you desire. Those are easy to make certain that you're using all of the resources available to you. But what about those applications that do not give you that option? Are you out of luck? Not so! Here's how to use symbolic links on macOS so that you can spread your data across as many drives as you like for any application you need.
- Understanding symbolic links
- Words of warning
- Best use case is the desktop environment
- Setting up symbolic links
- Final comments
Understanding symbolic links
A symbolic link (symlink for short) is a sub-option of the ln Unix command that allows for the "linking" of files and directories across many locations on a filesystem. As per the ln man page:
"The ln utility creates a new directory entry (linked file) which has the same modes as the original file. It is useful for maintaining multiple copies of a file in many places at once without using up storage for the copies''; instead, a linkpoints'' to the original copy. There are two types of links; hard links and symbolic links. How a link ``points'' to a file is one of the differences between a hard and symbolic link."
A symbolic link will redirect any access to its location to the linked counterpart elsewhere. Be it on the same filesystem or other disk drive or network location. The way this helps us is that by having a file or folder on Disk A pointing to a linked location on Disk B, we can "trick" the operating system to think that we are accessing a file on Disk A while in fact the file lives on Disk B.
The end result is that you have essentially load balanced your data across multiple drives without need of informing any specific application.
Words of warning
Whenever you start playing around with the underlying operating system you run the risk of severely breaking things. Creating a bad link for an essential folder like /lib or something critical can cause your system to become inoperable.
Best use case is the desktop environment
Although you can perform these changes on any Mac, it would be best practice to do it on a machine that stays put on a desk. I'll be using an external disk drive enclosure called a Drobo that will be connected at all times for example. If you have a notebook that you are constantly bringing with you and disconnecting external storage, well, then when it comes time to get access to your data, you're disk will be missing and you won't be able to access it. If you have a workstation type environment that does its daily grinding in one place, then these suggestions are best suited for you.
Master your iPhone in minutes
iMore offers spot-on advice and guidance from our team of experts, with decades of Apple device experience to lean on. Learn more with iMore!
Setting up symbolic links
You'll now need to get your hands dirty and use the terminal on macOS. If typing out commands is not your thing turn back now! For the rest of you brave souls, carry on!
In this example, I'll be showing how to link your default "Downloads" folder to a second disk drive for data storage. These steps can be replicated for any file or folder you need to link to or from.
- Start terminal.
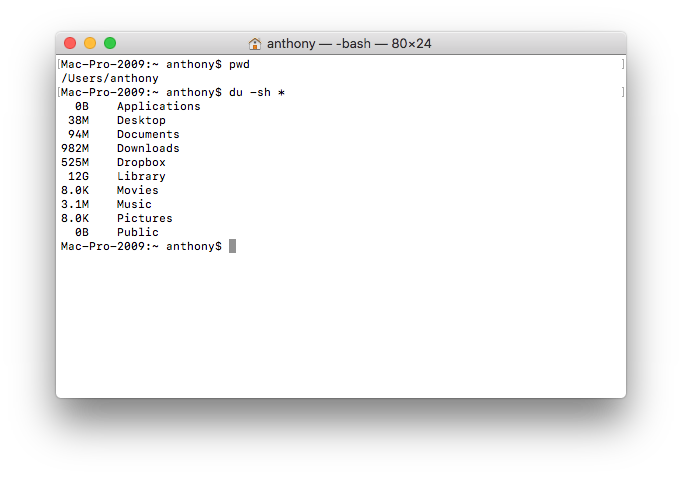
- Type pwd to make certain you are in your "Home" directory,
- Type du -sh * to see how much data is being stored in each directory and file in your home directory.

- I want to move the "Downloads" folder so I need to move the data that is already in the directory to the new location. I don't already have a directory called "Downloads" on my new disk drive so we run the command cp -a Downloads/ /Volumes/Drobo/. to copy the entire directory to the new location. You need to replace the "/Volumes/Drobo" with what ever name you gave to the new location. You can alternatively use "Finder" to copy the files over as well.
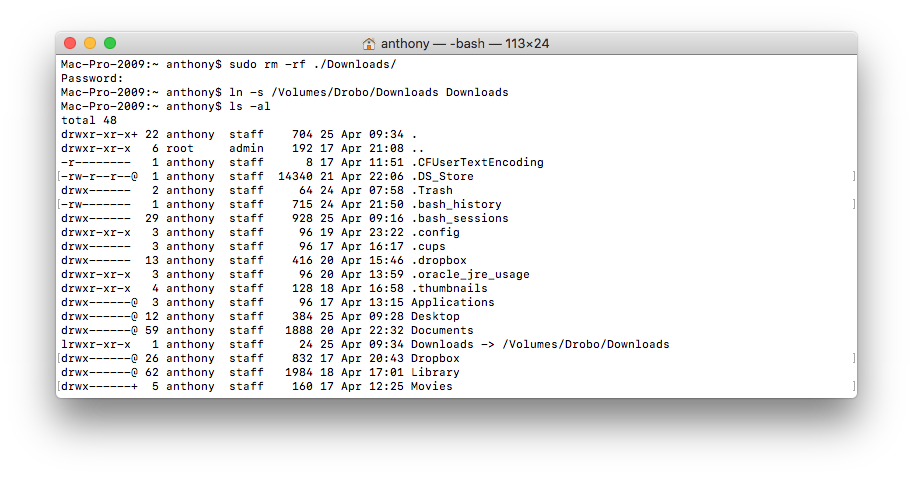
- Once you're certain the copy was successful, you can delete the original "Downloads" folder by typing sudo rm -rf ./Downloads/. You'll be prompted for your password.
- Enter your password.
- Now we make the symbolic link by entering ln -s /Volumes/Drobo/Downloads Downloads again substituting your own new location for "/Volumes/Drobo/Downloads".
- Now type ls -al to see that the link is working and pointing to the correct location.

- Now we restart "Finder" by going to > Force Quit to force it to see the changes.
- Select Finder.
- Click Relaunch.
Final comments
I have successfully moved my Downloads, my Documents, my iTunes backups etc… to a separate larger disk drive. Using multiple disks at once does increase complexity but it also increases efficiency and data access speeds when using multiple resources. I love the fact that macOS has full Unix underpinnings that gives me amazing capabilities and powerful commands at my disposal. How about you? How do you utilize the Unix underpinnings of macOS? Let us know in the comments!

