How to use tables in Notes on iPhone and iPad

While we mostly think of the Notes app as a place to quickly jot down plain text, there is so much more that you can do with it. Plus, it's probably the best note-taking app for the iPhone and iPad because it's already pre-installed on your device, so no extra downloads are required. With Notes, you can not only do plain text notes, but rich format notes, sketches and diagrams, and even add things like tables when you need a comprehensive chart of data. It's perfect when you need a little something extra in your note organization.
Regardless of whether you're using an iPhone SE or iPhone 13 Pro, here's how to use tables in the Notes app on your best iPhone and iPad.
How to create a table
- Launch the Notes app on your iPhone or iPad.
- Tap the create note button on the bottom right of your screen. It looks like a square with a pencil on it.
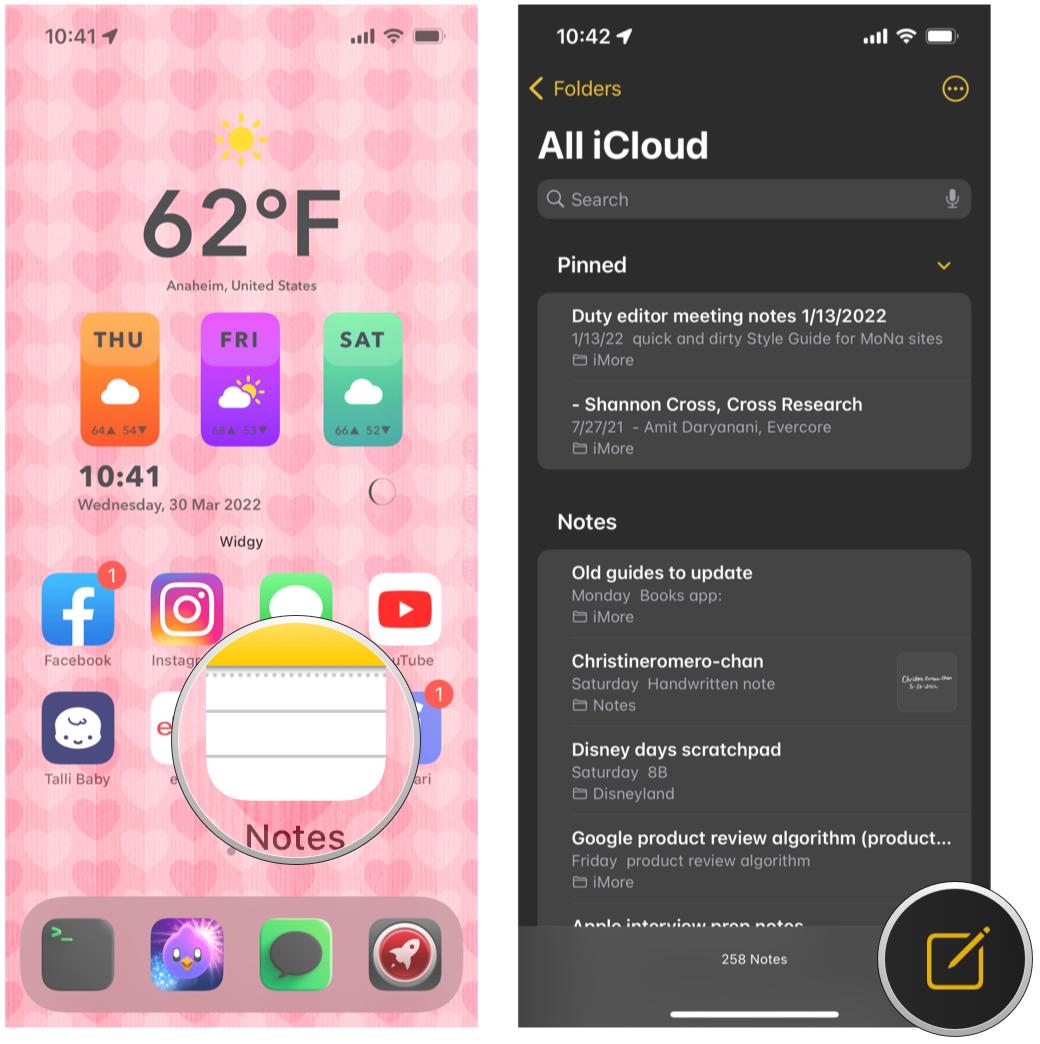
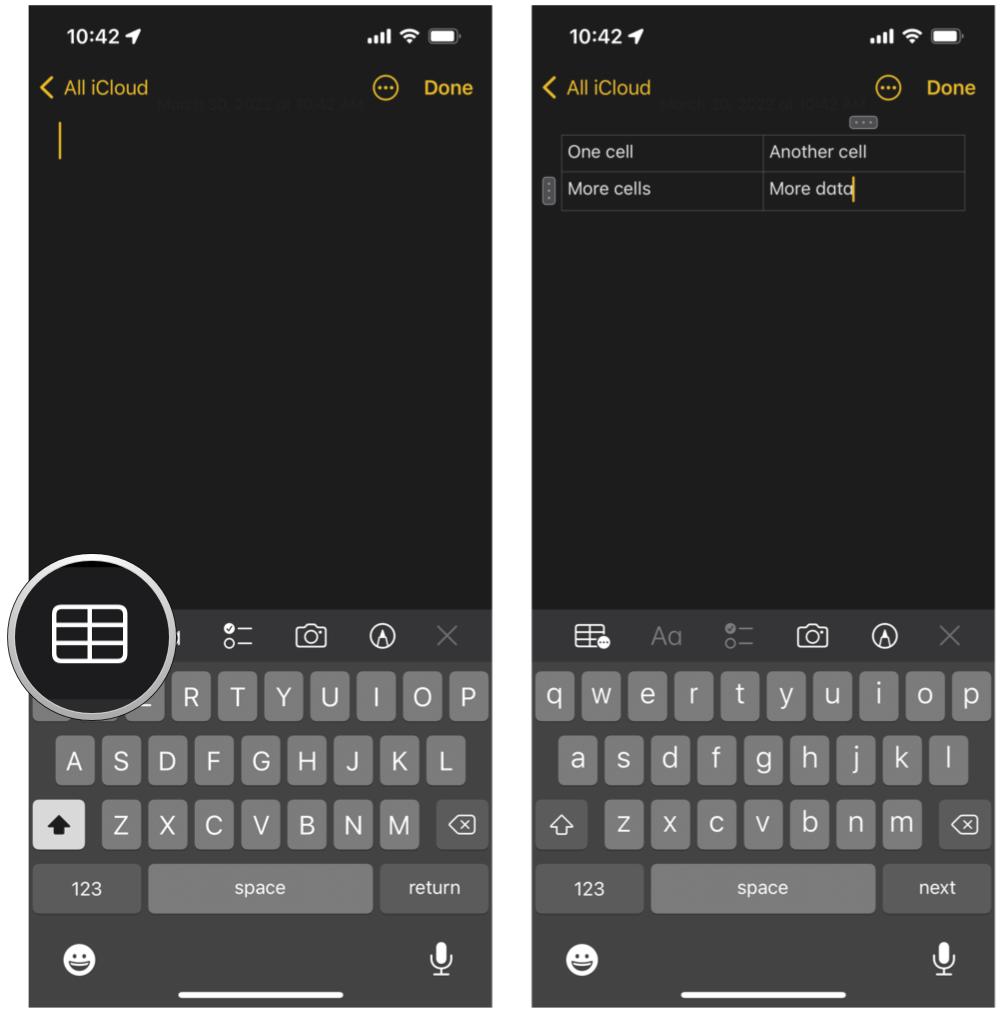
- Tap the table button on the lower left of the note pane. It looks like a rectangle made of smaller rectangles.
- Enter the information you'd like to add to your table.
- Tap another cell when you want to add information to it. You can also tap Enter on the keyboard to move to the next cell automatically.
How to add more columns or rows to your table
If you need more than the basic 2x2 table, you can add more rows and columns.
- Launch the Notes app on your iPhone or iPad.
- Tap the create note button on the bottom right of your screen. It looks like a square with a pencil on it.
- Tap the table button on the lower left of the note pane. It looks like a rectangle made of smaller rectangles.

- Tap the more button on the outside of the cell. It's a small button with three dots in it. The one on top of the table is for adding columns; the one on the left of the table is for adding rows.
- Tap Add Row or Add Column, depending on which more button you've tapped.

How to rearrange rows or columns
- Launch the Notes app on your iPhone or iPad.
- Tap the create note button on the bottom right of your screen or use an existing note with a table in it. It looks like a square with a pencil on it.
- Tap the table button on the lower left of the note pane. It looks like a rectangle made of smaller rectangles.

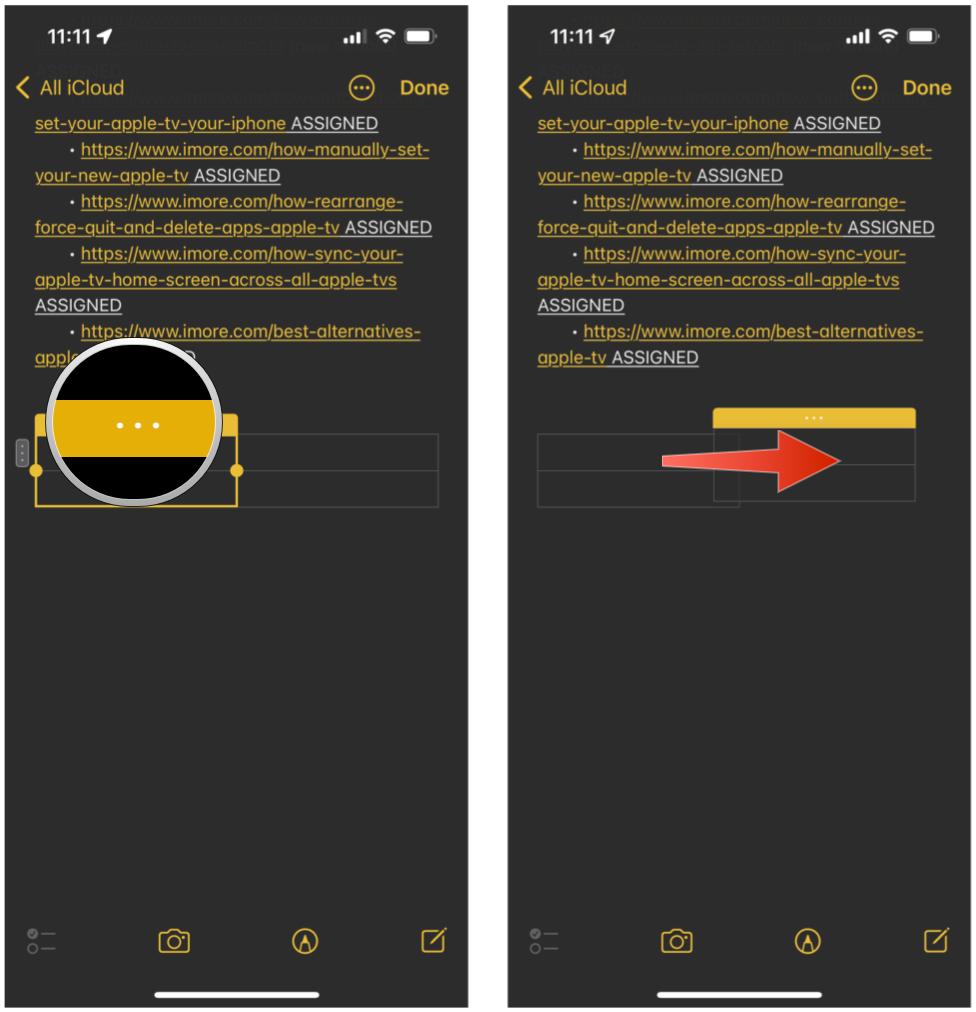
- Tap the more button on the outside of the cell so that a row or column is highlighted in yellow. The one on the left of the table is for moving rows; the one on the top of the table is for moving columns.
- Tap, hold, and drag the more button to move rows or columns around.
How to remove columns or rows
- Launch the Notes app on your iPhone or iPad.
- Tap the create note button on the bottom right of your screen. It looks like a square with a pencil on it.
- Tap the table button on the lower left of the note pane. It looks like a rectangle made of smaller rectangles.

- Tap the more button on the outside of the cell. It's a small button with three dots in it. The one on top of the table is for adding columns; the one on the left of the table is for adding rows.
- Tap Delete Row or Delete Column, depending on which more button you've tapped.

How to convert text to a table
- Launch the Notes app from your Home screen.
- Tap an existing note or create a new one.
- Tap the text in your note to highlight and select it.
- Tap the table button in the toolbar. It looks like a rectangle made of smaller rectangles.
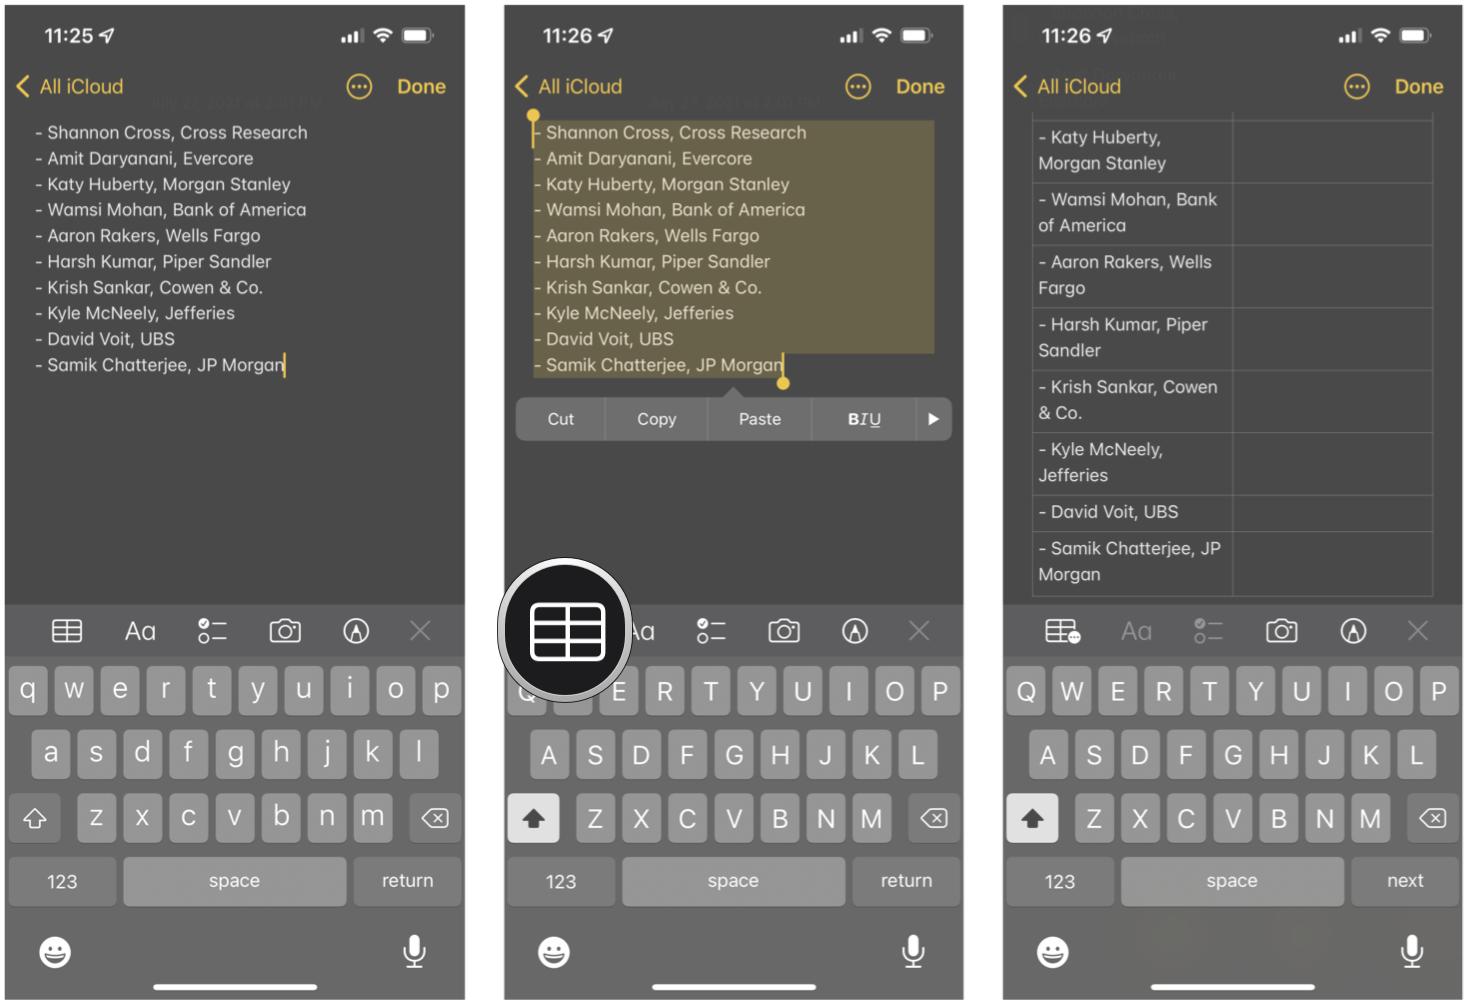
Your text will be put into a cell in your table.
How to convert a table into plain text
You may not be able to view a table on certain devices or in certain apps, but plain text is pretty universal.
- Launch the Notes app from your Home screen.
- Tap an existing note with a table in it or create a new one.
- Tap inside a cell in the table.
- Tap the table button in the toolbar. It's a rectangle made of smaller rectangles.
- Tap Convert to Text.
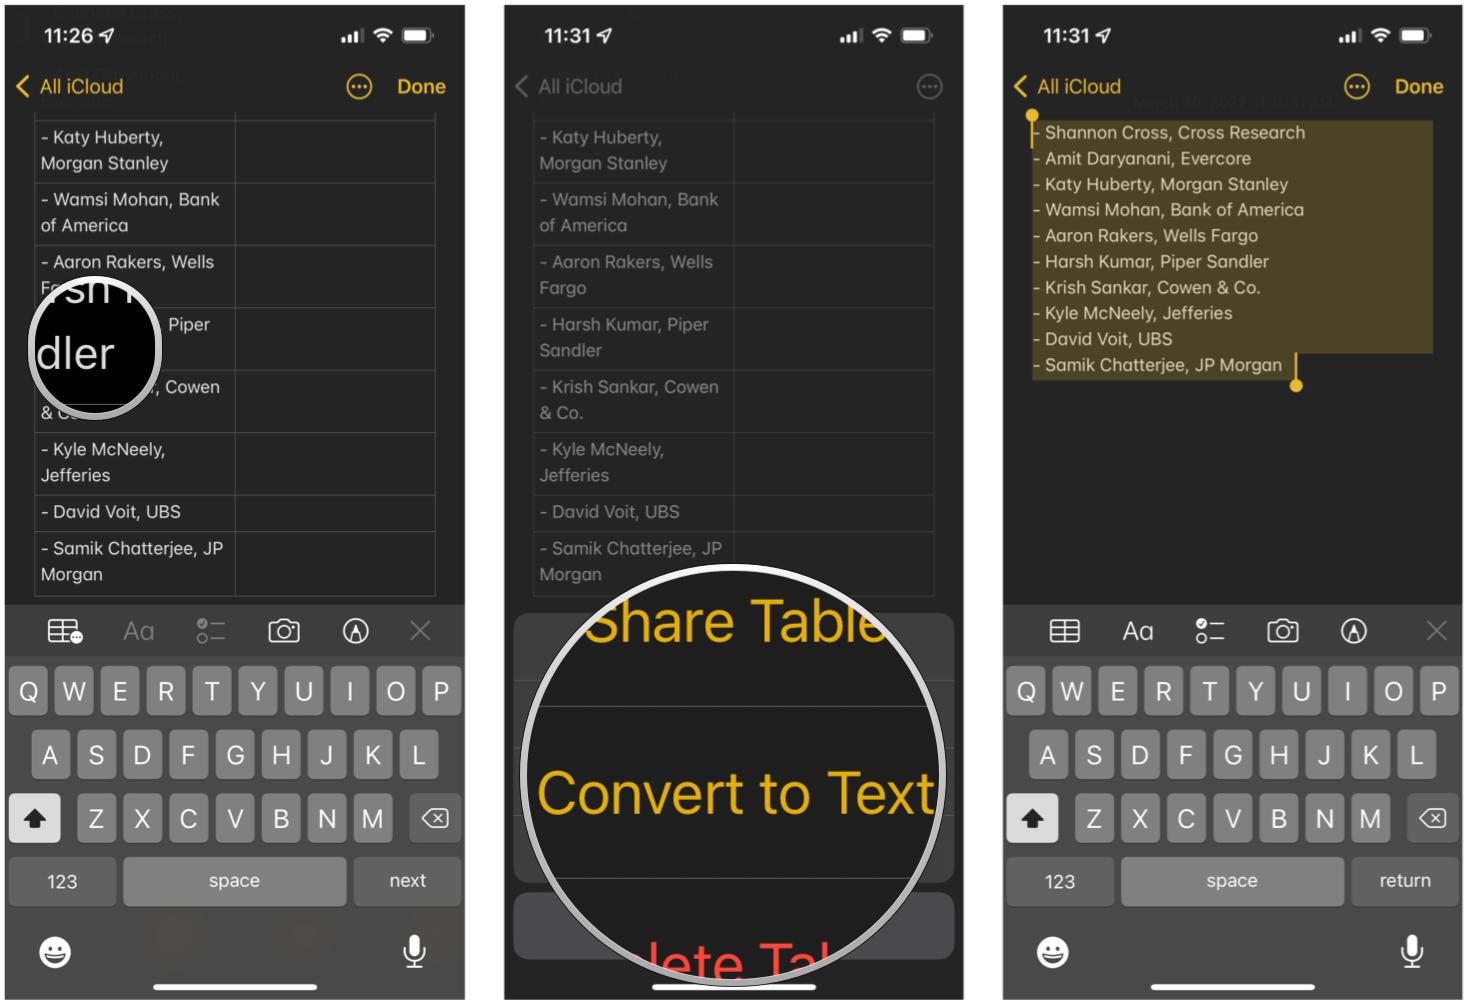
How to format text inside your tables
You can't change font, but you can underline, bold, and italicize your text. Here's how:
- Launch the Notes app from your Home screen.
- Tap an existing note with a table in it or create a new one.
- Tap inside a cell in the table.
- Tap the bold, underline, or italics button.
- Choose your formatting.
- Type your text.

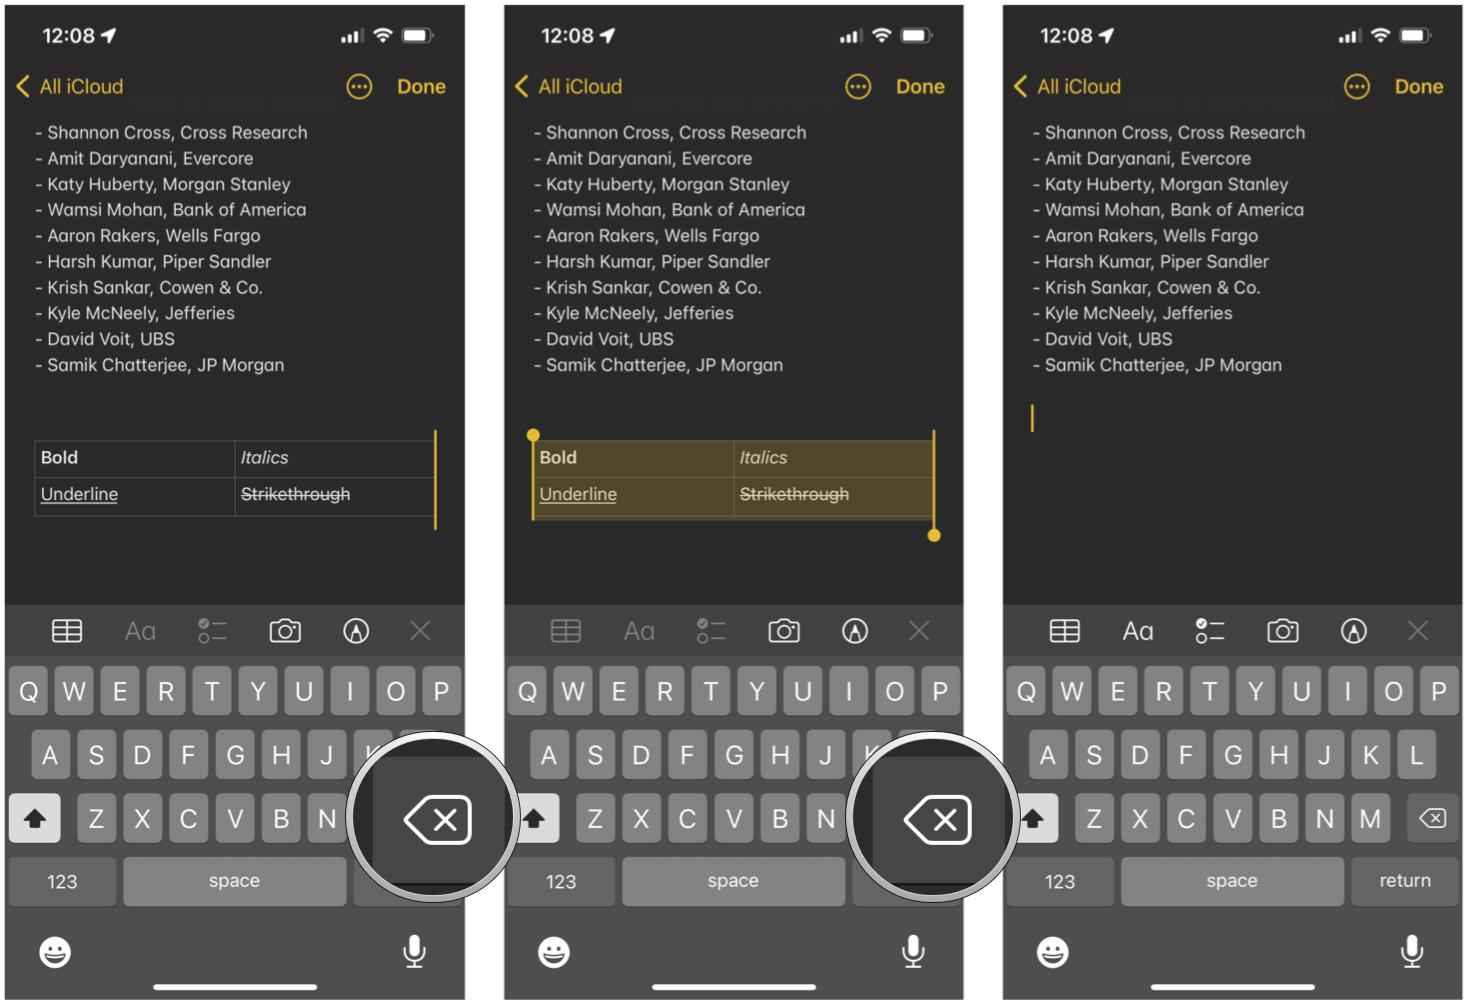
How to delete a table from a note
- Launch the Notes app from your Home screen.
- Tap an existing note with a table in it.
- Tap the note field so that the insertion point is immediately after the table.
- Tap the delete button on your keyboard. This will select the whole table.
- Tap the delete button again.
Organize it with tables
As you can see, the Notes app in iOS 15 is very versatile. You can do so much more than just plain text notes by having the ability to add tables, as well as sketches, rich format notes, and more. Notes is one of our preferred ways to quickly just get information down and process or refer back to later.
Master your iPhone in minutes
iMore offers spot-on advice and guidance from our team of experts, with decades of Apple device experience to lean on. Learn more with iMore!
Updated March 2022: Updated for the latest versions of iOS 15 and iPadOS 15.
Christine Romero-Chan was formerly a Senior Editor for iMore. She has been writing about technology, specifically Apple, for over a decade at a variety of websites. She is currently part of the Digital Trends team, and has been using Apple’s smartphone since the original iPhone back in 2007. While her main speciality is the iPhone, she also covers Apple Watch, iPad, and Mac when needed. When she isn’t writing about Apple, Christine can often be found at Disneyland in Anaheim, California, as she is a passholder and obsessed with all things Disney, especially Star Wars. Christine also enjoys coffee, food, photography, mechanical keyboards, and spending as much time with her new daughter as possible.

