How to make better use of your disk drives in macOS

I have an older solid state disk drive (SSD) in my Mac Pro that is decently fast but is a paltry 160GB in size. I could go about getting more disk space by either buying a new and larger SSD, backing up my current SSD, and then restoring the data on the new SSD. The larger the SSD, the larger the cost. Especially when comparing it to the considerably less expensive and traditional hard disk drives (HDD), where I could buy much more capacity at a fraction of the cost.
The other way I could increase capacity is by simply attaching another disk drive (SSD or HDD) to my system and be done with it. Here we show you how to use the added disk drive more efficiently for your day-to-day tasks on macOS.
Not all data is the same
Depending on what you'll be storing on your drive, you can decide which type of disk drive will be best for you. You don't necessarily need blazing fast speed when storing Pages documents or Numbers spreadsheets onto your drive, so you can opt for a "slower" and lower cost HDD, like those that Western Digital offers.
Or you might need faster more direct connections for running large applications or data sets with a SSD connected directly via SATA or thunderbolt if you only have an external connection.
The point is to know what you'll be storing on your hard drive first before buying and setting them up for use. Applications or speed intensive data on faster SSD drives, and non-speed sensitive data or very large data sets where cost is more important than speed on larger and cheaper HDDs.
How to change default storage locations on your Mac
The easiest way to start using your newly attached (whether internal or external) disk drive is by changing the default storage location for specific applications.
Photos, iMovie and Final Cut Pro store its data in a "Library" which is effectively an monolithic file that grows with the more data put into it. Their default locations live in your home directory in ~/Library/Pictures or ~/Library/Movies. Upon initial installation, these your home directory exists on the main install/boot drive which in my case is my small SSD. You can save a lot of disk space by placing each of these on a separate disk drive. Here is an example of changing your default location with Photos. The process will be similar for iMovie.
Master your iPhone in minutes
iMore offers spot-on advice and guidance from our team of experts, with decades of Apple device experience to lean on. Learn more with iMore!
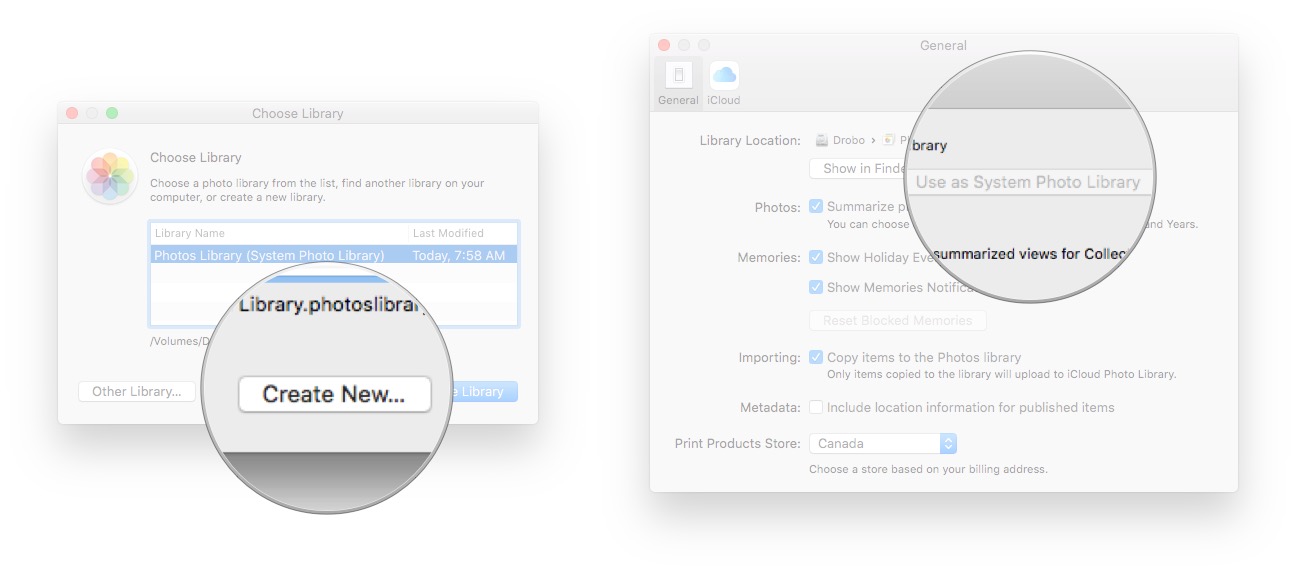
Photos
- Option-Click Photos.
- Click Create New…
- Navigate to your new hard drive.
- Click Select.
- Open Photo Preferences.
- Select Use as System Photo Library.

Now all of your photos and videos will be imported by default into the new Library. You can always re-open the old one if needs be.
Final Cut Pro
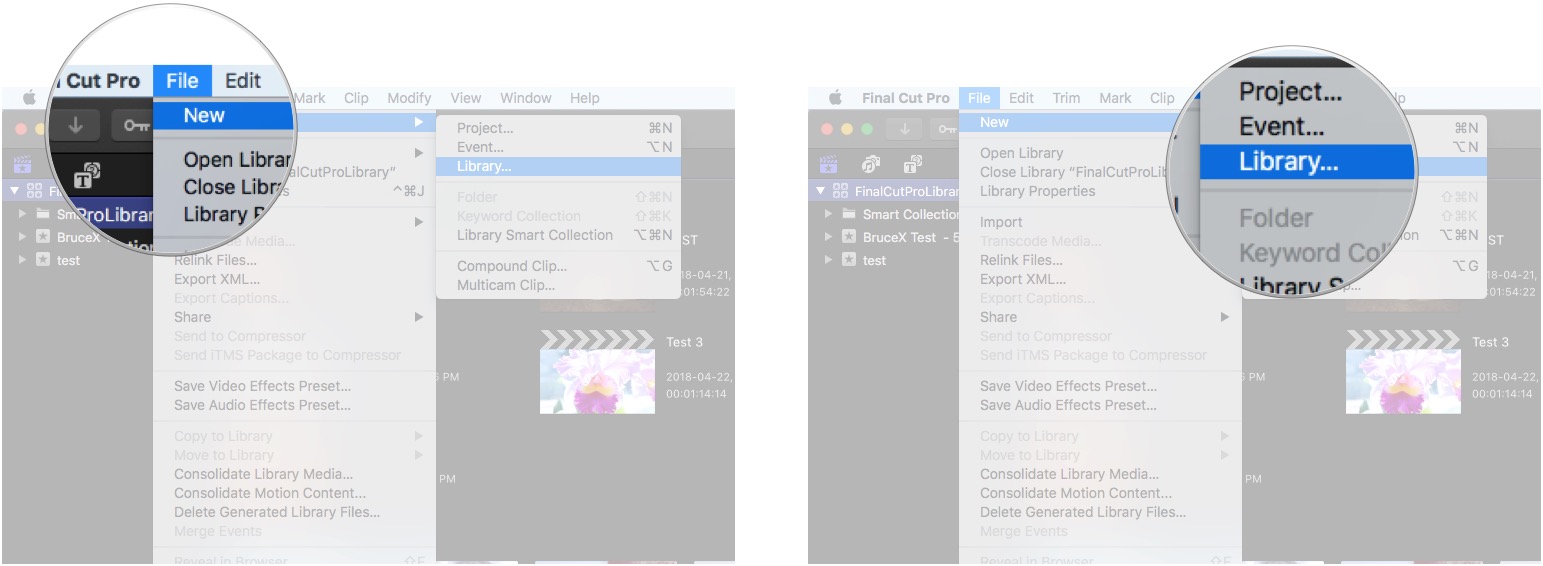
Final Cut's process is a little bit different since being a Pro application, access to various Libraries is a must regardless of where they live but here is how to add a new one on. Your new hard drive.
- Start Final Cut Pro X.
- Navigate to File > New > Library.

- Navigate to your new hard drive.
- Name your new Library.
- Click Select.
Now you simply ensure that you always import and make projects in that newly names Library.
Steam
If you play games or run VR applications on your Mac you're likely to have Steam installed. Games can get pretty big so you might want to install them on a separate disk drive.
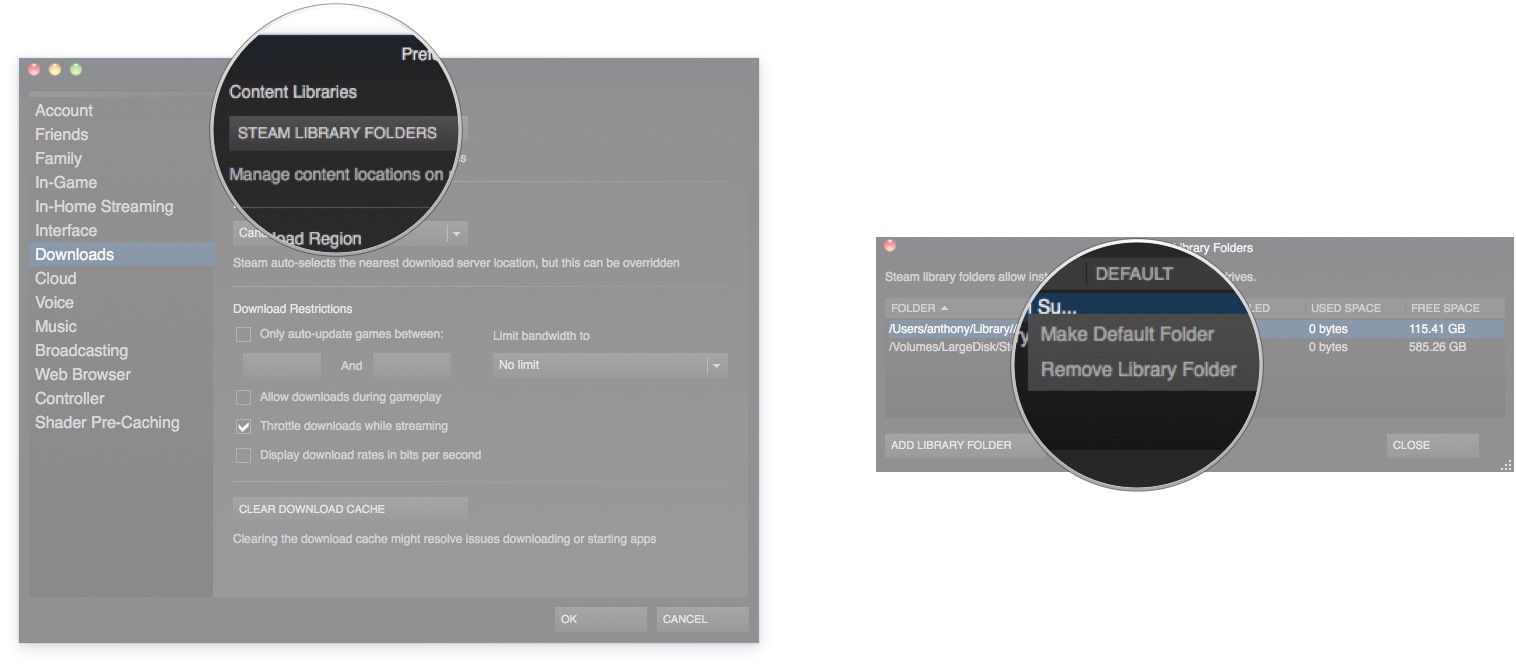
- Start Steam.
- Navigate to Steam > Preferences.
- Select Downloads.
- Click Steam Library Folders.
- Click Add Library Folder.
- Navigate to your new hard drive.
- Click Select.
- Option-Click your new folder location and select Make Default.

Now your default location for installing games will be on your new drive.
Best used on desktops
Although you can perform these changes on any Mac, it would be best practice to do it on a machine that stays put on a desk. If you have a notebook that you are constantly bringing with you and disconnecting external storage, well, then when it comes time to get access to your data, you're disk will be missing and you won't be able to access it. If you have a workstation type environment that does it's daily grinding in one place, then these suggestions are best suited for you.
Final comments
These are the easier ways of spreading your data across multiple drives. I'll be following up with some under the OS cover options for those applications that do not give you an option to change its storage location so stay tuned. Any comments or questions? Let us know in the comment section!

