How to get started with Scrivener for Mac
By design, you don't need to know every facet and feature of Scrivener to use it well. The following guide will help you get over any initial intimidation and begin putting words on the page.
Behold the Binder
When you create a new Scrivener project, choose the category and template that best fit what you're writing -- whether that's a novel, short story, screenplay, research paper, or more. Scrivener's templates come with helpful features customized for each type of project. The Novel template, for example, includes categories to list characters and places, examples of the front matter you'll need for manuscripts, paperbacks, or ebooks, and samples of how your finished work will look.
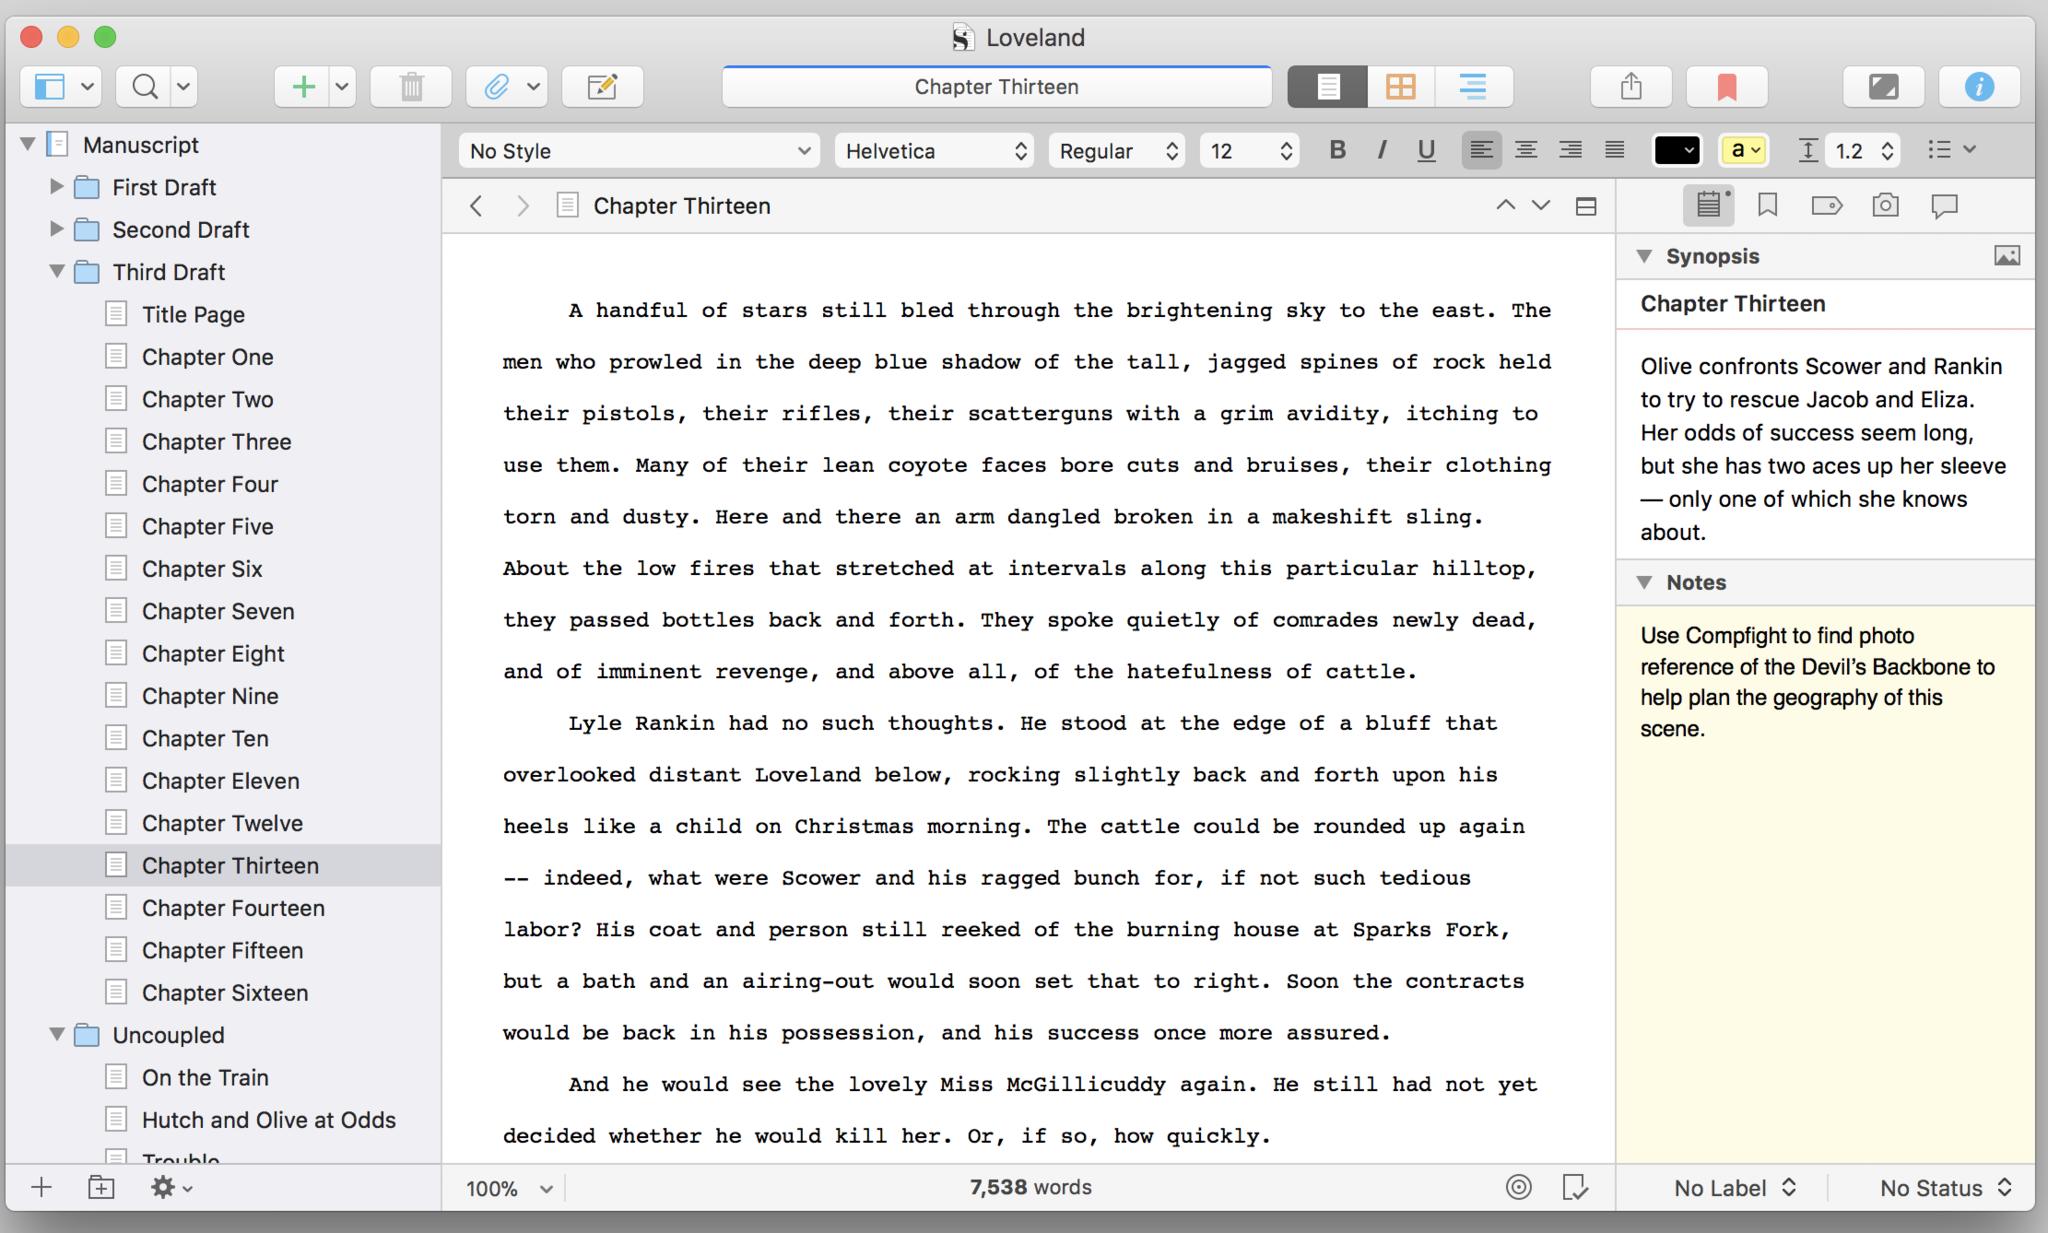
Once you make your new project, you'll see Scrivener main window. It's divided into three portions: the Binder at left, text in the center, and — once you reveal it with the rightmost button in the menu bar along the top of the window — the Inspector at right.
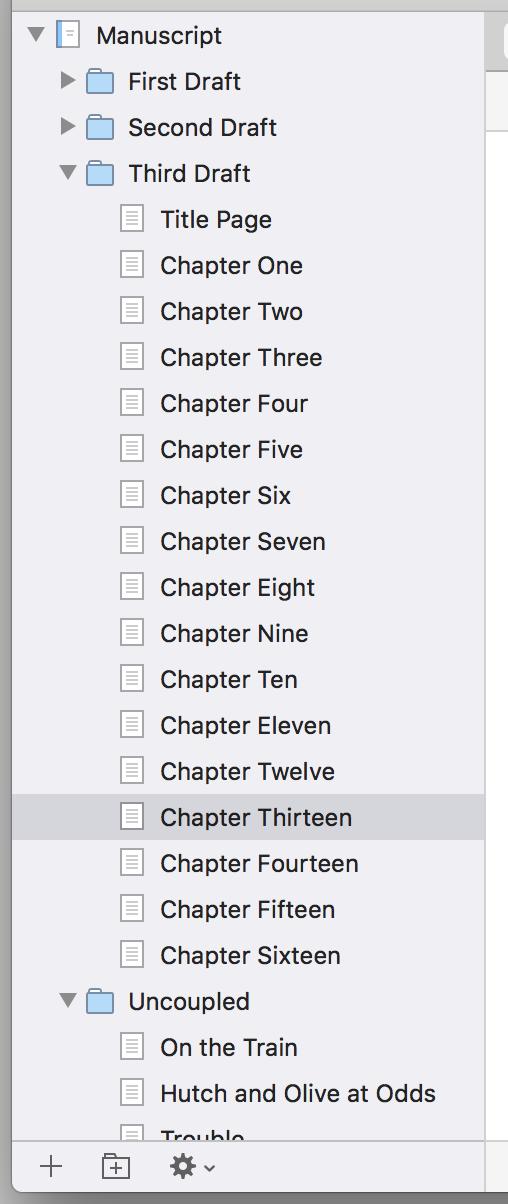
Start on the left side of the window. The Binder stores every file in your project. Actual writing goes in the Draft folder, which can contain subfolders and sub-subfolders to suit your needs.
I like to make each folder within the Draft section a chapter and make the documents within them discrete scenes within that chapter. But you can also write text for a folder itself, separate from the documents within it — say, if you wanted an introductory quote or a quick preface for the documents to follow.
Note the Research folder below your Draft. Here — again, with as many subfolders as you like — you can assemble reference material for your writing. Scrivener handles text, photos, PDFs, Quicktime video and audio, and web pages dragged in from Safari with aplomb. When writing about a car chase in the Chinese port city of Guangzhou, I used the Research folder to keep Google maps of the city and articles on all-electric Chinese supercars within easy reach.
Write in the middle
This, as they say, is where the magic happens. Or doesn't, depending on how bad your writer's block has hit you. Aside from the space for writing, you should observe a few other features here.
iMore offers spot-on advice and guidance from our team of experts, with decades of Apple device experience to lean on. Learn more with iMore!
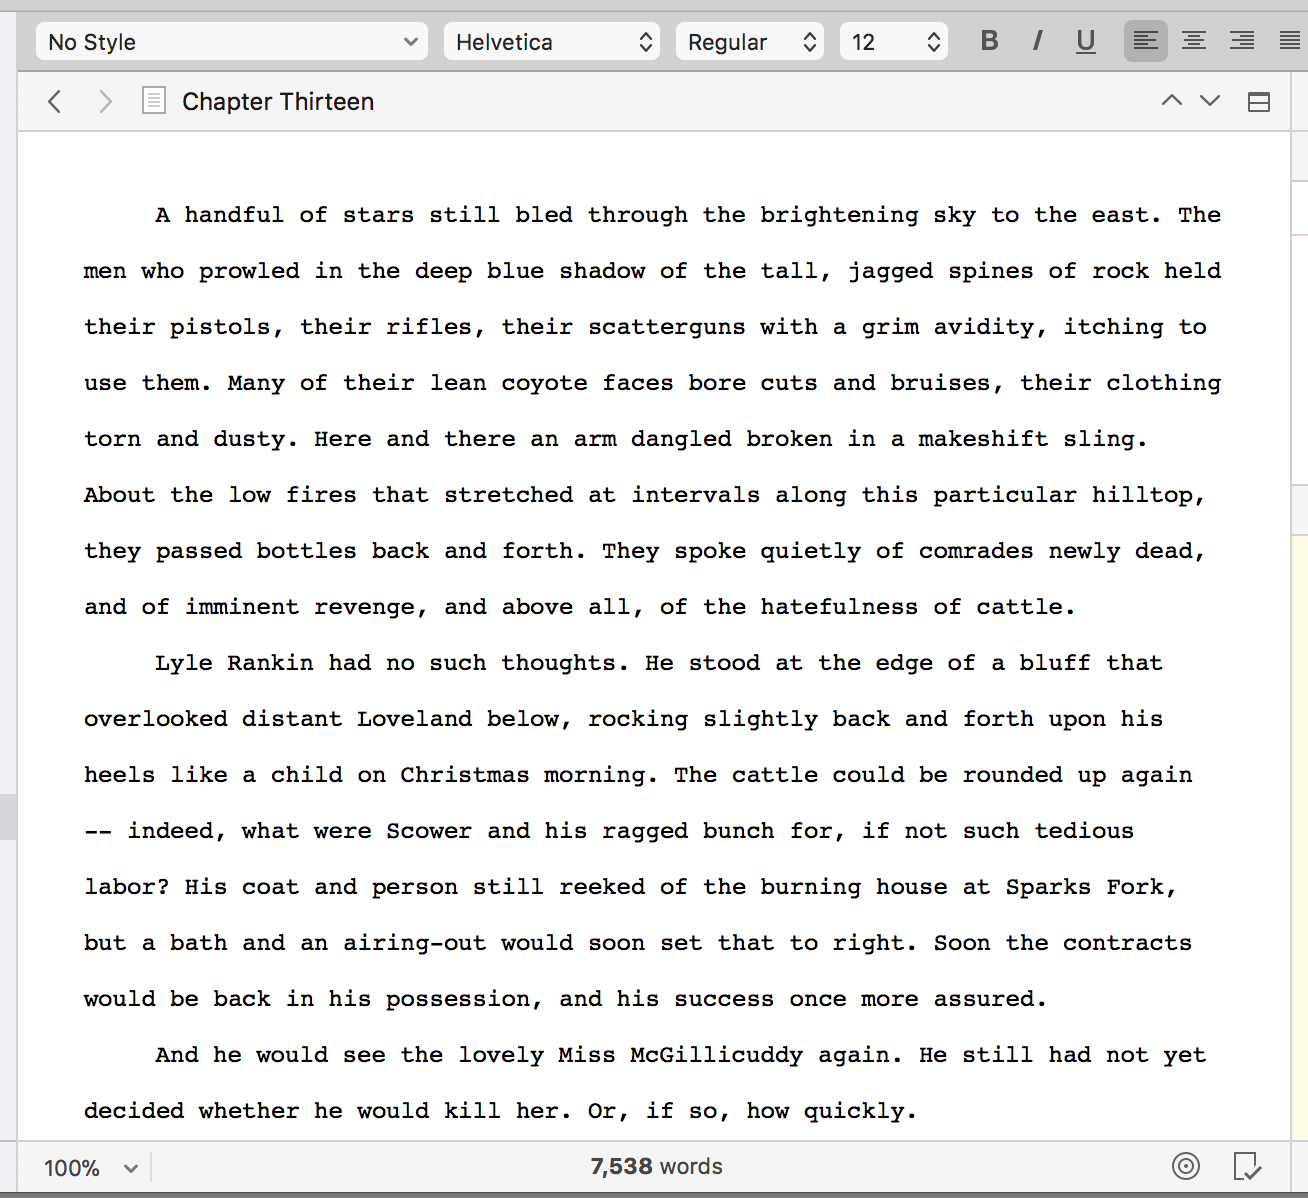
Use the bar running along the very top of this section to add basic styles and format text. Just below that, you'll see a navigation bar with the name of the current document. To the left of that name, left and right arrows navigate to and from each previous document you've viewed within the project like you would in a Web browser.
To its right, a three-horizontal-lines icon lets you jump quickly to other documents in the folder. Up and down arrows pop you to the beginning or end of your text. And a divided box icon lets you split your viewing window to see two documents at once.
At the very bottom of this section, Scrivener tallies your word count. If you're competing for National Novel Writing Month, or just thrive on challenges, a bullseye icon at the bottom of the screen will set a word count target. Once set, it turns into a progress bar to reveal how close you are to reaching your goal.

Good evening, dear Inspector
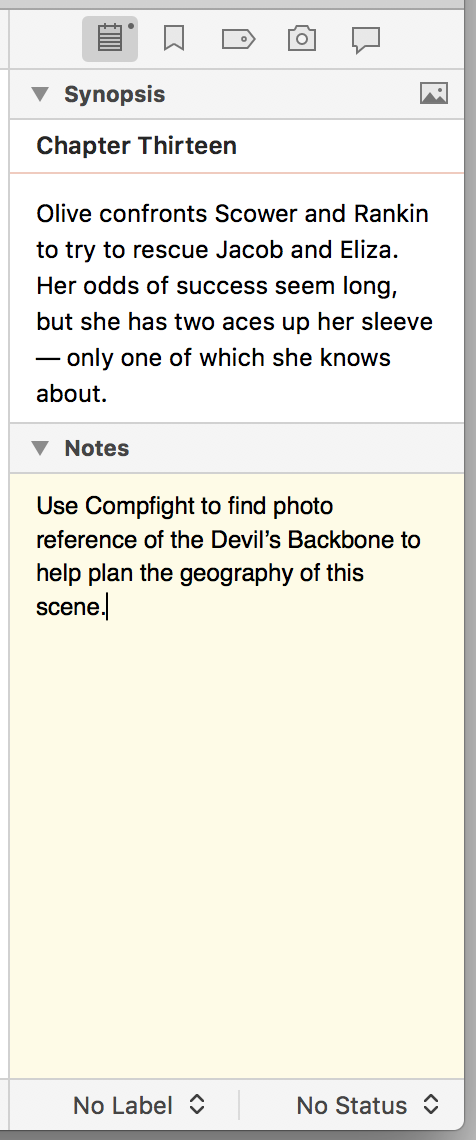
Scrivener squeezes many functions into the Inspector column on the right, but most — like custom metadata, bookmarks to other documents within your project, and comments or footnotes — you probably won't need at first. I find the Inspector most useful for its Synopsis & Notes pane, under the notepad icon.
With Synopsis, you can fill in a quick description of what should happen in the current document — useful for planning your plot before you start writing. And the Notes field provides space for reminders of elements you want to include or points you want to make.
Take a peek at Snapshots under the camera icon as well. If you're worried that you might lose something good when you start making revisions, take a Snapshot of the document by hitting cmd-5 or clicking the + button in the Snapshots pane. It'll save a version of that document as is for later inspection or retrieval.
Now, just sit down and open a vein
That's all you need to know to get started on your literary masterpiece (or tawdry-but-fun airport novel). If your ambitions lie more toward the silver screen, we'll next discuss how Scrivener can help you write screenplays.

Nathan Alderman is an iMore contributor. He’s been using Apple computers since his first Apple IIe in 1985, and writing professionally about Macs and their software since 2005. During his 12 years freelancing for Macworld, he covered email clients, web browsers, web design programs, writing apps, and games, and he’s continued to follow those interests at iMore since 2017. An editor and writing coach in his full-time career, he spends his dwindling spare time writing fiction for fun, volunteering for democracy, and contributing to podcasts on The Incomparable Network. Nathan adores his wife and wrangles his alarmingly large children in bucolic Crozet, VA.
